You have various options available in enaio® client for exporting documents, folders, and registers:
You need the Client: Export document contents system role for the Export > Content function.
The Export function is available if you want to directly export documents from folder windows or hit lists. You can find the function in the context menu of the marked document or in the Hit ribbon tab and Folder ribbon tab. You can export documents in the file format in which they are managed in enaio® into a directory on your local computer that you can specify in a selection dialog.
This is available for all documents with pages.
For image documents consisting of multiple files, all files are copied to the Windows clipboard.
You need the Client: Send content as e-mail system role for the Clipboard action.
You can copy documents to the clipboard using Actions > Clipboard in the context menu. Documents can then be inserted as a file or link from the clipboard into a program outside of enaio®, such as Windows Explorer. When copying documents, the following options are available depending on the context:
Creates an internal reference from the marked document and copies the reference file to the Windows clipboard (see Internal References).
Creates a preview URL from the marked document and copies the link to the Windows clipboard. This allows other enaio® users to preview the content file and object properties of the linked document in a browser. The object properties preview displays index data and basic parameters, as well as information on workflows, the history, notes, and follow-ups. The recipient requires a browser, enaio® login credentials, and appropriate rights to the object to use this URL.
Creates a webclient URL from the marked document and copies the link to the Windows clipboard. This allows other enaio® users to view the filing location of the linked documents in enaio® webclient in a browser. A enaio® webclient, enaio® login credentials, and appropriate rights to the object are required to use this URL.
Copies the content file of a document to the Windows clipboard. The content file can be saved from the clipboard to the local file storage system, for example.
For image documents consisting of multiple files, all files are copied to the Windows clipboard.
Converts the content file of a document to PDF and copies the PDF file to the Windows clipboard. The PDF can be saved from the clipboard to the local file storage system, for example.
With folders and registers only references can be created for the clipboard.
It is also possible to drag and drop documents, folders, and registers in order to copy them from enaio®. The results will vary based on the type of object and the target location.
References will be created at the target location for folders or registers. These references are imported and can be launched in Windows Explorer and in Office applications.
Documents are transferred in the given file format. The file is then inserted in Windows Explorer or Office applications.
Other applications may only accept part of the data or only save it as references to temporary storage locations.
Consequently, you always have to check the result after having dragged and dropped objects onto applications.
Using extensions, such as enaio® Office Add-In NG , enaio® integration-for-microsoft-teams
, enaio® coLab
or the enaio® office-365-dashlet
, you can file enaio® documents from the respective applications to the local filing system or the cloud storage.
Exporting Image Documents
When exporting image documents from the Document Display Window, you can choose which images will be exported and in which file format. If you open an image document in the document display window, the Image view ribbon tab will contain the ![]() Export function, which you can use to open the export dialog. Here, you can select which pages are saved from a document and whether the annotations on the slides that you can edit yourself are saved with the file. Every selected page will be saved as a separate file.
Export function, which you can use to open the export dialog. Here, you can select which pages are saved from a document and whether the annotations on the slides that you can edit yourself are saved with the file. Every selected page will be saved as a separate file.
Annotations on layers which you are not allowed to edit will always be saved in the file.
-
Double-click in the document display window to open an image document; alternatively, you can use the
 Open function in the context menu.
The document display window will now open.
-
Select the
 Export function in the Image view ribbon tab.
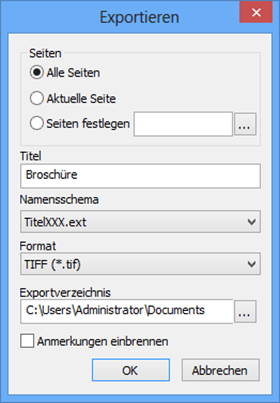
The export dialog will now open.
-
Enter the desired export settings for the open image document in the Export dialog box.
 The following options are available:
-
In the Page area select:
-
All pages
-
Current page
-
Select pages
You have several options for individually specifying the pages to be exported:
-
You can enter the page numbers, separated by a semicolon, directly in the Select pages input field.
-
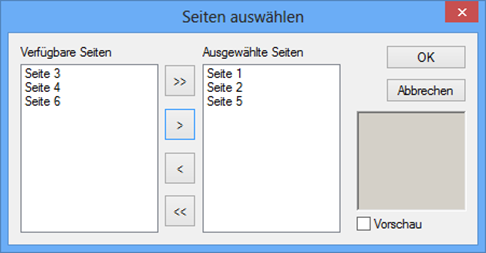
You can select the pages including a page preview via a selection menu.
To do so, use the Select pages selection menu via the ... button located next to the text field.
In the Available pages area, use the arrow keys to move pages into the Selected pages area. You can show a preview of the pages by activating the Preview checkbox.
-
-
-
Enter a name in the Title field. Since every page is exported individually as a file, choose a naming convention for numbering the files. The file names are created based on the name and the naming convention.
-
In the Naming convention field, select a scheme from the list:
-
Title.XXX
The entry in the 'Title' field is used as the file name.
-
TitleXXX.ext
The entry in the 'Title' field is used as the file name, and consecutive numbering will be appended. The file extension is obtained from the 'Format' field.
-
XXXTitle.ext
Consecutive numbering, followed by the entry in the Title field, will be chosen as the file name. The file extension comes from the Format field.
-
DOCID.XXX
Instead of the entry in the 'Title' field, the 'DOCID' is used as the file name, while the file extension will be consecutively numbered.
The 'DOCID' is a hexadecimal number identifying each document in the database. The 'DOCID' enables the administrator to retrieve a document from the database.
-
DOCIDXXX.ext
The 'DOCID', followed by a consecutive number, will be used as the file name. The file extension comes from the Format field.
-
-
In the Format field, select a file format from the list.
-
In the Export directory field, enter the directory you want the files to be saved in.
-
When you select the Burn-in annotations option, the annotations on editable layers will be saved with the files.
-
-
Confirm your entries by clicking OK.
The pages from the open document will be exported and saved in the local file system according to your specifications.


 areas. Use the toolbar to show all hidden areas at once:
