Catalogs and Add-ons
You can assign catalogs and add-ons to text fields. Catalogs offer the user to select list entries from facilitating the box entry. Add-ons allow the user to integrate functions. You can find a detailed description of the add-ons in the documentation for enaio® editor.
On the form, catalogs and add-ons are displayed as an icon next to the text field they are assigned to.
The following catalogs and add-ons can be created:
|
Catalogs |
Add-ons |
List Catalog
You can configure list catalogs from which users can select values, lists from which users can select several values, and lists from which abbreviations or numbering for the values are imported into the catalog field.
If you select List in the Catalog line on the properties window, the List tab will be created.
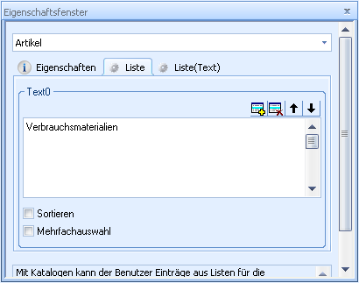
In the editable field, enter the list value for each row individually. A new line is added by clicking the + line icon or the Ins key. List values can be moved up and down using the arrow keys. Use the Del key or the delete button to remove rows.
The list values will be shown in the displayed order or, if you have selected the Sort checkbox, they are displayed in alphabetical order in the client.
Abbreviations and numbering to be imported into the catalog fields (instead of the values) are defined with this structure:
<Abbreviation>|<List entry>As a separator use the 'pipe' character (|). The values which follow the 'pipe' character will be displayed in the list but not transferred to the catalog field. You can also leave comments on individual list values.
The character 'pipe' (|) must be used for the first list entry. It is optional for the following list entries.
If you select the Multiple selection checkbox, then the user can adopt multiple values from the list for the catalog field. Imported values in the catalog fields are separated by semicolons.
List catalogs are not validated on workflow forms by default, enabling users to store any values in the catalog field. The VALIDATE=1 entry on the List (Text) tab activates validation.
You can enter the list on the List (Text) tab. The lines are numbered sequentially.
Example:
ZEILE0=AbelZEILE1=Bauer
ZEILE2=Dorau
SORTIERUNG=NEIN
MULTISELECTION=NO
VALIDATE=0
Tree Catalog
Tree catalogs are list catalogs in which values are created on different levels. This structure allows the user to select values from long lists more quickly. In contrast to hierarchy catalogs the level names are not adapted to the catalog fields. The user can only select values on the last level.
If you select Tree in the Catalog line of the properties window, the Tree tab will be created.
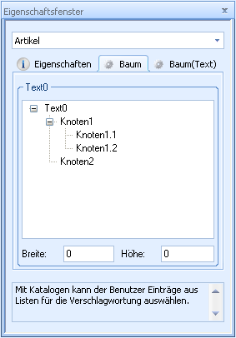
On the tab of the selected field name, select New node in the context menu or press the Ins key. In the editable field, enter the name of the node on the first level. When you select a node, you can create a node on the next level in the context menu or by pressing the Ins key.
You can select an existing node and then use the mouse to drag and drop it to a different location. It will be placed beneath the node that you drop it on. All other child nodes will also be moved.
The order of nodes on the same level can be changed by holding the CTRL key down and then dragging the nodes to another node on the same level. It will be placed below the target node.
Tree catalogs are not validated on workflow forms by default, enabling users to store any values in the catalog field. The VALIDATE=1 entry on the Tree (Text) tab activates validation.
Level names are not imported into the catalog field, meaning it is not possible to differentiate between the same values from different links.
Hierarchy Catalog
The hierarchy catalog is like the tree catalog, except that the level names are entered in the text field. That allows you to distinguish between identical values from different threads.
In the catalog field the transferred level values are separated; the default separator character is the 'pipe' (|). You can also specify any other character as a separator.
A hierarchy catalog is created in the same way that a tree catalog is.
Hierarchy catalogs are not validated on workflow forms by default, enabling users to store any values in the catalog field. The VALIDATE=1 entry on the Hierarchie (Text) tab activates validation.
Exporting and Importing Catalog Data
You can export and import the data associated with list, tree, and hierarchy catalogs.
Thus, data can be moved between test systems and deployed systems. Data for structure trees are already available as files and can be exchanged in the same way.
Data is exported from the corresponding catalog tab. The Export catalog data and Import catalog data entries can be found in the context menu.
For data export enter a location and name for an XML file.
If you want to import catalog data, you will need a catalog file exported as such, or an XML file that corresponds to the schema of an exported catalog file.
Quickfinder Add-on
With the 'Quickfinder' add-on, the Quickfinder field in the index data form will be linked to a dialog element of a different object type. You can link multiple dialog elements of the index data form using the Quickfinder field.
In the file selection dialog, select the axaddreq.dll file located in the administration components directory.
WWW Add-on
With the WWW add-on, a user can open the URL entered in the text box in a standard web browser, or transfer the e-mail address specified in the text box to an e-mail form of the default e-mail program.
Select Add-on in the Catalog line of the properties window to create the Add-on tab.
In the file selection dialog, select the axaddwww.dll file located in the administration components directory.
No further configuration is required.
User Add-on
The user add-on opens a list of all enaio® users and enaio® user groups created in enaio® administrator. The list contains the user name and the entries from field 'Full name' for all users. Only the user name is imported into the field.
Select Add-on in the Catalog line of the properties window to create the Add-on tab.
In the file selection dialog, select the axaddusr.dll file located in the administration components directory.
The entries in the configuration field are structured as follows:
EXTRA00=BENUTZER,GRUPPEN,MULTISELEKTION
EXTRA01=Wert1,Wert2,....
In the first line, you specify whether the list should also contain all users and groups and whether multiple selection is possible. The required values should be separated by commas. In the second row you can specify optional additional values for the list. The values should be separated by commas.
Workflow Recipient Add-on
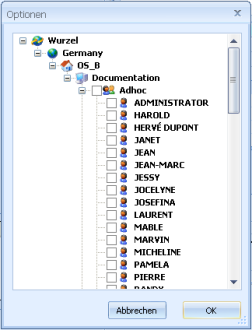
The workflow recipient add-on displays the units of the workflow organizational structure.
The user can use it to select individual people as well as roles and transfer them to the corresponding index data field. Multiple entries are separated by a semicolon.
In addition, users can manage favorites.
In the file selection dialog, select the axaddwforg.dll file located in the administration components directory.
The following dialog opens in the configuration field:
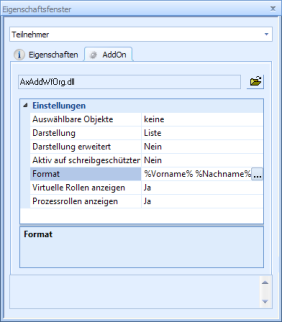
The Selectable objects line allows you to specify the roles and persons that can be selected.
|
Select the persons and roles which can then be selected by the user. Click twice on the checkbox of a role to shade-out the check mark of the role and grey-out the check mark of the role owner. The user can transfer the role and the persons assigned to it to the text field. |
|
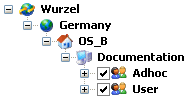
Choose Tree or List as the display option.
|
Tree:
|
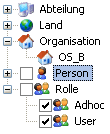
List:
|
With the Advanced display option you specify whether or not to show the tree and the list expanded when the dialog is opened.
You can disable this add-on on read-only fields.
In the Format line, you can define the user data to be displayed.
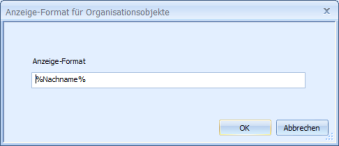
Open a list of the people's properties using the context menu. This list contains all class attributes. It also includes class attributes of the type 'string' that you created.
If nothing is entered, the object name of the people is shown.
Within a process, the participants of activities can be specified in a field with the workflow recipient add-on if it is assigned to an activity application as a parameter (see 'Application – Participants in the Activity').
You can specify whether process roles and virtual roles should be displayed.
Date Add-on
The date add-on adds a calendar. The user can use the calendar to choose a date to enter in the field.
Select Add-on in the Catalog line of the properties window to create the Add-on tab.
In the file selection dialog, select the axaddate.dll file located in the administration components directory.
No further configuration is required.
Application Add-on
Via the application add-on, the user can start an application.
Select Add-on in the Catalog line of the properties window to create the Add-on tab.
In the file selection dialog, select the axaddexe.dll file located in the administration components directory.
The entries in the configuration field are structured as follows:
EXTRA00=Pfad\Anwendung|WAIT
You specify the application with its full path. Be sure that the notation you use allows all users to access the specified application.
If you specify the optional parameter 'WAIT', the client waits until the user has closed the program again.
Database Add-on
The database add-on queries a database table of an external database and transfers the data into the index data field and associated fields.
Enter the following in the configuration field via additional entries:
- Connection parameters to the database
- SQL statement for the data query
- Table columns of the hit list which are not displayed
- Table column according to which the hit list content is sorted
- Column name for the header
- Table columns for which their content is not transferred
In the file selection dialog, select the axaddfdb.dll file located in the administration components directory.
SQL Add-on
The SQL add-on executes an SQL select statement. The user can transfer one or more values from the hit list into the field.
Configuration Procedure
-
Create a dialog element for a form in the workflow model and assign the add-on.
-
Enter the following on the Add-on tab:
EXTRA00=ADDONGUID;<ID>
Specify any unique ID.
Example: EXTRA00=ADDONGUID;265CB52E
-
Save and activate model.
-
Start the workflow and click the add-on button.
-
Configure the add-on as documented.
The add-on can only be configured the first time it is called up.
-
Save the configuration.
The configuration is stored in the etc directory of the data directory.
Name: sqlview.addon.<ID>
If multiple enaio® server are integrated, then configuration file must be stored in each \etcdirectory.
Editing a Configuration
To edit a configuration, you must temporarily integrate the add-on into enaio® editor, call up the configuration in enaio® client, import the configuration file, edit it, and export it back to the \etcdirectory.
Fieldmapping Add-on
The Fieldmapping add-on transfers index data of a queried object into index data fields which are linked to the add-on field via the Controlled by crosscheck property. The add-on field is indexed using the ID of the queried object.
Configuration Procedure
The configuration procedure for integrating the workflow is the same as for the SQL add-on with the following difference:
Name of the configuration file: fieldmapping.addon.<ID>
The Fieldmapping add-on is documented here.
Treeview Add-on
Structured lists can be configured with the Treeview add-on. Multi-selection is possible; the element path of the values can be returned, as well.
A text for the display and a tooltip can be entered with the values.
Configuration Procedure
The configuration procedure for integrating the workflow is the same as for the SQL add-on with the following difference:
Name of the configuration file: treeview.addon.<ID>
The Treeview add-on is documented here.
 areas. Use the toolbar to show all hidden areas at once:
