Activities
A workflow consists of a sequence of activities which are linked through transitions.
Arrange activities and transitions visually on the Drawing page tab. You can configure the size and grid of the drawing page in the settings.
Two activities are predefined for each model:
|
|
The start activity is the starting point of the first transition. It does not need to be further configured. The start activity has no participants. Which users are allowed to launch a process of a model is configured in the model properties. |
|
|
The end activity is the end of the process. You configure the transfer of variables for the end activity. |

The start and end activities cannot be deleted.
You can create the following activity types:
|
|
Participant activity Enter participants and an application and configure the variable transfer. Activities have a starting point and an end point for transitions. |
|
|
A participant activity can only be edited by one participant, whereas a multi-instance activity can be edited by multiple participants at any one time. |
|
|
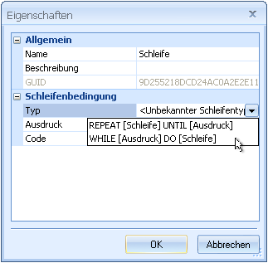
Enter a condition and the variable transfer. In addition to a starting and end point, loop activities have a loop exit point and a loop entry for the loop transitions. |
|
|
Route Routes are support activities which are required within loops to merge data. You need to set up the variable transfer. Routes have a starting point and an end point for transitions. |
|
|
An ad hoc activity is an area where you can arrange multiple participant activities and multi-instance activities. The activities within an ad hoc activity are not linked using transitions but arranged in series by the user. |


You can visually design a workflow with activities and transitions, even if you have not set up any organizational structures, forms, variables, or applications.
Creating Activities
Arrange activities graphically on the Drawing page tab. You can configure the size of the drawing page and the grid properties in the settings.
Use the toolbar of the drawing page to create activities.
Click an activity icon and then on the drawing page.
|
|
The activity is added with a default name. You can use the mouse to drag the activity to the desired location. |

Use the context menu to open the properties dialog of the activity:
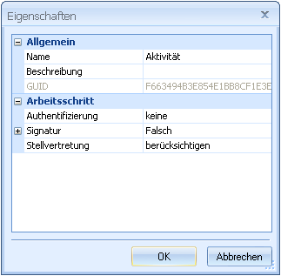
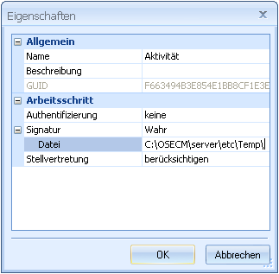
Enter the name of the activity and optionally a description.
Each activity automatically receives a unique ID.
Define a type for loops only.
Delete activities using the context menu. Transitions which are associated with an activity are shown in red.
Activities and Participants
Activities are processed by participants. All persons and roles in the organization are possible participants.
In addition to the roles and persons created in the organization, the following persons with a virtual role are now available as participants:
- Process creator
The person that initiated a process.
- Process participants
All persons who already participated in the process.
- First editor 'activity'
The first person to modify a preceding activity.
- Last editor 'activity'
The last person to modify a preceding activity last.
The participants dialog can be opened from the context menu:
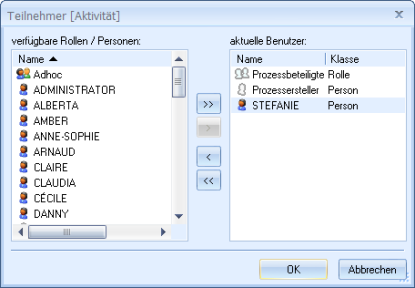
Use the arrow buttons to add or remove all or the selected roles/persons from the list of current users.
If you enter roles, all persons who are in the organizational structure of the role automatically become participants.
Persons who are entered as participants do not need to be integrated in the organizational structure.
Loops, routes, and the end activity do not have participants. Enter the participants of the start activity using the model properties.
Click the Save button in the toolbar of the model editor to save the configuration data.
Notification
E-mail notification
Participants can additionally be informed about available activities by e-mail.
E-mail notification has to be activated in enaio® enterprise-manager.
Open the message dialog from the context menu of an activity:
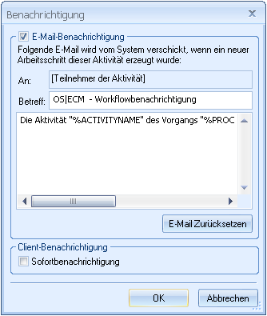
While the addressee is preset, you can edit subject and text. Use the context menu to select and transfer process variables. All activity variables are available, as well.
A reference to enaio® client is attached to the e-mail.
Client notification
If you select the Instant notification option, the next step is immediately opened for the participant who has started the activity or forwarded a process step, as long as he can also execute the following step in enaio® client.
In order to use instant notifications, you will need to specify a time period in which the instant notification is sent in the configuration file as.cfg in the directory etc of the file directory:
[WORKFLOW]AUTOSTARTWAITTIME=time period in seconds
You should measure this time period so that the server is able to process all the data and the user is able to define the sequence and assign the steps. In most cases, a time period of 20 seconds will be sufficient.
Once this period has expired, a process step will no longer open automatically.
Signature and Authentication
The completion of an activity by forwarding it can be protected via authentication and a digital signature.
On authentication, the participant has to confirm forwarding by entering his or her password.
If a signature is required, forwarding is confirmed by importing a signature card and entering the PIN. A PDF file with the activity data is created, signed, and saved in the workflow file as a document.
Both authentication and signature are enabled in the properties dialog of an activity.
You can define for each activity that it not be forwarded to any substitute.
Signatures cannot currently be used in Unicode installations.
Password-based authentications for enaio® webclient require specific configurations for logins.
Signature Style Sheet
A style sheet is specified for the signature in order to format the activity data for the PDF file.
The following style sheet is installed:
\server\etc\Templates\oxwfdigsig.xslThe style sheet can easily be customized.
Specify the document type and index assignments for the PDF file import into enaio® as a document. This data must be entered in the as.cfg file located in the etc folder of the file directory.
For each activity that needs to be signed, create a section and specify the ID of the document type that will be assigned to the PDF, as well as the index data fields of the document type to be populated with process data.
The entry has the following structure:
[WFPROTOCOL|WorkflowName|ActivityName]OBJECTTYPE=ID of the document type
CREATOR=field for the enaio user name
FULLUSERNAME=field for the full user name
DATE=field for the current date
TIME=field for the current time
PROCESSNAME=field for the process name
PROCESSID=field for the process ID
WORKFLOWID=field for the model ID
AKTIVITYNAME=field for the name of the activity
The ID of the document type must be specified. Assignment to index data fields is optional. The document is saved to the workflow file.
Activities and Variable Transfer
In most cases, variables are created as global variables, except local variables that require the configuration of variable transfer.
For the activities, specify from which preceding activity the values of local variables will be transferred.
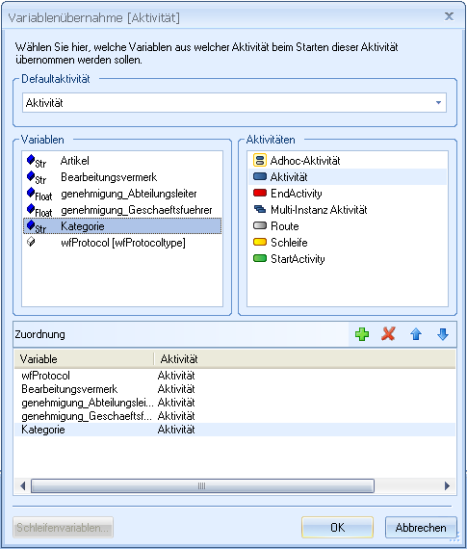
The Variable transfer dialog is opened using the context menu:
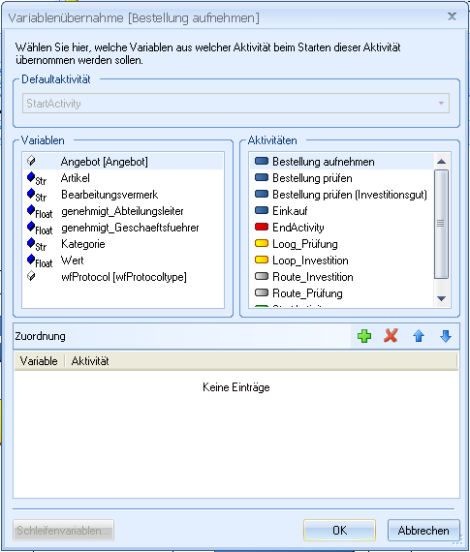
Choose a preceding activity as the default activity from the activity list.
All variable values are transferred from the default activity if you have not created additional assignments. During transfer, assignments created by you have a higher priority than the default activity. If a local variable is associated with more than one activity, the assignment which is at the top of the list has the highest priority. Variable values are transferred from the activity with the highest priority.
Assignments can be created if you do not want to apply all variable values from a preceding activity. You will need assignments if the activity can be accessed via more than one transition.
Follow these steps to create assignments:
- Select an activity in the Activity area.
- Select one or more variables in the Variables area.
- Click on the Add icon.
Assignments are shown in the Assignment area.
You can create further assignments.
Use the arrow buttons to change the order of the assignments and thus the priority for the transfer.
Use the Remove icon to undo assignments.
Variable transfer is not configured for the start activity. If a variable is preset, it has the corresponding value. If the variable is an input parameter, another application can preset it.
Additionally, loop variables are configured for loops. The values of loop variables are forwarded within the loop until they match the exit condition and can leave the loop.
Click the Save button in the toolbar of the model editor to save the configuration data.
Activities and Applications
Assign an application to an activity and application parameters to variables. Activity participants can view or edit variable values in the application form.
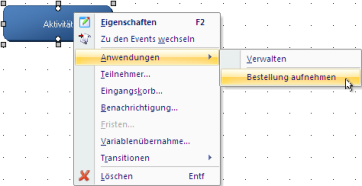
The Manage applications dialog is opened using the context menu.
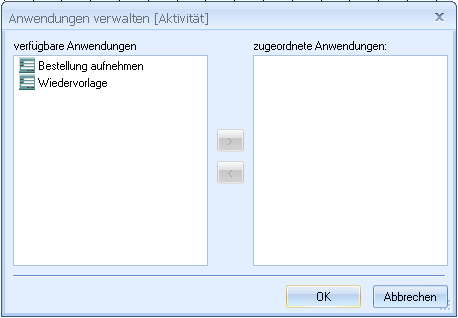
You can assign one application from the available applications and/or multiple applications, one for each client type.
Then, open the Setup application dialog from the context menu:
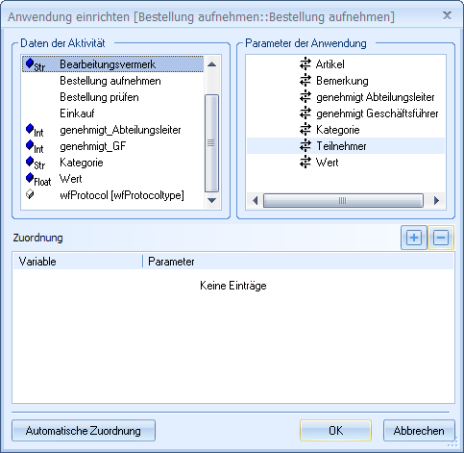
The parameters of the selected application are displayed. They are flagged as follows:
|
|
Parameters which are assigned to a dialog element on the form. |
|
|
Parameters which are managed via scripts. |
|
|
Input parameters |
|
|
Output parameters |
|
|
Input/output parameters |


You can assign variables to application parameters:
- Select a variable in the Data of the activity area.
- Select a parameter in the Parameters of the application area.
- Click on the Add icon.
Assignments are shown in the Assignment area.
Use the Remove icon to undo assignments.
Variables and parameters with the same or very similar names are automatically assigned to each other using the Automatic assignment button.
Click the Save button in the toolbar of the model editor to save the configuration data.
Variables which are not assigned to any application parameter can only be accessed using server scripts.
Application – Participants in the Activity
In addition to the variables, all other activities are listed in the Data of the activity area of the Set up application dialog.
When assigning an application parameter, which is linked to the form on the workflow recipient add-on, to an activity, users can be selected using the add-on during the process and are added automatically to the activity participants within the process.
Inbox
All variables which you have assigned to an application parameter during application configuration can be displayed in the user inbox. This helps the user to distinguish between process steps.
On the drawing page, open the Inbox dialog via the context menu of the application.
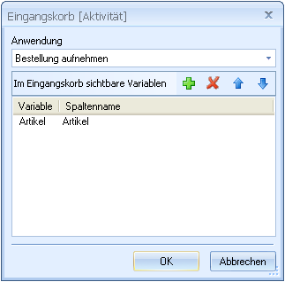
All variables configured for the inbox will be listed. You can add or delete variables and change their order.
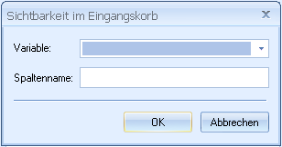
When configuring a variable for the inbox with the Add icon, choose the variable, and enter a column name for the inbox view.
 areas. Use the toolbar to show all hidden areas at once:
