You can save the following queries in enaio® client to use them again later:
To Save Individual and Combined Requests, Follow These Steps
-
Open a search form or a combination of search forms (see 'Combined Queries').
-
Fill out the search forms.
-
Right-click to open the context menu of the search form.
-
Click
 Save.
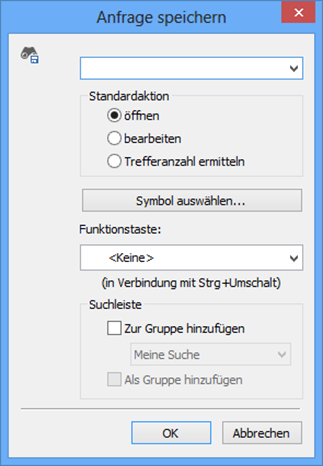
Save.The Save search window will now open.
-
Enter a name for the search.
Decide whether to execute the query instantly at start-up or open the hit list, whether or not to make your query editable before it is carried out, and whether or not to calculate and display the number of hits.
Press Select icon to assign an icon to the saved search (see To assign icons to saved searches, follow these steps ).
The Function key list allows you to select a function key that, when pressed together with Ctrl+Shift, will launch the search. Check whether the keyboard shortcuts are already in use.
You can specify whether a query will be added to the navigation as well as to the desktop area.
-
Click OK or press the ↩ enter key.
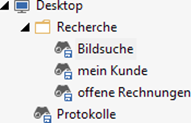
The query is saved and shown in the object search in the Desktop directory.
You can save full-text queries in different ways:
To save full-text searches via the full-text search input field in the ribbon, open the configuration dialog via the ![]() Full-text configuration icon next to the full-text search input field. In the Configuration field, enter a name, select the desired objects to be included in the full-text search, and confirm with OK. The configuration is saved and can be selected from the configuration list in the full-text search input field to run the search.
Full-text configuration icon next to the full-text search input field. In the Configuration field, enter a name, select the desired objects to be included in the full-text search, and confirm with OK. The configuration is saved and can be selected from the configuration list in the full-text search input field to run the search.
Configurations set up here are available both in the full-text search input field on the right of the ribbon and in the navigation. These saved search requests can only be changed or deleted again in the configuration dialog.
If you open the full-text search form via Start ribbon tab > Search > ![]() Full text, you will see a Save button which you can use to open the Save search window. Here, you can save the search terms and the object selection as a saved search. These saved full-text queries are stored in the object search and navigation. You can edit and send them there at a later time (see Editing Saved Searches).
Full text, you will see a Save button which you can use to open the Save search window. Here, you can save the search terms and the object selection as a saved search. These saved full-text queries are stored in the object search and navigation. You can edit and send them there at a later time (see Editing Saved Searches).
If configured accordingly, some object types have a full-text search input field. Search terms as well as single or combined search requests in this field can be saved (see Single and Combined Queries ).
To save full-text searches in the navigation, open the configuration dialog via the ![]() Full-text configuration icon next to the full-text search input field. In the Configuration field, enter a name, select the desired objects to be included in the full-text search, and confirm with OK. The configuration is saved and can be selected from the configuration list in the full-text search input field to run the search.
Full-text configuration icon next to the full-text search input field. In the Configuration field, enter a name, select the desired objects to be included in the full-text search, and confirm with OK. The configuration is saved and can be selected from the configuration list in the full-text search input field to run the search.
Configurations set up here are available both in the navigation and the full-text search input field on the right of the ribbon. These saved search requests can only be changed or deleted again in the configuration dialog.
For search requests with variables, you will have to select all those fields from the combined search form that are to be shown separately. A new search form is created from this field selection.
To Save a Search with Variables, Follow These Steps
-
Open a search form or a combination of search forms (see 'Combined Queries').
-
Complete the fields on the search forms that are to contain constant values.
-
Right-click to open the context menu of the search form.
-
Click
 Variables.
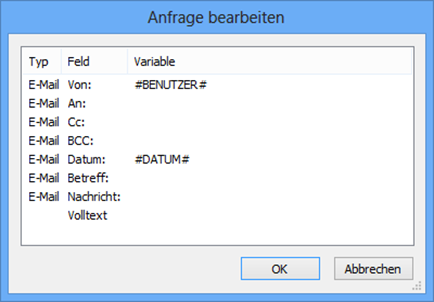
The Edit query window will now open.
In the Edit query window, all fields from the search form or combined search forms are listed. Entries from a search form will be shown in the Variable column as constant values.
-
Enter the variables.
You can enter constant values in the cells of the Variable column or select values from a list. When you click on a cell, the list opens. It contains special values, variables, and static variables. Static variables are variables which will be temporarily saved and used as default values the next time you open the saved search.
The following specific values may be available:
-
#Benutzer# – the current user name
-
#Datum# – the current date
-
#Null# – a non-indexed field
-
#Computer-IP# – the IP address of the querying computer
-
#Computer-GUID# – the GUID of the querying computer
-
#Computer-Name# – the name of the querying computer.
A not-equal to operator <> or != can be placed before special values, but not variables.
Only fields in which you enter a variable ($VARn$) or a static variable ($STATn$) from the list will be displayed when starting the query. Fields containing specific or entered values will not be displayed. Empty fields will not be evaluated.
If you assign the same variable to more than one field, only one mapping is displayed. The value you enter will be applied to the other mappings of the variable.
The fields for search forms in expert mode are neither saved nor displayed in the Edit query window
-
-
Click OK.
The Save search window will now open.
-
Name the query.
Choose whether to execute the query at start-up and open the hit list or whether or not to make your query editable before it is run.
Press Select icon to assign an icon to the saved search (see To assign icons to saved searches, follow these steps ).
The Function key list allows you to select a function key that, when pressed together with Ctrl+Shift, will launch the search. Check whether the keyboard shortcuts are already in use.
You can specify whether a query will be added to the navigation as well as to the desktop area. Queries with variables can be created as an extra group in the navigation. If the search bar already contains a saved search as an extra group, the new saved search along with its variables will be added as the last group in the navigation.
-
Click OK or press the ↩ enter key.
The query is saved and shown in the object search in the Desktop directory.
You can add the saved search to the navigation and hide/show it quickly there (see Queries in the Navigation ).
You can also save queries on portfolios, but without variables and without expert mode, by including them in the navigation (see Including Portfolio Queries in the Navigation or Portfolio queries ).
Searches via basic parameters (see Searching via the Basic Parameters) can only be saved in combination with other queries.
For searches in expert mode, only the entries for expert mode of one or more search forms are saved.
You can assign an icon to saved searches and links to external applications.
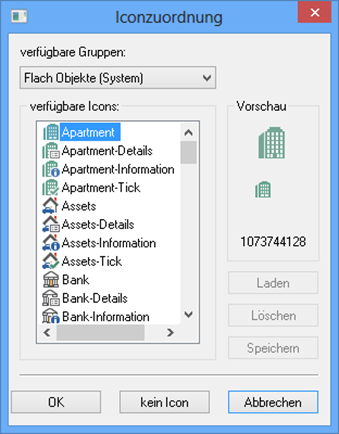
When creating saved searches or linking to external applications, you will be prompted to assign an icon. The Icon assignment dialog lets you select a pre-installed icon from a group; you can also upload your own icons.
You will need the appropriate system role to load and delete icons. Access rights and system roles are assigned by your administrator.
If you want to load icons, select the General icons (user-defined) group, click the Load button, and choose an icon file (*.ico) from the file selection dialog.
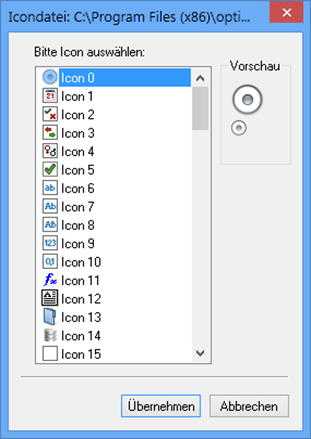
If you select a library (.dll) or a program (.exe), all icons contained in the file will be displayed.
You can select the required icons and apply them.
The imported icons will be placed in the General icons (user-defined) group. The assignment must be saved before you can use the icons.
Managing Queries in the Navigation and Object Search
The saved search is displayed in the object search on the desktop and can be executed and edited there. Saved searches can also be added to the navigation and managed in the navigation or in the object search in folders. To learn how to file and manage searches in the navigation, read Customizing the Navigation.
-
Open the
 Object search.
 -
Select the Desktop entry in the object search.
-
Open the context menu and click
 Folder.
A new folder is created in the object search.
-
Name the folder.
You can still rename the folder later (
 Rename), create additional folders (
 Folder), and delete empty ones (
 Delete) via the folder’s context menu.
 -
Saved searches can be placed in a folder by dragging and dropping them onto a
 Folder icon.
Editing Saved Searches
The context menu of a saved search offers various functions for editing, renaming, and removing the search request. This is also where you can configure the call of saved searches or send a saved search.
| Icon | Comment |
|---|---|
|
|
Open The query will open and, based on the settings (see 'Query behavior' area ), either be executed or displayed. |
|
|
Edit The query will open for editing. |
|
|
The selected query is flagged with an arrow symbol and will open when enaio® client is started. You can set this option for any number of queries. |
|
|
Rename The name of the query is selected. You can edit it in the object search. |
|
Publish The query is available to other users on the public desktop. Special rights are required to use this feature. |
|
|
|
Remove from navigation and object search The saved search is deleted from the navigation and object search. |
|
Copy for navigation The saved search is copied and can be inserted into an object group of the navigation by selecting Copy from object search from the context menu. |
|
|
|
The query is sent to an e-mail recipient. enaio® client users can double-click the attachment to import it into their object search. If a query is opened on a tab, you can also send it via the context menu of the tab. |
Running Saved Searches
Saved searches can be configured to run immediately when they are opened or can be made available for editing. You can also flag saved searches as a launch query. This means that they will be executed or opened immediately when enaio® client is started.
Queries which contain variables will always open. If the query contains static variables ($STATn$), the entered value will be temporarily saved and used as default values the next time you open the query.
All simple field types and catalogs are available in the search forms of saved searches with variables. For fields to which add-ons are assigned, the add-ons are not available in the search form. The fields can be filled out manually. The date add-on and the user add-on are available.
Customizing the Column Configuration for Saved Searches
The hit list for a saved search will have the name of the query in its status bar. The hit list is presented as defined in the general hit list configuration. You can change this presentation for saved searches (except for SQL queries). The prerequisite is that the hit list contains only a single object type.
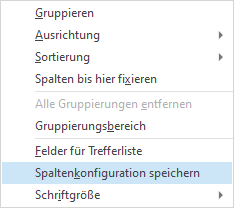
The setting options are provided in the context menu of the hit list's column header.
If the hit list of a saved search contains different object types, the setting options are not offered.
Clicking the Save column configuration function will save the customized column configuration for the saved search. The general column configuration of hit lists and portfolios will then remain unaffected by the changes.
The customized column configuration of saved searches is preserved when publishing (public desktop) and sending saved searches. When distributing saved searches via profile allocation, these will also retain their column configuration if configured accordingly.
Customized column configurations of saved searches are not taken into account if the saved searches have been allocated and are executed in enaio® webclient, in enaio® webclient as a desktop application, or in enaio® mobile.
Distributing or Applying Saved Searches
Queries that have been saved by you can only be accessed by you. However, you can also distribute them to other users by means of the ![]() Send e-mail function in the context menu of a saved search or by dragging the search to the public desktop in your object search. Likewise, your administrator can provide you with saved searches via profile allocation and other enaio® users via public desktop or e-mail. You do not need to do anything yourself if a search was distributed via profile allocation or via the public desktop. How to apply saved searches you receive via e-mail to your enaio® client is described below.
Send e-mail function in the context menu of a saved search or by dragging the search to the public desktop in your object search. Likewise, your administrator can provide you with saved searches via profile allocation and other enaio® users via public desktop or e-mail. You do not need to do anything yourself if a search was distributed via profile allocation or via the public desktop. How to apply saved searches you receive via e-mail to your enaio® client is described below.
-
Place the saved search in the e-mail attachment in your file storage system.
-
Double-click the *.os file in your file storage system.
If you have not opened enaio® client yet, it will open now.
An enaio® client dialog box will ask you if you want to apply the saved search.
-
Confirm the dialog box prompt by clicking the Yes button.
The saved search is transferred to the object search of enaio® client and displayed in the Desktop area.
You can now rename the applied query using the functions in the context menu of the saved search, transfer it to the navigation, or move it to a folder in the object search using drag and drop.
 areas. Use the toolbar to show all hidden areas at once:
