The Settings Menu
enaio® client is highly configurable. For example, you can configure settings for confirmation dialogs and the way windows are displayed, among others. Every time you start enaio® client, these settings will be applied. Choosing the correct settings in line with your requirements can help make your work much easier.
Select ENAIO ribbon tab > Settings or use the keyboard shortcut Ctrl+R to open the Settings window. Here you will find the default settings areas, sorted by subject. If you click an entry in the list, the respective settings area will be shown on the right.
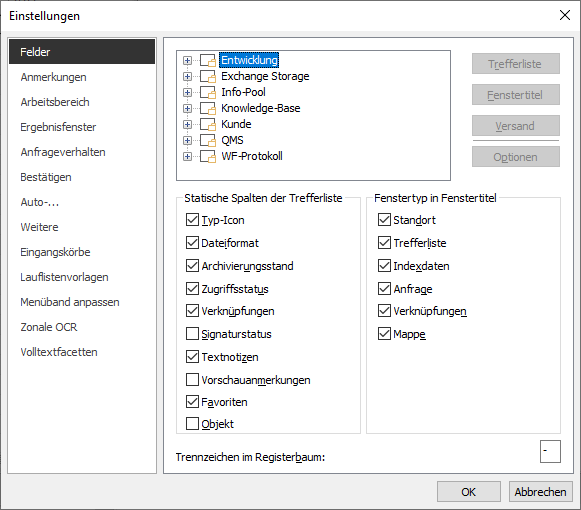
The menu of the 'Fields' area is divided into the following sub-sections:
The configured folder types are presented in a tree structure here in the upper area of the menu. Click once or double-click on the leading ![]() Plus icon to view the basic parameters, register types, folder types, and document types.
Plus icon to view the basic parameters, register types, folder types, and document types.
You can control, for example, the display or use of index data in hit lists, in window title bars, in register trees in folder views, and in internal and external sending for the object type selected in each case.
Please note that settings you select for hit lists are inherited by window title and e-mail settings. You can change the inherited hit list settings in the window title menu and the e-mail settings menu without affecting the other settings menu.
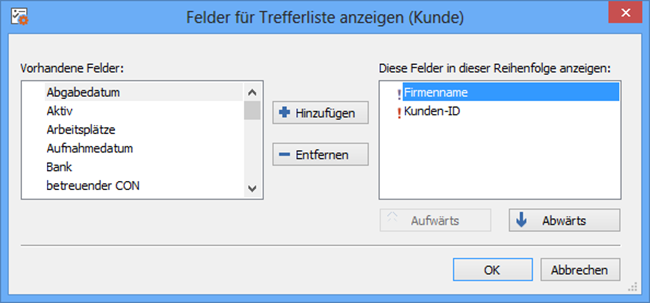
For a selected document type, folder type, or register type, press Hit list to open the Show hit list fields window. Select fields from the index data that are to be shown as columns in a hit list, in a folder window, or in a portfolio in the Available fields area.
You can also open the window by selecting Fields for hit list in the context menu of a selected folder, register, or document type in the object search.
To determine which hit list columns will be displayed, select one or multiple fields from the list of existing fields and add them to the list of displayed fields. Change the order of the fields using the Up and Down buttons.
If you leave the Display these fields in this order area empty, then the hit list columns are shown based on the default settings.
For the columns of a document hit list, you can additionally select entries from the basic parameters and the folder index data. The selected entries apply to all document types from the corresponding cabinet.
Select the basic document parameters of a cabinet and use the Hit list button to open the Show hit list fields window. Basic document parameters, the file size, and folder index data fields are shown in the Existing fields area. Select the fields and their order in this area.
Select the basic register parameters of a cabinet and click the Hit list button to open the Show hit list fields window where you can select the basic register parameters and fields for register hit lists.
Select the basic folder parameters of a cabinet and click the Hit list button to open the Show hit list fields window where you can select basic folder parameters as fields for folder hit lists.
Use the Window title button, similar to the Hit list, to specify the corresponding fields whose index data should identify the title bar of a window (for example, index data forms). The settings apply to the selected object type.
If you configure settings for the basic folder, register, or document parameters, then these settings apply across all object types, that is, for all corresponding object types in a cabinet. In addition, the <<<Do not inherit fields >>> option is available for the settings of the basic folder, register, or document parameters. Select this option if you do not want to show basic parameters in the window bar.
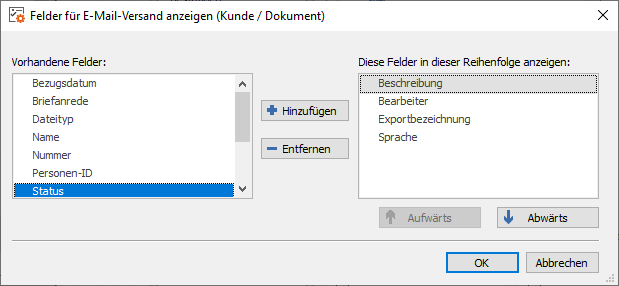
Click E-mail settings to specify the fields, similar to the Hit list, whose index data are used to identify the file name of an object when sending it by e-mail. The settings apply to the selected object type.
If you configure settings for the basic folder, register, or document parameters, then these settings apply across all object types, that is, for all corresponding object types in a cabinet. In addition, the <<<Do not inherit fields >>> option is available for the settings of the basic folder, register, or document parameters. Select this option if you do not want to use basic parameters when sending e-mails.
Depending on the object type, the following options are available for selection when you press the Options button:
-
Approve for archiving at creation
These documents automatically receive the
 'approved for archiving' property when they are created.
Registers and folders will not be archived and do not have any archiving properties. -
Save index data to clipboard
The index data of a new object will be saved to the clipboard; the fields of the next object of the same type will be auto-populated with these values in the index data form.
Entries in multi-fields or read-only fields are not saved to the clipboard. -
Use index data for external mail
When sending documents to external recipients, the index data as shown in the hit lists is used as the file name. The length is restricted to 100 characters. Character that the operating system identifies as invalid for file names will be removed. If a document contains more than one file, a counter will be appended, beginning with the second file.
Registers and folders cannot be sent to external recipients. -
Use index data for internal mail
The index data as shown in the hit list will be used to name the link. The length is restricted to 100 characters. Character that the operating system identifies as invalid for file names will be removed.
-
Debug events
Events will not be executed all at once, but rather line by line in the event editor. This function is only available to users with the matching rights.
-
Folder hit list as register tree
A folder hit list is not displayed in the case of folder queries, but a view containing the list of all folders returned during the search in the left navigation area and the contents on the right. The list in the navigation area cannot be sorted.
-
Show register tree
A navigation area is shown in the folder window.
-
Sort register tree (ascending/descending)
In the navigation area of the folder window, the register types and the registers within the types are alphabetized and shown in ascending or descending order.
-
Determine number of objects in register tree
The total number of objects for each register will be displayed in the navigation area. The user's access rights are not displayed in this view. That is why the hit list may contain fewer objects than shown here. This function requires the Client: Show number of objects in register tree system role.
-
Free text input when saving the documents
A text editor will open when a document file of the selected object type is saved where you can add an entry to the history.
-
Double-click to open documents in read-only mode.
Existing W-Documents or container documents will open in read-only mode when you double-click on them.
These can also be easily applied by selecting the ![]() Options option in the context menu of the selected folder type, register type, or document type in the object search.
Options option in the context menu of the selected folder type, register type, or document type in the object search.
The settings apply to the selected object type.
In the Static columns in hit list list, define the columns to be shown in the hit list for folders, registers, and documents by enabling or disabling the checkbox.
| Checkbox enabled | Checkbox disabled | |
|---|---|---|
| Display of static columns in hit lists | 
static columns are shown |

static columns are not shown |
The settings for static columns in the hit list apply to all object types.
You specify in the Window type in window title list whether or not the window type should also be shown in the title bar of a window.
| Checkbox enabled | Checkbox disabled | |
|---|---|---|
| Display of the window type in a window (Hit list window type) | 
|

|
The settings for showing the window type in the window title bars apply to all object types.
The specified separator separates the index data entries in the register tree.
Enter the default settings for annotations on layers in the 'Annotations' area.
You can select colors for lines, highlights, font, and filled rectangle.
You can preset the font for text fields, the font size, and the line width.
You can determine how the workspace is saved on exiting the application. The following changes in the object search can be automatically saved:
-
Positions (navigation/object search)
The navigation and the object search area will open in the same position they were in when the program was last closed.
If you press and hold the F8 key while starting enaio® client until 'ready' is displayed in the status bar, the navigation and the object search will not be shown and they are reset to their default values. -
Settings (navigation)
The current layout of the navigation area is saved.
-
Settings (object search)
The current layout of the object search is saved.
Press Reset window layout to rearrange the areas on the main workspace (see also Settings for the User Interface).
Choose the layout which best meets your requirements. Alternatively, you can move an area to another position by simply dragging it onto the navigation cross on the title bar.
You can choose a language for the enaio® interface. This setting will be applied immediately and is also valid for other enaio® applications. In enaio® webclient and enaio® capture
, the interface language can be changed for the relevant application.
You can also select a language for the object definition. The field names in the index data and search forms will then be read from a language table, which was created along with the object definitions. The workflow forms will also be displayed in the various language versions.
If the language of the object definition is changed, you will also need to restart enaio® client.
This is where you can set the number of most recently edited objects to be displayed in the History area.
The History can be shown and hidden via the Start ribbon tab.
You can show forms, hit lists, folders, and documents in individual windows instead of as tabs (see Window display). To do this, simply disable the Tabs option.
You can then specify on the View ribbon tab whether the windows that are currently open should be cascaded or tiled horizontally.
The currently active tab is highlighted in the tab view. You can specify how the tab headings will be displayed. By default, the tab heading is a single line at the top of the tab. Due to the more compact display, we recommend one-line names for devices if you are using a low-resolution monitor.
When you set the tab view, you can save the column widths of the displayed hit list, activate the tab, and close all tabs (except for the active one) during an object search by selecting the matching entry in the context menu for a tab heading.
Moreover, a portfolio or folder can be sent by e-mail directly from the context menu of the tab. If a register is selected in a folder view, the register will be sent. If no register has been selected, the folder will be sent. In the same way, queries can be sent since the feature is also available when a hit list was created based on a saved or SQL search. The objects above are sent as enaio® files by default.
When working with several tabs, you can select the desired tab by dragging an element to the corresponding tab.
If you switch from register view to window view, you will need to restart enaio® client to apply the modified setting. If you log in to enaio® client without restarting it beforehand, the active view will be kept unchanged.
Optimized menus show only the features that are used frequently in the context menus. All other features can be accessed from the ribbon. The keyboard shortcuts for the features can be shown in the context menus.
You can choose between the color schemes white (default), light gray, dark gray, and black and also choose a background for the ribbon.
Clicking the Advanced button opens the Advanced settings window. Here you can increase the contrast of fonts in forms as well as set the font size of the dialogs. The changes affect all index data and form screens as well as all dialogs in enaio® client, such as the settings dialog, history dialogs, or searches with variables that are displayed as dialog elements in the navigation. Depending on the configuration of the dashlets or COM-based tools used in your system, these settings may also affect the contrast and font size of these integrations.
If you change the advanced settings, you must restart enaio® client to apply the changes.
You can specify whether the column widths and window positions of lists and dialogs should automatically be saved when you exit enaio® client. The column width and position of link areas are not saved automatically.
The Show links option shows the link area in hit lists, folder windows, portfolios, the history, and favorites. It can be temporarily switched off and on in the areas.
To display hit lists and inboxes, you can make the following settings:
-
whether separators are shown between the lines
-
whether even and odd lines should have alternating background colors and which colors to use
-
whether the column used to sort the entries by is highlighted in a lighter or darker color
-
what font size to use for the lines.
For filtering within lists, you can specify whether the search term or cell should be marked.
For lists, you can specify the text and background colors for even and odd lines.
You can specify the background color for the selection of the filter in lists and the grouping in lists.
Here you can choose the display level of a hit list, i.e., whether hit lists will be displayed as folder, register, or document lists, whether this is automatically selected based on the tab in the foreground, or whether you can select it manually.
You can specify whether to keep, minimize, or close the query window after the query is completed.
To start the query, select the register or window types to be automatically closed when you start a query.
-
The Always include objects without register assignment option determines whether objects without register assignment (i.e., documents that are not located in a register) are included in the hit list when a query is made using register and document data.
-
Select If possible, use the same hit list to specify that a hit list still open from an earlier query will be updated for a new query. If this option is not selected, then a new hit list will be opened for a new query.
This behavior can be individually defined for every search form using the
 /
/ Reuse hit list buttons.
 -
The Open one hit list for each folder setting specifies that a check is performed when a folder is opened to determine whether the folder is already open and, if it is, it is shown in the foreground instead of being opened again.
You can also restrict the hit list to a specific number of hits and specify whether you want to be informed if a hit list exceeds the set number of hits.
The maximum number of hits in hit lists that is specified by the administrator always applies.
You can decide when users will be shown a confirmation dialog where they will be prompted to verify that they want to move or delete actions.
You can tick or untick the Save when switching data sheet checkbox to specify whether or not changes to index data are saved automatically when browsing hit lists. If the feature is disabled, modified index data is saved by default when scrolling to the next index data form without a confirmation dialog being shown.
You can also set up a confirmation dialog to appear before opening documents, hit lists, and database catalogs that are larger than a specified size. If, for instance, a document exceeds the specified size, you will have to confirm that you want to open it.
The administrator can also configure a confirmation dialog to appear before opening large documents. If you specify a different maximum file size, the administrator's setting will be overwritten. The default settings for the number of hits when opening a hit list or a database catalog can also be overwritten.
Process owners with the Client: Workflow process administration system role can cancel a workflow process via the context menu of the Current workflows inbox. Users can tick or untick the Cancel running workflows checkbox to specify whether you will need to confirm that you want to cancel a workflow.
The administrator can set PDF as output format for archive print. If this is the case, you can set up a confirmation dialog for PDF generation for AS printers. In this confirmation dialog, you can select TIFF G4 for black-and-white prints with the archiving system printer and JPEG for color prints with the AS color printer instead of PDF.
The administrator can configure a system-wide confirmation dialog to appear before index data is saved. You cannot disable this confirmation dialog.
You can define whether to automatically append/prepend search form fields with an '*' (placeholder for any string of characters). The default settings you specify here also apply for enaio® webclient .
Queries that include placeholders and queries with parts of terms take longer than queries without these added search criteria.
A placeholder can be entered as follows:
-
Behind the entry (e.g., abc*)
The placeholder is added for text fields without a catalog and text fields with a database catalog.
-
In front of the entry (e.g., *abc)
The placeholder is added for text fields without a catalog and for text fields with a database catalog; the placeholder for displaying the catalog values is also added for text fields with a database catalog. Queries where this option is enabled will take much longer.
-
Behind the entry of a database catalog
The placeholder for displaying the catalog values is added for text fields with a database catalog. You can select or deselect the 'Behind the entry' option for the query.
You can also tick the Search for parts of terms checkbox to select this option. If you enter several terms into a field, the system searches for objects that are indexed with these terms regardless of the order in which they appear.
These settings are not valid for searches via notes and links, searches via table fields, or full-text searches.
In the Open (one hit) area, you can specify whether the folder, register, or document is opened with hit lists containing only one hit. In the Close (no hit) area, you can specify whether an empty hit list or a message indicating that there are no hits is shown.
-
Additionally, you can specify that the editor used to enter a free text opens automatically if a link to an object is added.
-
Deactivated users can be hidden. Deactivated users are users whose accounts have been expressly blocked by the administrator. These users are hidden in all user lists but not in the workflow.
-
A full-text area can be automatically displayed for a full-text hit list; you can use the full-text area to further specify the full-text query via facets.
-
With the setting Close hit list after automatic opening (one hit) you specify that a hit list with one hit is automatically closed, if an object is automatically opened for a single hit.
The Favorites, Filing tray, History, and Recycle bin areas can be opened automatically when enaio® client is launched.
When opening a location, the focus can be placed on the register tree or on the list.
In the More area, you can select from the following options:
The transfer rate for the document display will be shown in the status bar.
W-Documents which you receive as internal references will open as read-only documents if this option is activated. Other documents are always opened as read-only.
If Microsoft Outlook is set up, you can send e-mail messages from enaio® client using Microsoft Outlook.
If you use optical character recognition within the display window, the index data form of the displayed document will be opened after OCR is completed. You can copy the recognized text from the clipboard to an index data field.
Use optical character recognition to automatically calculate the number of columns.
The scan settings will be saved per user and not per computer.
Only the last change to a subscribed object will be shown in the subscription section.
Objects you edited yourself will not be listed in the subscriptions area.
Users who have the right to create events can access enaio® editor-for-events from their workspace.
Application events will not be executed all at once, but rather line by line in the event editor. This function also requires a special system role. Access rights and system roles are assigned by your administrator.
Application events will not be executed all at once, but rather line by line in the event editor. This function also requires a special system role. Access rights and system roles are assigned by your administrator.
If you place references to folders on the desktop of the object search, these will, for example, also be presented as suggested locations for archive print.
You can select whether to close all open windows when opening OS files.
The function of automatic personalization of a workflow when a user opens a work item can be removed. If you enable the checkbox, workflows will not be personalized automatically if no data is entered and saved in the opened work item.
When an incoming follow-up is received, system information can be displayed.
When a subscription is received, system information can be displayed.
If a work item is active, system information can be shown.
We have enhanced the display contrast of read-only index data fields on data forms, in particular for the needs of users with visual impairments.
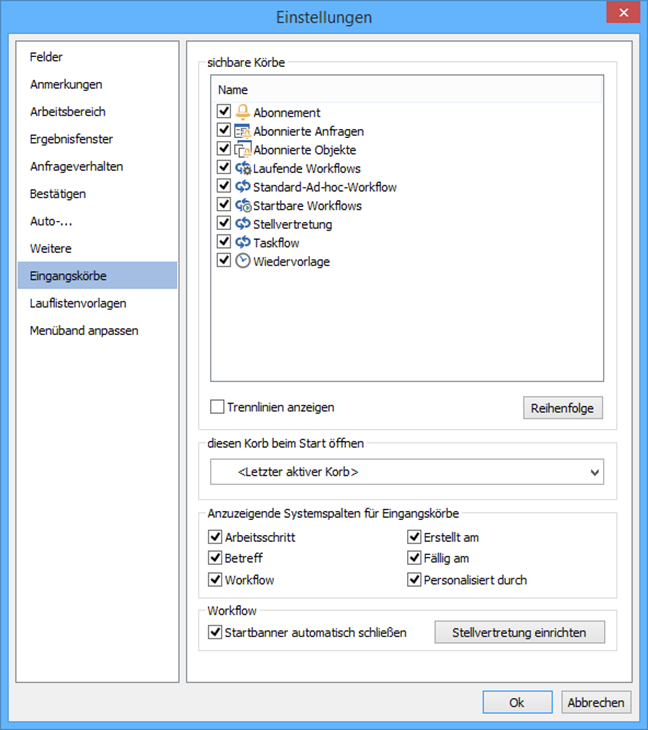
You can define which inboxes are shown.
Follow-ups, subscriptions, and workflows are shown in the main inbox My incoming messages if no separate inboxes were specified for these types.
You can create a separate inbox for each workflow. You can specify the order of the inboxes.
To show objects in the inboxes, you can specify whether separators are displayed.
Specify the inbox to be opened at startup.
For workflows you can define whether a note that is shown when workflows are started in enaio® client is automatically closed or not. If this option is disabled, users can close the message manually after the start of the workflow. This prevents the user from overlooking the message about a workflow that has started.
In the 'Inboxes' area area, you can also set up the substitution for workflows and for follow-ups (see Absence and Substitution).
You can open the 'Inboxes' area directly from the context menu of the column headers in the inbox.
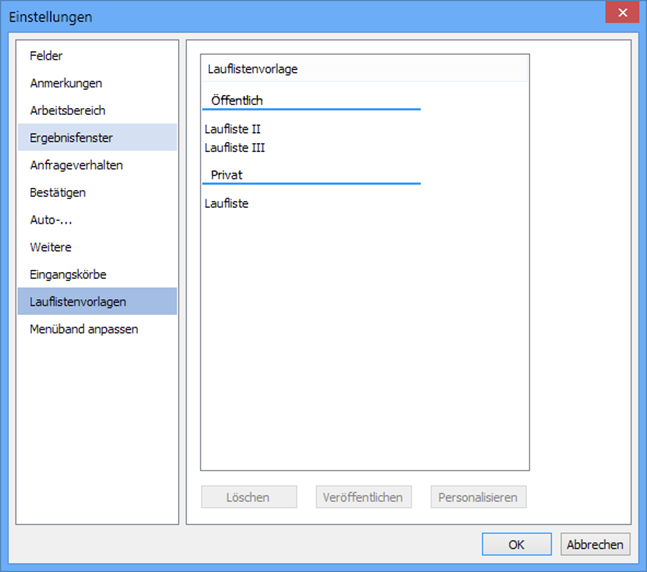
You can publish circulation slip templates in this area.
Circulation slip templates which you created for ad-hoc activities of the workflow are private and can only be accessed by you. If you publish circulation slip templates, any user of the ad-hoc activity can use them.
You can publish, personalize, and delete circulation slip templates.
You will require designated system roles to manage private as well as public circulation slip templates. Access rights and system roles are assigned by your administrator.
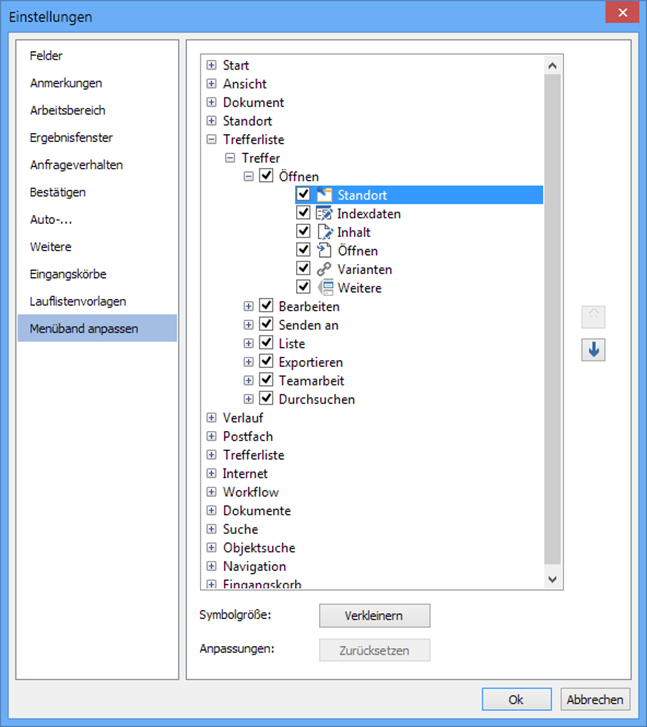
In the 'Customize ribbon' area, you can customize all the ribbon tabs.
Users need the Customize ribbon system role.
All ribbon tabs are listed with the groups. Groups and buttons can be flagged within the groups and moved using the arrow buttons. Buttons can be moved to another group; groups cannot be moved to another tab.
If you want to hide or show a button or group, disable or enable the checkbox.
Every button can be displayed with a large or small icon.
You can reset all changes via the corresponding interface.
After updating enaio® client, changes to the ribbon and quick access toolbar will be automatically reset.
This area is only shown if the OCR mode is set up and is licensed on the workstation.
Languages can be preselected for optical character recognition from the display window of image documents.
While working in OCR mode, you can open the language selection dialog by pressing Ctrl+Shift.
Full-text hit lists are shown with facets. You can enable and disable the basic facets as well as activate fields with list catalogs and date fields as additional facets for object types.
The area lists the basic facets and all object types with list catalogs and date fields. Open the dialog for enabling/disabling the facets via the button at the end of the line.
Exporting and Importing User Settings
Users can export their settings and import exported settings – also from other users.
This export data includes the saved searches, scan settings, the navigation and object search content, links to external applications, and the tab and window settings.
Exporting and importing user settings is particularly suitable for profile allocation for empty systems, since objects such as links to documents, registers, and folders in the navigation are not exported during export and existing settings are overwritten during import. To distribute links in the navigation, use the Send e-mail function from the context menu.
If you want to export your user settings, open the context menu above your name in the object search and choose Export user settings.
In the save dialog, enter a name for the file and choose a folder. The data is saved as an encrypted ZIP archive.
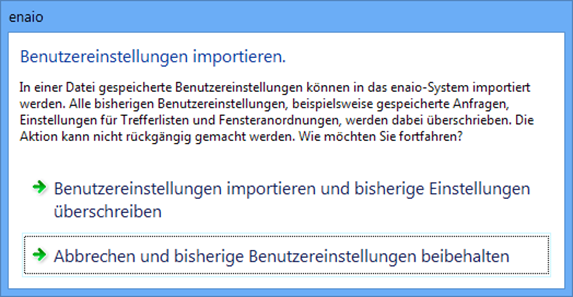
If you want to import user settings, press and hold F12 when starting enaio® client to open the import dialog.
In the dialog that appears, choose whether you want to replace the current user settings with user settings from a file and, if necessary, select the file.
Please note that you are only allowed to import user settings from systems with the same folder, register, and document types.

 areas. Use the toolbar to show all hidden areas at once:
