Standard Ad-hoc Workflow
This model includes commonly encountered work items that make up workflows in organizations: confirmation of notice, approval, poll, follow-up inquiry, collaboration, revision.
The standard ad-hoc model aims to immediately create significant added value in terms of productivity and process reliability in installations. At the same time, the standard model can be used in an introductory phase for standardized workflow processes to evaluate the possibilities and thus electronically map the informal processes that have existed up to now without anchoring the users' workflows in fixed structures. In this way, recurring sub-processes can then be stored step by step, initially in circulation slips, and then transferred to defined models.
The standard ad-hoc model is geared to very common use cases. Consequently it does not use all the technical possibilities of the workflow. Changes to the model by the operator are not foreseen to ensure the model's broad usability and ease of maintenance. However, at the same time, an analog model can be developed by the operator or in the project to implement specific requirements more precisely.
Installation
When installing enaio®, the osdefaultmodels.xml workflow model will be copied to the administration components directory. This model is imported via enaio® editor-for-workflow and contains all the data required for the taskflow and for the standard ad-hoc workflow.
Make sure that the WF jobs 'WFM::WorkItemNoti,' 'WFM::WorkerJob,' 'WFM::SpoolerJob,' and 'WFM::CheckJob' are enabled in enaio® enterprise-manager.
In addition to this model, there is an object definition file available for the standard ad-hoc workflow that allows you to set up a cabinet, register type, and document types to automatically store log files of ad-hoc operations in enaio®. This log management is controlled via a configuration file.
Alternatively, log files can be generated as image files and stored in the process owner's tray. There is no need to configure the log for this solution.
You will need to integrate the OXVBBAS library the standard ad-hoc workflow.
The model is only available in an installation’s osdefaultmodels.xml file in the ANSI variant. The model is converted to Unicode when importing it into a Unicode system.
Configuration
The standard ad-hoc model is configured in three steps:
-
Import and enable the osdefaultmodels.xml model.
-
Assign people via the organizational model.
-
Optionally, you can set up object types for logging and configure a storage location for the log.
Importing the Workflow Model
You can import the workflow model via enaio® editor-for-workflow.
-
Start enaio® editor-for-workflow.
-
Select the Import organization function from the toolbar or the File menu.
-
Open the file osdefaultmodels.xml located in the administration components directory using the file selection dialog.
-
Mark the 'System projects' area in the Source area and 'Organization' in the Destination area.
You can also use the mouse to drag the 'System projects' entry to the 'Organization' entry.
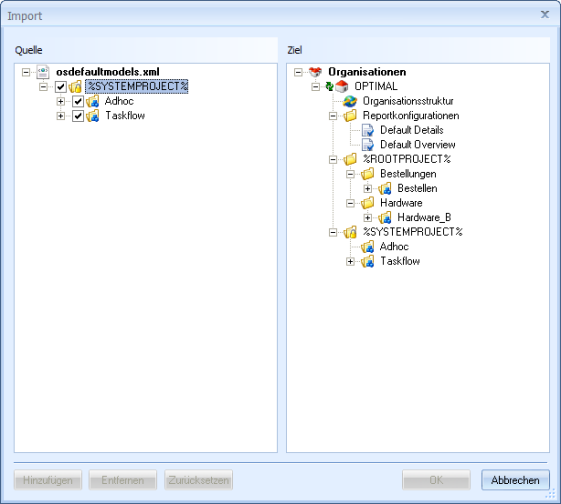
Then click the Add button. The project will be imported and the dialog will close.
You can also import only the individual models you want to use instead of the two projects Taskflow and Standard ad-hoc model in three language versions each. The selected language version only determines the language that the enaio® server chooses for communication and logging.
Regardless of this, the workflow steps are available in each language version in each of the three languages: German, English, and French.
-
Open the model explorer. The new system project will be displayed.
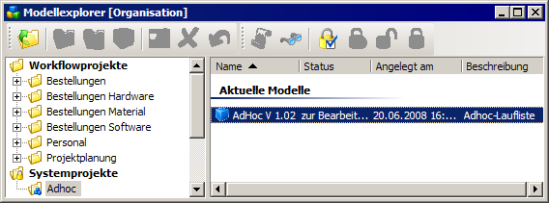
The imported models are read-only and cannot be edited.
-
Mark the desired language version of the model and enable it using the corresponding function from the context menu or the toolbar.
During the automatic check, you will receive the message that no record owner has been entered. This function is automatically imported via events by the user who starts a process. At the end of the process, all documents from the workflow file that do not yet have a location are transferred to the personal tray.
In so doing, the model is integrated and activated. You integrate roles and persons in the following step.
Configuring the Organizational Structure
When installing enaio®, the 'Ad-hoc' role is automatically created and inserted within the organizational structure on the top level. All persons who you add as sub-objects of the 'Ad-hoc' role in the organizational structure can start ad-hoc processes and taskflows in enaio® client if they have the 'Client: Use workflow' system role.
All persons and roles from the organizational structure in enaio® client can be entered as participants for the ad-hoc processes when configuring the circulation slip of an ad-hoc process.
Edit the organizational structure via enaio® editor-for-workflow:
-
Start enaio® editor-for-workflow.
-
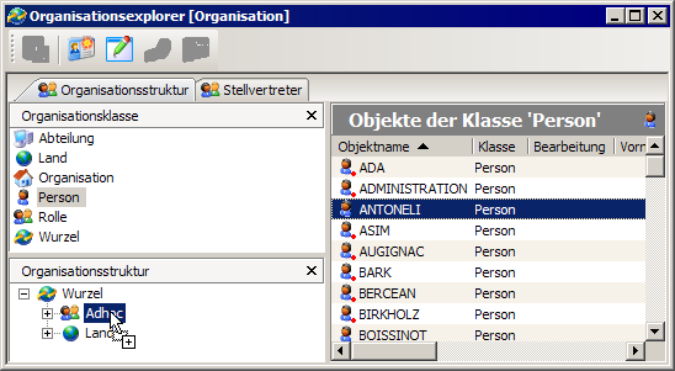
Open the organization explorer via the workspace.
-
Assign objects of the class 'Person' to the 'Ad-hoc' role.
-
Save the changes.
When this step is complete, ad-hoc operations can be started and executed in enaio® client.
If you import users in the organization explorer, you can assign them the 'Ad-hoc' role right away.
Optionally, you can create and include additional roles for ad-hoc processes. Users who had a function in the process are assigned to these roles via the events from the context of running processes.
The following roles are possible:
|
Role |
Description |
|
%First recipient of the activity |
If an activity is listed at least a second time on the circulation slip, this entry specifies as participants those persons or roles who were entered as participants for the activity the first time. |
|
%First editor of the activity |
If an activity is listed at least a second time on the circulation slip, this entry specifies as participants those persons or roles who performed the activity the first time. |
|
%Previous recipients of the activity |
If an activity is listed at least a second time on the circulation slip, this entry specifies as participants those persons or roles who were entered as participants for the activity the previous time. |
|
%Previous editors of the activity |
If an activity is listed at least a second time on the circulation slip, this entry specifies as participants those persons or roles who performed the activity the previous time. |
|
%Last editor |
The participant who last forwarded an process step. |
|
%Process initiator |
The person who started the process. |
You can create these roles as objects of the 'Role' class using the organization explorer and assign them to the organizational structure.
Configuring a Logging
Part of the 'Ad-hoc' model is the 'Log' activity, which, controlled by events, compiles all data of the already completed activities in a log. The activity is automatically performed if it is included in a circulation slip. Afterward, the log is located as a document in the workflow file. The log can be assigned to a document type, indexed, and saved to a location in the following activity. If this is not done, the log is automatically placed in the personal tray of the user who started the activity after it has been completed.
A configuration can be used to define the format for the log and to configure a location where the log is automatically saved. This configuration is optional; however, without configuration the log will be placed in the workflow tray as an image document.
The following object types are defined in the object definition file for ad-hoc workflow logging:
|
|
'WF log' folder type 'General' register type 'Log' document types |
The configuration file is harmonized with this object definition. A folder is created for each year, a register for each month, and there a document with the log data.
|
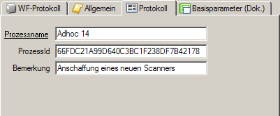
The document is tagged with the process name, the process ID, and with the subject from the process steps: |
|
Transferring the Object Definition
You open the object definition file AdHoc_asobjdef.xml located in the directory of the installation data \Samples\WF-Adhoc\WorkflowProcessComponents using enaio® editor.
You copy the cabinet, register, and at least one document type into the system object definition. You only need the document type that corresponds to the desired log format.
Then you save the object definition and adjust the tables.
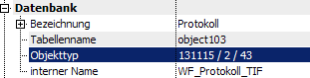
For further configuration you need the ID of the object types. This ID can be found as the first entry in the 'Object type' column of the properties dialog.
|
Example: The document type 'Log' has the ID 131115 |
|
Log Configuration File
You use the AdHoc_Config.xml log configuration file to specify the file format in which logs are created and where they are saved.
The file will be installed in the \etc directory of the data directory. If you do not change the file, log files are created in PDF format. If you delete the configuration file, only an image file without document type will be created.
Prerequisites for logs in PDF format are a JRE on each relevant enaio® server, the environment variable JAVA_HOME is set to the Java installation path …\java\jdk\, and conversion engines are enabled.
The log configuration file has the following content:
<?xml version="1.0" encoding="UTF-8"?>
<Protocol Type="NONE">
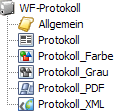
Enter 'XML,' 'TIF,' 'PDF,' or 'NONE' for the protocol type. Enter 'NONE' if you only want a log in the file and do not want an automatic transfer to a location. Then only the document type for the log file is taken from the following configuration.
Enter 'TIF' if you want an image document. The file format for the tray – JPG or TIFF – is automatically determined by the assignment to an image document type. Enter 'XML' if you want an XML document.
<Folder ObjectId="0" InternalName="WF_Log">
Enter the folder type ID and the internal name of the folder type.
<Fields>
<Family InternalName="WF_Family"/>
<Year InternalName="WF_Year"/>
</Fields>
You need to enter the internal field names for the folder fields to which the model name and the year are assigned.
</Folder>
<Register ObjectId="6488064" InternalName="WF_General">
Enter the register ID and the internal name of the register.
<Fields>
<Month InternalName="WF_Month"/>
</Fields>
Enter the internal field names for the register field to which the month is assigned.
</Register>
<Document ObjectId="458752" InternalName="WF_Log_PDF">
Enter the document type ID and the internal name of the document type that you configured in the object definition for the desired file format.
<Fields>
<ProcessName InternalName="WF_ProcessName_PDF"/>
<ProcessId InternalName="WF_ProcessId_PDF"/>
<Comment InternalName="WF_Comment_PDF"/>
</Fields>
You need to enter the internal field names for the document type fields to which the process name, process ID, and subject are assigned.
</Document>
</Log>
You can also change this configuration to other archive object types. A structure consisting of folder type, register type, and document type is necessary. The assignment is always done via object type ID and internal names.
If you select the XML format for logging and the assigned document type 'Log_XML,' you can assign the style sheet adhoc.xsl located in the \etc\templates directory of the data directory to the document type for the view in enaio® client via an entry in the as.cfg file from the \etc directory of the data directory.
Updating enaio® will not overwrite the AdHoc_Config.xml configuration file located in the \etc directory of the data directory or the style sheets adhoc.xsl, adhocFO.xsl, or their equivalents in other languages from the directory \etc\templates. Any customizations will also remain unchanged even after an update. However, an update will always replace all corresponding default files (AdHoc_Config_default.xml, adhoc_default.xsl, adhocFO_default.xsl, etc.) that are also available in the directories \etc and \etc\templates of the data directory and that you can use as a current templates for your own customizations.
Standard Ad-hoc Workflow – Process
The standard ad-hoc workflow provides the model for processes that users can quickly and easily learn, but at the same time are complex enough to organize a large part of daily recurring work processes.
The standard ad-hoc workflow consists of an area with seven coordinated activities, which – in contrast to the structured workflow – are not connected by predefined transition paths, but from which a flexible flow is created by the users only in the process. Three different processes are executed with these activities: coordination processes, release processes, and information processes. These processes can be combined in any way, and can also be executed more than once. A workflow is finished as soon as no more activities are listed on the circulation slip.
The file of the standard ad-hoc workflow can be edited by each participant in every step. The technical process can be clearly viewed in each step on the Log tab. Each step provides an area in which users can enter information for an annotation history. This can also be viewed by all users on the appropriate tab in each step.
The standard ad-hoc workflow can be executed in enaio® client as well as in the enaio® webclient. All steps are available in English, German, and French.
In the following, the individual activities are described with their relations to the preceding and following activities.
Initialization
An ad-hoc process is started from enaio® client via the 'Startable workflows' inbox. The person who starts a process becomes its initiator. If a process is complete and there are still documents and logs in the workflow file that have no location in enaio®, they will be placed in the personal tray of the initiator.
The first process step of the started process is always 'Initialization'.
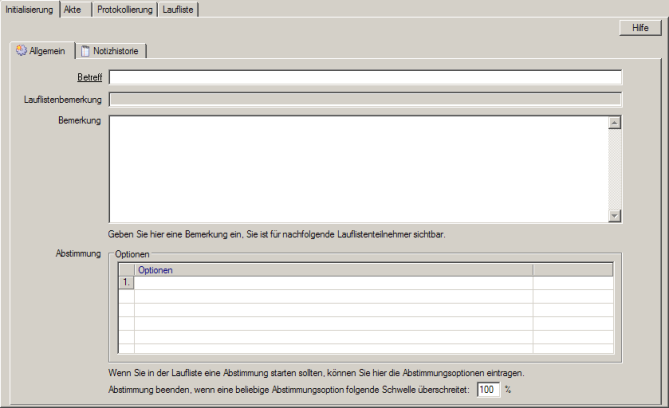
The workflow form of the process step has three editable areas on the General tab:
-
Subject
Subject is a mandatory field and must be filled in. The subject identifies all the steps of the process in the inbox and can be used for indexing log files. For this reason, it makes sense to enter a meaningful description for the process in the Subject field.
The entry in the Subject field can only be changed in a further process step 'Initialization'.
-
Comment
The comments field is displayed in all steps, and can also only be changed in another process step 'Initialization'. An entry in this field will be shown in all following steps and also transferred to the annotation history.
-
Poll
The Poll field is used to specify options for a poll via a table in a follow-up 'Poll' step. Poll options can be changed in a follow-up 'Revision' or 'Initialization' step. If voting has already taken place, any changes will always reset existing voting results.
The poll options entered here will be shown in a list in the 'Poll' step from which participants select the required option. The option 'No opinion' for the poll is added automatically.
A poll is a multi-instance activity and can be executed by several participants. Polling is automatically closed if either all participants have cast their vote or if the votes cast for a specific option exceed an amount in percent specified.
The poll result is shown in the follow-up 'Confirmation of notice' step and on the Log tab.
The Circulation slip remark field shows the comment for this activity entered in the circulation slip.

Circulation slip comments are optional. This field remains empty in the first initialization step.
When forwarding, the user receives a note if no objects have been placed in the file.
All follow-up steps, except for another initialization, show which participant initialized the process on which date on the Annotation history tab in the fields Initiator and Start date.
The annotation history on the corresponding tab remains empty in the first step.
Revision
You will find in the 'Revision' step the corresponding entries from initialization in the fields Subject and Comment and in the field Circulation slip remark, the entry that was specified in the circulation slip as a comment for this activity. These three fields are read-only.
Entries in the Note field will be entered in the annotation history and are shown in all subsequent follow-up steps.
Poll options can be specified or revised in a table, just as during initialization, on the Edit poll options tab. If polling already occurred during a previous step, this poll data will be deleted and can be accessed, provided that it was saved during a preceding logging step.
Collaboration/Follow-up Inquiry
In the 'Collaboration/follow-up inquiry' step, you will also find the corresponding entries from initialization in the read-only fields Subject and Comment, and in the field Circulation slip remark the entry that was specified in the circulation slip as a comment for this activity.
Entries in the Answer field are transferred to the annotation history and are visible there in all follow-up steps.
Poll
The form in the 'Poll' step shows as a selection list the poll options specified during initialization or revision via a table.

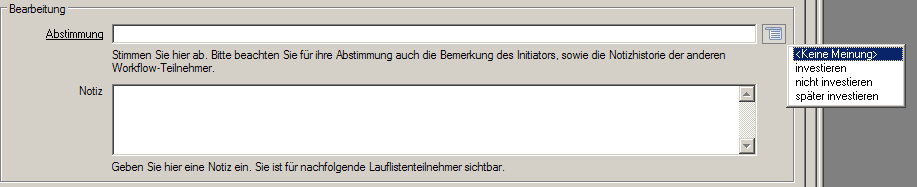
In addition to the poll options entered, the participant always has the option to select the 'No opinion' option. The Poll field is a mandatory field and must be filled in.
Polls are multi-instance activities and can be executed by several participants.
Polling is automatically closed if either all participants have cast their vote or if the votes cast for a specific option exceed an amount in percent specified.
The poll result is displayed as a table in the 'Confirmation of notice' step on the Poll result tab. You can view how the individual participants voted on the 'Log' tab. The contents of this logging table can be copied to the clipboard via the context menu or pressing Crtl+E.
Approval Activity
The fields Subject and Comment contain the corresponding entries from initialization and in the field Circulation slip remark, the entry that was specified in the circulation slip as a comment for this activity.
In the 'Approval activity' step, an option from the Decision area can be marked: Open, No approval, or Approval granted.

The selected option is logged and can be viewed in all follow-up steps on the Log tab.
If this is followed by a follow-up 'Approval activity' step, the option you previously selected will be preset.
Entries in the Note field will be entered in the annotation history and are shown in all subsequent follow-up steps.
Confirmation of Notice
You will find in the 'Confirmation of notice' step, as well, the corresponding entries from initialization in the read-only fields Subject and Comment and in the field Circulation slip remark, the entry that was specified in the circulation slip as a comment for this activity.
Entries in the Note field will be entered in the annotation history and are shown in all subsequent follow-up steps.
If there was a previous poll, you will find the poll result as a table on the Poll result tab. You can view how the individual participants voted on the 'Log' tab.
Information on approvals can be found on the Log tab.
Log
The 'Log' step has no participants. It is not started by any participant; it is performed automatically. If the step is included in the circulation slip, a log file containing the data of all items performed so far is generated and stored in the workflow file. This log file can be viewed during any following step.
The 'Log' step can be at the end of a process. If no further step follows, a log file that has not already been assigned a location and document type via a configuration is placed in the initiator's tray like all documents without a location from the workflow file.
In addition to this logging, a technical process log is automatically created on the Log tab. This logging contains approval information, for example; however, it does not contain notes from the individual steps. These can be viewed via the annotation history.
The contents of the Log tab can be copied to the clipboard via the context menu or pressing Crtl+E.
Escalation for Standard Ad-hoc Activities
An escalation set up in the model can be assigned to an activity in a circulation slip. The following escalations are possible for all activities in the standard ad-hoc workflow:
-
Remainder e-mail
If a process step has arrived in a user's inbox and is not forwarded within a specified time period, the user will receive an e-mail to this effect. The time period will be specified via the Due on and At fields.
This is subject to the e-mail address being specified in the workflow user administration.
-
Automatic forwarding
The process step is automatically forwarded to the follow-up activity when the end of a time period is reached. Both personalized and non-personalized work items are forwarded. The preset time period of two days can be changed in the Due on and At fields.
-
Assigning a work item to a substitute
If a process step arrives in a user's inbox and is not forwarded within a specified time period, the process step will automatically be assigned to the substitute. The time period is specified in the Due on and At fields.
For this to happen, a substitute must be set up in the workflow user administration.
 areas. Use the toolbar to show all hidden areas at once:
