Configuring Subprogram Types
In the configuration, specify how subprograms transfer data in the configuration (see 'Assigning Subprograms'). You can configure data processing with the configuration program of a subprogram type.
The configuration program AXRCCONF is assigned to most of the subprogram types.
AXIMGIMP, AXVALID, AXMAILDC, and AXIMPMDC are each used as both the subprogram type and configuration program. To configure them, you only need to specify a path to a temporary directory or to the desired data when you start the subprograms in configuration mode.
Start configuration programs as follows:
|
|
Select the subprogram and click Configure on the START tab. The configuration program will start. |

Now specify the path to the images for AXIMGIMP in the Edit subprogram types dialog (see 'Assigning Subprograms') with the parameter '/S' in the command line. AXIMGIMP does not have to be started in configuration mode.
|
Example: |
|

You can optionally specify a temporary image directory for AXVALID, for example, a local directory for the workstation. When the program is started, the images are copied there and then presented for validation from this directory.
Specify the path to the required configuration file for AXMAILDC and AXIMPMDC.
Set up a database connection to an external database and complete the value, search, and synchronization fields for enaio® database synchronization.
AXRCCONF
The configuration program AXRCCONF is assigned to the subprograms AXDSCAN, AXTWSCAN, AXICSCAN, AXFINER, AXNOOCR, and AXIMPORT.
AXRCCONF can be started by selecting Configure from the context menu of a subprogram. It does not matter which subprogram linked to AXRCCONF was previously selected. AXRCCONF administers the configuration settings in a configuration file.
In the program window you can find the tabs assigned to process components.
General/Scan
Optionally, enter a temporary directory for the images of scanned pages on the General/Scan tab, e.g., a local directory. After scanning, the images are moved from this temporary directory into the following directory:
...\ASIndex\AXINDEX.DAT\configuration name\BATCH_ID
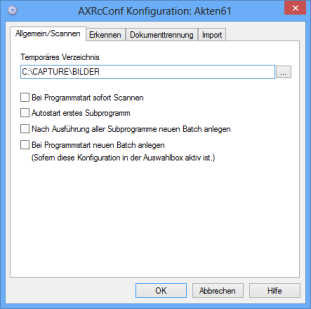
With the Start the first subprogram automatically option, you can set the scan subprogram to start immediately when a new batch is created and to start scanning immediately and forward the scanned pages and batch.
Furthermore, there are two options available for automatic batch creation.
The Create new batch after execution of all subprograms option is used to specify to automatically create a new batch as soon as a batch has executed all subprograms and has been moved to the filing tray.
If you activate the Create new batch at program start option, a new batch is created every time enaio® capture is launched, provided that the configuration selection menu is shown (see 'Rights to Delete Batches') and the respective configuration selected. Make sure that the first subprogram does not contain a non-locked batch and the last subprogram is not run on an autostation; otherwise, both options will not be available.
Recognition
The Recognition tab contains further tabs:
- Field attributes
Indexing fields are defined here.
- Fixed field attributes
Indexing fields that should receive constant values must be defined here.
- Field replacements
According to the value, you can assign another value to automatically indexed fields.
- Regex
Working with text recognition, regular expressions can be specified to filter recognized text.
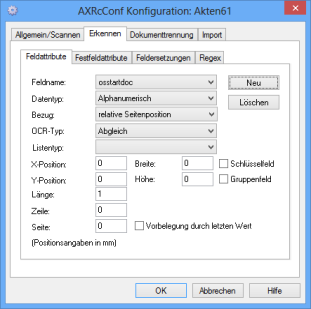
Field Attributes
On this tab you can define, edit, or delete the indexing fields of the documents. For import, it is also possible to assign indexing fields of enaio® objects (see 'Field Mapping') to these indexing fields.
Many fields and large amounts of content may lead to errors during processing since SQL statements become too long. Please keep this in mind when specifying the number of fields and the data type.
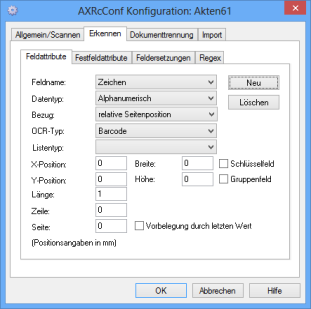
You can set up new indexing fields by clicking the New button and remove them by clicking the Delete button. Choose the indexing fields which you want to edit from the Field name list.
Assign a Data type to indexing fields:
|
Data type |
Format |
Length |
|---|---|---|
|
Alphanumeric |
All characters |
Database-dependent number of characters |
|
Numeric |
{0...9} |
max. nine characters |
|
Date |
YYYYMMDD |
Ten characters |
|
Decimal |
XXXXXXXXXX.NN |
Ten characters before the decimal point, two characters after the decimal point. |
For indexing fields completed by the barcode recognition or OCR system, you will have to define a recognition area on the pages where barcodes or characters will be searched.
If you select Reference: Relative page position, you can specify the area with coordinates.
|
Field |
Description |
|---|---|
|
X position |
Upper left corner of the horizontal recognition area in mm |
|
Y position |
Upper left corner of the vertical recognition area in mm |
|
Width |
Width of the recognition area in mm |
|
Height |
Height of the recognition area in mm |
|
Length |
Length of the indexing field (number of characters). If the data type is 'Decimal', enter the amount of characters before the decimal point. If the data type is 'Date', enter '10' as length. In addition to the length, you can set a minimal and a maximal value separated by commas. If the amount of recognized values is not part of this area, the value is classified as invalid and will not be used. Example: 10,4,10 Note: Enter '10,8,8' for a barcode date in the format 'YYYYMMDD'. The data type 'Date' requires '10' as its internal length; the date to be recognized has a minimum and maximum length of exactly eight. |
|
Line |
Barcode line (if the OCR type is 'Barcode') |
|
Page |
No longer supported |
You can copy and paste the coordinates of an area using enaio® client into an archived sample document. To do so, select an area and copy the coordinates to the clipboard by pressing ALT+C. Insert the data using the Ins key into one of the fields X position, Y position, Width, or Height.
Choose Reference: Other Field to import values from another index field, e.g., to allocate information from one barcode to several indexing fields. This other indexing field itself should not reference another indexing field.
|
Field |
Description |
|---|---|
|
Reference field |
The indexing field to be read. |
|
Start |
The position of the first character in the indexing field that will be read out. |
|
Length |
The number of read characters. |
|
Field length |
The maximal number of characters that can be entered in the indexing field. |
Choose an OCR type for an indexing field. Indexing fields referring to another index field do not need an OCR type.
|
OCR Type |
Description |
|---|---|
|
Barcode |
Barcode recognition |
|
Omnifont |
OCR recognition of laser print pages |
|
Omnifont numeric |
OCR recognition of numbers. If other characters appear, recognition will fail. |
|
Omnifont replacement |
OCR recognition for which intelligent character replacement can be configured in place of complete field replacement. |
|
Dot matrix |
OCR recognition of matrix printed pages |
|
ICR |
Recognition of handwritten characters |
|
ICR numeric |
Recognition of handwritten, numeric characters |
|
Synchronization |
The indexing field is left empty to be completed by a pre-check or after-check program, for example. Choose this type even if the indexing field is completed manually. |
|
Selection |
Recognition of black corners. Black corners are blackened-out areas on document areas, which can very likely be recognized. This method is applied to improve the quality of document splitting. |
|
Accumulative adjustment |
Fields of this type are completed by the user at the start of validation. The entered value will then be applied to all documents; it can however be overwritten when validating individual documents. |
Using the List type field you can assign a catalog list to indexing fields which have been created in enaio® editor and assigned to a field. The properties of catalog lists, e.g., width and height of tree catalogs, based on the individual catalog settings in enaio® editor. In AXVALID, you can then select values from the catalog list using a catalog button for this field.
You can assign the Key fields option to indexing fields. A recognized value is automatically transferred to the next pages, as long as no new value has been identified.
The automatically transferred value will not be shown in AXVALID but applied to the following document splitting and import steps. If a user enters a value into a key field of AXVALID, this value will also be used for document splitting and import for the next pages if no new value has been determined or entered.
Key fields are not labeled specifically in AXVALID. Therefore, inform the user if you use this option.
If you select several fields as group fields, a check is performed to determine if all group fields are filled or if they are all empty. If neither of these situations is the case, the user will be notified as soon as another document is selected.
If Initially filled with last value is selected, fields will automatically be filled with the last entered value and shown in color when displaying the page at validation. The value can be transferred.
If you select the Obtain confirmation before processing option, the user can change the fixed value globally for all pages in AXVALID.
Fixed Field Attributes
With the Fixed field attributes tab you can define fixed fields, i.e., indexing fields with preset values.
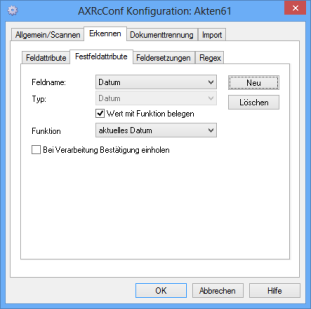
You can set up new fixed fields using the New button and remove them using the Delete button. Choose the fixed fields you want to edit from the Field name list.
You have to assign a type to fixed fields:
|
Data type |
Format |
Length |
|---|---|---|
|
Alphanumeric |
All characters |
Max. 248 characters |
|
Numeric |
{0...9} |
Max. 248 characters |
|
Date |
can be selected using Function |
|
Enter the value for the fixed field in the Value field.
If you want to set up a field in which the user enters a value for all documents, you can create an Accumulative adjustment field type.
Select the Set value with function option to assign a function to the fixed field from the Function list. The respective data type is selected automatically.
|
Function |
Data type |
|---|---|
|
Current date |
Date |
|
Current year |
Alphanumeric |
|
Current quarter |
Alphanumeric |
|
Current YYYYMM |
Numeric |
|
Current YYYYMMDD |
Numeric |
|
Current month |
Alphanumeric |
|
Current quarter or year |
Alphanumeric |
If you select the Obtain confirmation before processing option, the user can change the fixed value globally for all pages in AXVALID.
The individual fixed fields can be edited in AXVALID.
Fixed fields that are not important for validation and do not have to be displayed, can also be set up using the import wizard (see 'The Import Wizard').
Field Replacements/Character Replacement
Depending on the value, you can assign another value to indexed fields on the Field replacements tab. The replacement value replaces only an entire field value.
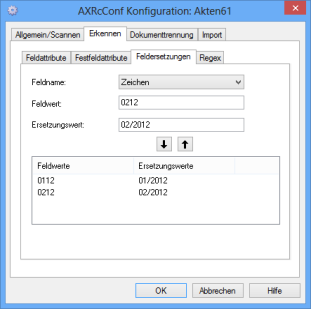
Choose an indexing field from the Field name list.
Enter the value to be replaced automatically in the Field value field.
Enter the value replacing the field value above in the Replacement value field.
Use the arrow button to add the selected combination of a field value and a replacement value to the list in the area below. You can add further combinations. The area below cannot be edited. If you want to modify or delete combinations, select them and use the arrow button to delete them from the list.
In fields with the OCR type Omnifont replacement, strings within the field values cannot be replaced. Strings and replacement values can be assigned more than once. Assignments are processed from the top down according to the list order.

Regex
Choose a field name and enter a regular expression. Text recognized by the text recognition program is filtered by this regular expression.
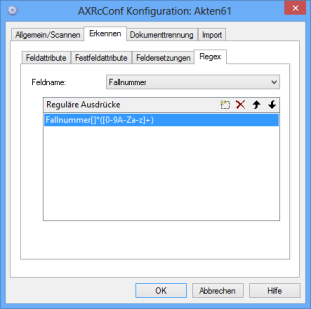
This function is only available together with text and barcode recognition.
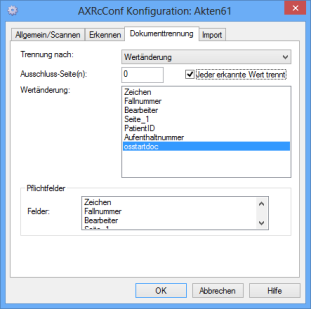
Document Splitting
On the Document splitting tab, enter the criteria to specify how individually scanned pages are merged into documents.
Choose the following criteria from the Split after field:
- By number of pages
- Field value
- Value change
Specify the chosen criterion with the following fields.
Criteria for document splitting cannot be combined.
Splitting Documents by Number of Pages

If all documents have the same number of pages, enter this value in the Number of pages field.
Enter the pages you do not want to import into the new document in the Exclude page(s) field.
Example: 1;4;9-11
If a field marked mandatory field is empty on a document, it will not be imported and it will remain in the batch.
Splitting Documents by Field Values

For splitting by field value, you can enter conditions for indexing fields. If a condition has been fulfilled on a page, a new document will start with this page. All following pages will be assigned to the document until another or the same condition has been fulfilled. The first document starts with the first page.
A field value condition consists of a Field, a Logical operator ('=', '<', '<=', '>', '>=', 'IsNull', 'IsNotNull'), and a Value. The entries in these fields can be transferred to the field value conditions list by pressing the Add button. Several field value conditions are linked using the logical OR operator.
If you enter a value which is not equal to 0 in the Exclude page(s) field, the first n-pages of the document will not be passed to the new document.
If a field marked mandatory field is empty on a document, it will not be imported and it will remain in the batch.
Splitting Documents by Value Changes
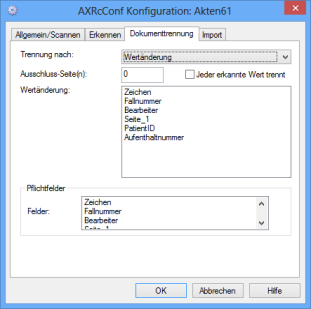
For splitting by value change, specify indexing fields where a value change marks the beginning of a new document. If an indexed field on a page is followed by an empty field on the next page, this page will always be assigned to a page with the last recognized value.
If you select Every recognized value splits, no comparison with the contents of the last value change field will take place and the available information in the value change field will be used as the splitting criteria. An empty field cannot be a recognized value.
If you enter a value which is not equal to '0' in the Exclude page(s) field, the first n-pages of the document will not be imported into the new document.
If a field marked mandatory field is empty on a document, it will not be imported and it will remain in the batch.
The 'Beginning of document' Checkbox
You can set up a checkbox for document splitting that is selected during validation either manually or via a script and thus indicates the beginning of a document.
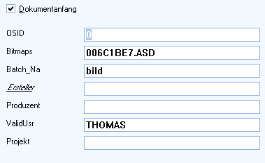
The Beginning of document checkbox will be shown automatically at the top of the data area during validation.
To do so, set up a field with the following attributes:
|
Field name osstartdoc, Data type Alphanumeric, OCR type Synchronization, Length 1.
|
|
Define this field as the value change field on the Document splitting tab:
|
Splitting by value change, Value changed osstartdoc, Additionally select Every recognized value splits.
|
|
Import
Enter a data source which is used in creating a database table for recognition in the ODBC connection field on the Import tab. Pages, indexing fields, and index values are assigned to each other in the database table. The table directory has to be located in the ...\ASINDEX\AxIndex.dat directory.
In Unicode installations, some components of enaio® capture are installed as both 32-bit and 64-bit components. For that reason, you need two identical data sources, one created with the 64-bit ODBC tool and one created with the 32-bit ODBC tool. If you are unable to obtain two identical data sources, then install the corresponding Microsoft Database Access Engine found in the Prerequites directory of the installation data.
The number of characters which an alphanumeric field may contain depends on the database used (see 'Field Attributes').
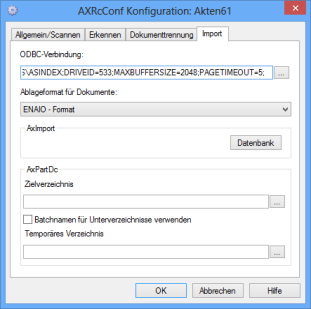
Pages can be stored in the enaio® format or as PDF files. Provided that FineReader is installed and licensed accordingly, PDF files are created whose text can be highlighted and copied. Otherwise, PDF files will be image files with PDF headers.
Choose the enaio® format and the pages will be filed in the module-specific standard file formats, but with archive-specific file extensions.
In the AxPartDc area, you can enter a destination and a temporary directory for AXPARTDC (see 'AXPARTDC').
The text files/dBase files (32-bit) are placed in the target directory and the image files are placed in subdirectories labeled with the batch ID.
The Use batch name for subdirectories option specifies that the specified batch names will be used instead of the batch ID for subdirectories and that the corresponding text files/dBase files (32-bit) will also be placed in the subdirectories.
If data is saved by multiple workstations to a central directory, unique directory names are required.
With the Database button you can open the import wizard which you can use to assign enaio® document types to documents and define the archive location.
The Import Wizard
The import wizard offers many possibilities to import data into the archive. It is also used to configure automatic actions of the type 'Data/Document import'. Several options can be used for data import but not for file import. These options are not described in detail since documents are usually imported with enaio® capture.
System ID
In the first dialog in the import wizard, you can enter a system ID for all documents. Documents with a system ID consist only of the indexing data in enaio®. The files are located in another archiving system. A link to this archiving system will be set up with the system ID. You do not need a system ID to import image files.
Click Next.
Fixed Fields
You can set up further fixed fields with the second dialog. Fixed fields created using AXRCCONF (see 'Fixed Field Attributes') can be displayed and edited during validation. Fixed fields set up with the import wizard are created during the import step.
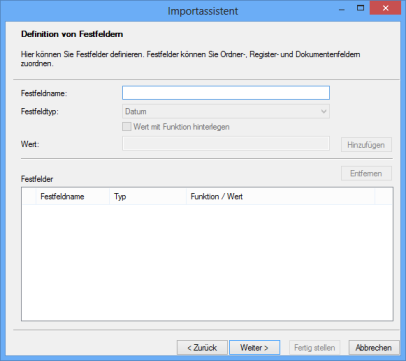
When configuring fixed fields, you also specify a data type, a value, or a function.
Click Next.
Object Connections
In enaio® you can connect objects you want to import with a note with other objects.
Object connections are created as follows:
|
1. |
Select the Create new object connection option and enter a Name for the object connection.
Click Next. |
|
2. |
Select the object type to which you would like to reference via the notes of the imported documents.
Click Next. |
|
3. |
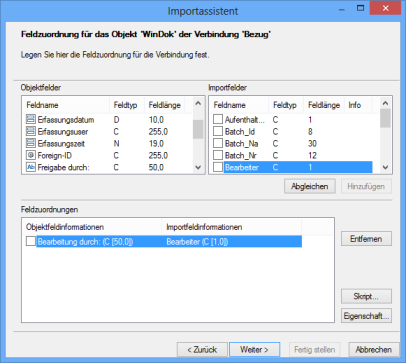
Create one or more field mappings. Use field mappings to specify import field data for searches in object fields of objects of the selected type. You can then use the notes of the imported documents to reference the objects retrieved this way.
Click Next. |
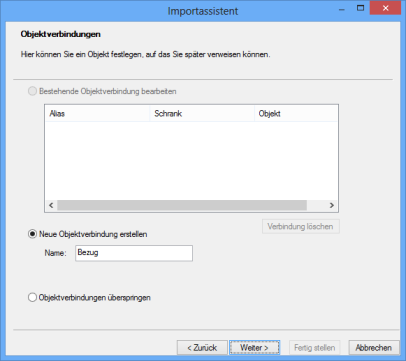

The Object connections dialog is shown again, now with a list of the configured object connection. You can create further object connections. If you do not require further object connections, select Skip object connections and click Next.
In the import wizard's subsequent dialogs, create a mapping between the 'Note' object field and the object connection that was created when mapping fields.
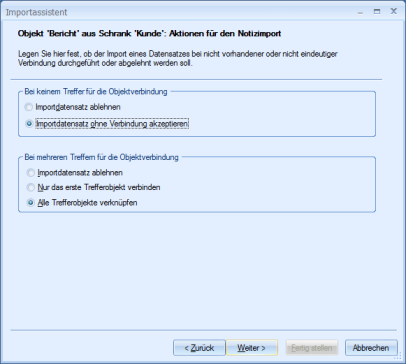
You also need to specify the import method if the object search for the note connection results in either zero or more than one hit.
Object Selection
Object connections is followed by Cabinet selection.
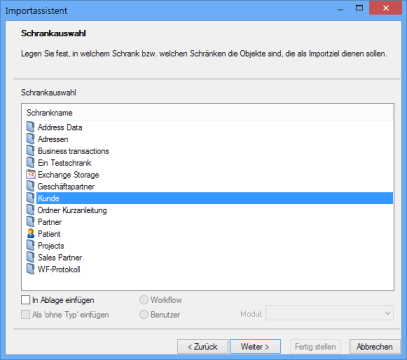
Documents can also be imported into a filing tray instead of a cabinet. The user can move it from there to the desired location in enaio® client.
You can select multiple cabinets.
Object selection is followed by Cabinet selection.
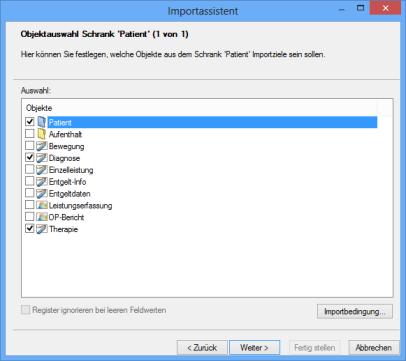
For every cabinet, choose the document type for which you want to create documents using the import data and optionally choose register types and the folder type.
If you do not choose register types or the folder type, documents of the selected document type are needed in the archive to define the location of import documents based on their location.
Field Mapping
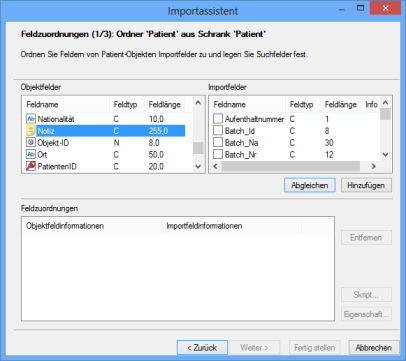
Afterwards, create field mappings for all selected objects.
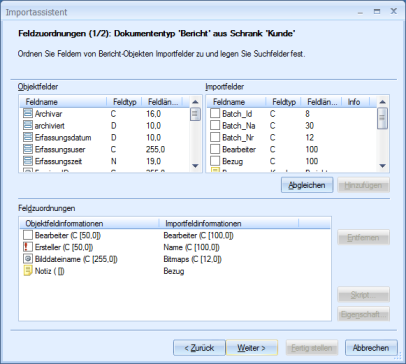
Map the import fields you created from the object definition of the selected object types. Create field mappings for each selected object type. For the image file, map the Image file name object field to the Bitmaps import field.
Objects are thus created with import field data, and they are indexed in the object fields.
If you do not define any field mappings as search fields, new objects will be created. Define field mappings as search fields to start a search via the mapping. New objects can be stored relative to the location of found objects, or import data can update the retrieved objects. The action can be set with the following Object action dialog.
Use the context menu or the Properties dialog to set the field mapping as a search field. The dialog can be opened using the respective button.
Object Action
When configuring search fields, specify the actions to be performed in case of one, multiple, or no hits in the Object actions dialog.

One hit:
- Update index data
Index data of the retrieved object will be updated with import data.
- Do not update index data
Index data of the retrieved object will not be updated.
- Execute master insert
If the found object is a document without pages, index data will be updated and the image assigned.
If the located object is a document with pages, a new document will be created at the same location.
- Create new index record
At the retrieved location, a new object with the indexing of the import record is created.
More than one hit:
- Do not import the active record into this cabinet
Neither a new object will be created, nor will an existing object be updated in this cabinet.
- Execute action "When there is one hit or a known location" for the first hit
The first hit will be taken and the action specified there will be executed.
- Update index data of the first hit object
The first hit's index data will be updated using the import data.
- Execute no action
No action will be taken for this object type.
- Delete copies
This option assumes that more than one identical and empty folder or document without pages was found. Then, only one object will be retained.
- Create new index data record (Location of first hit object)
At the location of the first hit object, a new object with data from the import record is created.
No hits:
- Do not import the active record into this cabinet
Neither a new object will be created, nor will an existing object be updated.
- Generate error message
The record will be flagged as corrupt. The import process will continue with the next record.
- Execute no action
No action will be taken for this object type.
- Create new index record
A new object with the indexing of the import record is created. The location will also be specified using the data from the index record.
For each case you will have to define whether or not to execute the Next action. The next action would be the import of data into a further cabinet.
Also specify whether to include Search fields in actions. If search fields are included, the index data of search fields will also be updated.
Document File Processing
You can define how document files will be processed if documents already exist. Specify whether existing document files will be replaced or retained, or if new document files will be attached to the old ones.
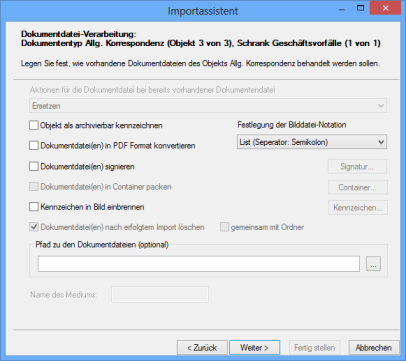
The notation is always 'AS notation', and you do not need to enter a path to document files.
When working with container documents, use the Container button to open the Container Properties dialog and specify the properties, just like you would when creating a new container document in enaio® client. The container is administered as a ZIP archive and may contain any file format.
Document files can be signed if you have access to an appropriate signature system. Signing is done using Mentana which can run locally at the workstation or as a web service.
Documents available in TIFF, JPEG, or PDF format may be specially labeled. To do so, select the respective option and click Flag to open a dialog where you can set the flag properties.
Sequence
If you configure search fields and object actions for multiple object types, you can also specify the order in which objects and search fields will be searched and the object actions processed.

If you select the order folder/register/document, folders will first be searched and folder object actions will be processed, followed by registers in relation to folders and objects in relation to registers or folders.
If you enter another priority, the object actions will not be processed relative to each other.
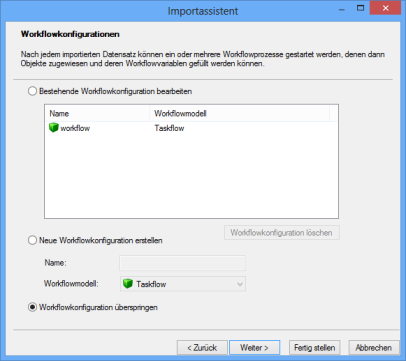
Add a Workflow Process
You can add a workflow process start to any data import. The import data transfer will then start the workflow process. References of the objects created through data import can be inserted into the workflow file.
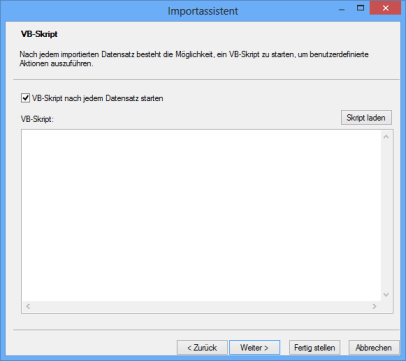
VB Scripts
After importing single or multiple data records you can run a script.
To do so, you can upload an existing script or paste it from the clipboard into the script area for editing.
Database Statistics
Here, you can define if and how database statistics will be updated. Database statistics have a major impact on database performance.
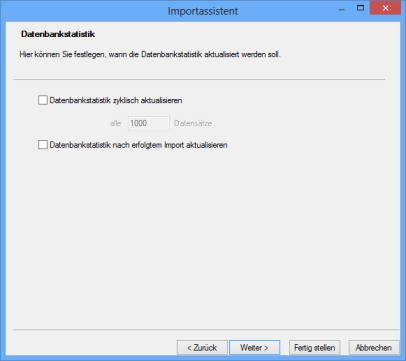
You can set the following options:
- Update database statistics cyclically
Please enter how many data records you want to update in the all ... data records field.
- Update database statistics after successful import
After import, an update will be carried out.
Log Settings
Independent of the logging in the enaio® system, every import process will be logged to the osimplog.xml file located in the import directory. If it is not possible to write to the import directory, the file will be created in the local working directory. In addition, the osimplog.xslt style sheet with which the log file can be displayed as an HTML file will be created automatically.
If an import process is canceled due to errors, it can be restarted after data correction and continued at the point where it was aborted based on the log file information and the import process security copy (see below).
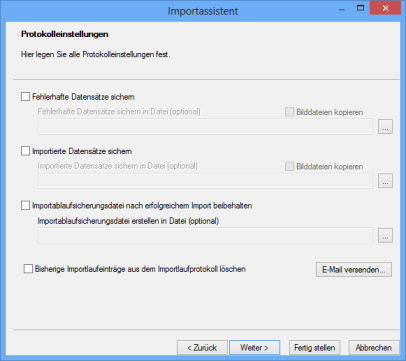
The following settings are possible:
- Save corrupt data records
Corrupt records will be saved. The file will be written to the batch directory and named name_err.
Corrupt records have a database format that is incompatible with the settings.
In the Save corrupt records field, you can specify a file where corrupt records will be saved and copies of the image files can be created.
- Save imported records
Correctly imported records will be saved. The file will be written to the batch directory.
In the Save imported records field, you can specify a file where corrupt records will be saved and copies of the image files can be created.
- Create import process security copy
A process security file will be created. It will have a binary format and will be written to the batch directory.
In the Create import process security copy field, you can specify a file where data will be saved.
- Delete previous import process entries from the import process log
If you select this option, the log file osImpLog.xml will not be continually extended; rather, for every import only the last import summary will be saved.
Optionally, you can select Send e-mail to receive e-mail notification when import errors occur.
Summary
Finally, a summary of your import settings will be displayed.
You can choose between a tabular and an XML view, and between saving and printing the files.
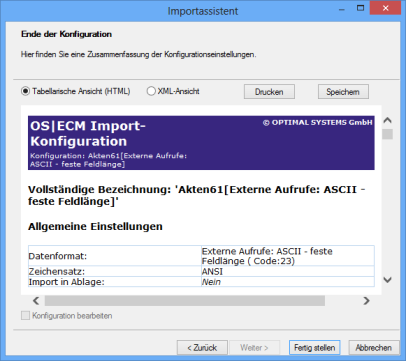
Click Done to save the configuration.
AXICSRV
If the Kofax engine has been installed and configured and you have defined AXICSRV as the configuration program for AXICSRV, you can access the Kofax filter and enter the barcode properties.
No configuration options are offered without the Kofax Engine.
Start AXICSRV in the configuration mode to open the following window:
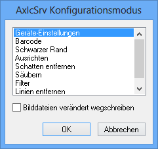
The listed filters can be used before recognition. If you select the Save modified image files checkbox, the image files will be saved based on the filter settings.
Double-click a list entry to choose and configure a filter.
You can specify barcode properties using the Barcode entry.
The filters conform to those in the Kofax scan dialog.
The selected settings are saved for this configuration.
enaio® database synchronization
With enaio® database synchronization, records in the enaio® capture database can be synchronized with data from an external database.
For enaio® database synchronization, also specify enaio® database synchronization as the configuration program. You will need to enter the data of the connection to the database as well as the desired database fields for the synchronization.
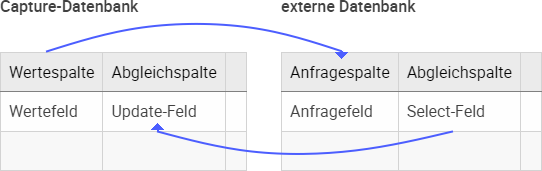
Schema:
The configuration can be done in wizard or expert mode. The wizard mode helps you formulate the SQL statements.
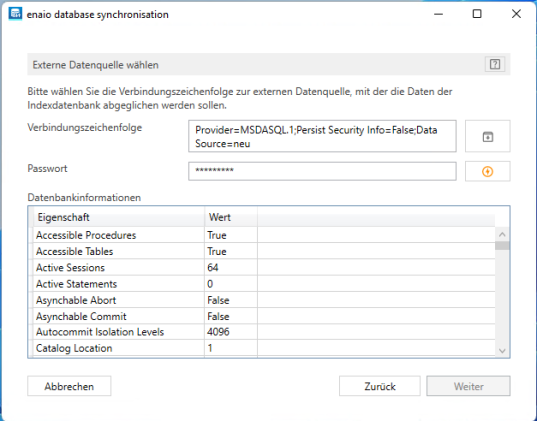
Connection Data
If you start enaio® database synchronization in configuration mode, then specify the external data source from which the data should be transferred. Database information is displayed in accordance with the connection.
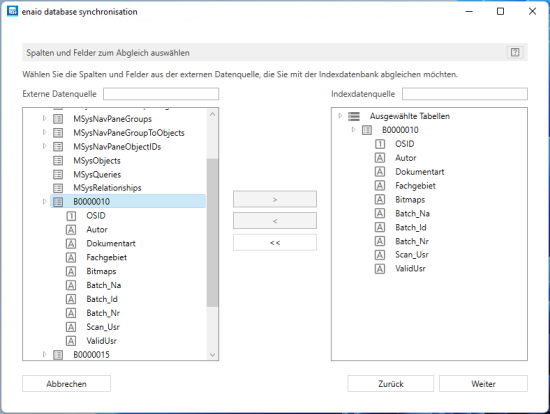
In the next step, select tables and columns from the external database from which the data should be transferred.
You can use arrow keys to select tables with all columns or select only individual columns.
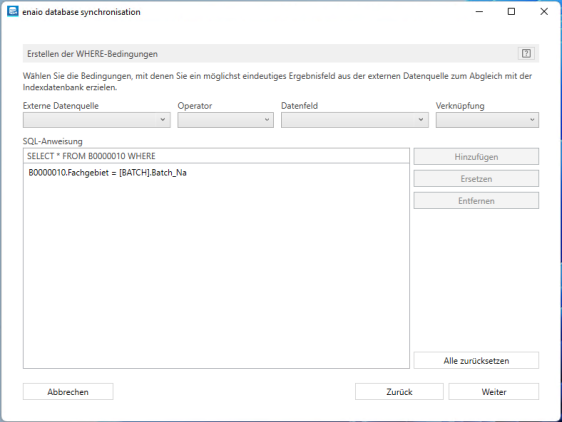
In the next step, create an SQL statement that will be used to query a field from the external database using a value from a data field in the enaio® capture batch database table.
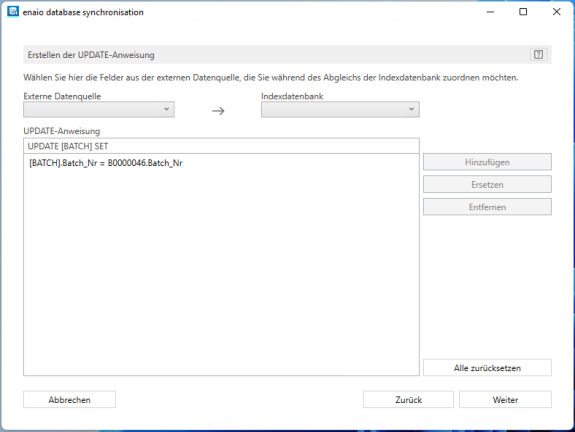
In the following step, create an SQL update statement that will be used to update a field from the enaio® capture batch database table with the corresponding value of the SQL query.
The last step displays a summary of the configuration.
You can always use buttons to navigate between each step. Click Done to save the configuration.
 areas. Use the toolbar to show all hidden areas at once:
