Subprogram Types
The following subprogram types are available:
|
Scanning with Kofax Image Products |
|
|
Scanning with TWAIN |
|
|
Scanning and barcode recognition with Kofax |
|
|
Import of image and PDF files |
|
|
Barcode recognition with Kofax or ZBar |
|
|
OCR/barcode recognition with FineReader |
|
|
Creation of a database table |
|
|
Manual indexing |
|
|
AXVBINAB |
AXVBINAB has been discontinued. Use enaio® database synchronization. |
| enaio® database synchronization | Data synchronization with an external database |
|
Document separation and import |
|
|
Document separation and sending |
|
|
Document separation, import, and sending of indexed values |
|
|
Document separation and creation of a dBASE table |
All subprogram types require further licenses at the processing workstation and must have a configuration program assigned.
The following subprograms are preconfigured:
|
Scanning and recognition (Kofax, B&W) |
AXICSCAN |
|
Scanning (Kofax, B&W) |
AXDSCAN |
|
Scanning (TWAIN) |
AXTWSCAN |
|
Scanning and recognition (Kofax, color) |
AXICSCAN /G |
|
Validation |
AXVALID |
|
Separation and import |
AXIMPORT |
|
Data and document provision (single page) |
AXPARTDC |
|
Data and document provision (multipage) |
AXPARTDC /M |
|
Data transfer from the database |
AXVBINAB |
|
Barcode recognition (ZBar) |
AXICSRV /N |
Scan and Image Components
To scan or import color images, enter the parameter '/G' into the Command line field of the Edit subprogram types dialog (see 'Assigning Subprograms').
Only black-and-white or color images can be processed at a time.
If you wish to scan or import both black-and-white and color images, you have to create two subprogram types for each component, one with and the other without the parameter '/G', and configure them separately.
Barcode recognition is only available for color images, provided that your Kofax engine supports this function.
AXDSCAN
You can use AXDSCAN for scanning with Kofax Image Products. Define AXRCCONF as the configuration program. Running AXDSCAN in the configuration mode allows you to specify a temporary directory into which scanned images are filed. The images will be filed by default in the following directory:
...\ASINDEX\AXINDEX.DAT\configuration nameAXDSCAN is followed by a recognition program or AXNOOCR.
Enter the following parameters into the command line of the Edit subprogram types dialog (see 'Assigning Subprograms'):
|
/G |
If you only want to scan color images, enter the parameter '/G'. |
|
/A |
You can use the parameter '/A' if scanned pages are to be temporarily converted into uncompressed TIFF files in order to use the automatic color recognition offered by Kofax VRS. For filing scanned pages, black-and-white pages will be automatically converted into TIFF-G4 format, and grayscale as well as color pages will be converted into JPEG format. If both the '/G' and '/A' parameters were defined, '/G' is ignored. |
The SCA module has to be licensed at the processing workstations. In addition, a matching Kofax engine must be installed and configured.
Scan parameters and scan filters are set by the user.
AXTWSCAN
AXTWSCAN is used for scanning via the TWAIN interface. Define AXRCCONF as the configuration program. Running AXTWSCAN in configuration mode allows you to specify a temporary directory into which scanned images are filed. The images will be filed by default in the following directory:
...\ASIndex\AXINDEX.DAT\configuration nameAfterwards, a recognition program or AXNOOCR follows AXTWSCAN.
The STW module must be licensed on the processing workstations.
The TWAIN source and scan parameters are defined by the user.
AXICSCAN
AXICSCAN comprises scanning with Kofax and barcode recognition. Define AXRCCONF as the configuration program. Running AXICSCAN in configuration mode allows you to specify a temporary directory into which scanned images are filed. The images will be filed by default in the following directory:
...\ASIndex\AXINDEX.DAT\configuration nameFurthermore, you can define indexing fields and specify a database source in the AXRCCONF configuration program. Unlike in AXICSRV, barcode recognition in AXICSCAN is configured very precisely.
Afterwards, either the validation program AXVALID or a document separation and import program follows AXICSCAN.
Enter the following parameters into the command line of the Edit subprogram types dialog (see 'Assigning Subprograms'):
|
/G |
If you only want to scan color images, enter the parameter '/G'. |
|
/A |
You can use the parameter '/A' if scanned pages are to be temporarily converted into uncompressed TIFF files in order to use the automatic color recognition offered by Kofax VRS. For filing scanned pages, black-and-white pages will be automatically converted into TIFF-G4 format, and grayscale as well as color pages will be converted into JPEG format. If both the '/G' and '/A' parameters were defined, '/G' is ignored. |
The SIC module must be licensed on the processing workstations. In addition, a matching Kofax engine must be installed and configured.
Batch processing errors may occur due to the use of high-performance scanners and sophisticated barcode recognition. If this is the case, allocate the process steps 'scanning' and 'recognition' to individual subprograms and workstations.
AXIMGIMP
AXIMGIMP is used to import image files. Image files must have one of the following formats: JPEG, TIFF, BMP, PCX, TARGA, or GIF. PDF files can also be imported.
Define AXRCCONF as configuration program.
Enter the following parameters into the command line of the Edit subprogram types dialog (see 'Assigning Subprograms'):
|
/A |
Use the parameter '/A' to specify the shared import of black-and-white, grayscale, and color images. Black-and-white images are filed in TIF format, and grayscale and color images in JPEG format. |
|
/G |
If you want to import only color or grayscale images, enter the parameter '/G'. |
|
/S |
To specify paths to image files, enter the parameter '/S' plus the directory path. |
|
/R |
The parameter '/R' is entered if you want the image files contained in subdirectories to be imported, too. |
|
/M |
Enter the parameter '/M' to have a file selection dialog opened from which you can select all image files to be imported. Additionally, enter the parameter '/S' and a path to define a root directory which will be displayed in the selection dialog. |
|
/O |
This parameter is used to have a file named batch_name.LST saved to the batch directory. This tab-delimited file contains the name of the source and the destination file. |
|
/D |
Type the parameter '/D' to have the image files deleted after import. Without entering this parameter, image files will be renamed by having the extension BAK added to their file names after import. |
|
/B |
By using the parameter '/B' and specifying the directory path, image files can be moved after a successful transfer. If both the '/D' and '/B' parameters were set, '/D' is ignored. For each batch, a new directory named after the batch is created into which the images to be imported are moved. If the '/R' parameter is also set, then the subdirectory structure with all images will be moved to the designated directory. |
|
|
Use the parameter '/PDF' if you want to import PDF files instead of image files. Images are automatically generated from individual PDF pages and can be displayed in the validation window. You can also specify the resolution in DPI of the images to be created, e.g., '/PDF300'. The default value of the resolution is 200 DPI. If a PDF page contains exactly one image, the image resolution is determined for image generation. If it is not possible to determine the resolution, the default value is used. The available filing formats are PDF and the enaio® format. In case of PDFs, the individual pages of a PDF file will be saved in a single file. When using the enaio® format, all individual images that were generated for display in the validation window will be filed in enaio®. When generating PDF documents containing hidden text using FineReader recognition with the '/PDF' parameter, new PDF pages are only generated from the individual PDF pages if they don't contain text. |
Example: 
Provided that the parameter '/M' was entered, the user can select the directory containing the image files. All images available in the selected directory will be imported.
Afterwards, a recognition program or AXNOOCR follows AXIMGIMP.
The SFI module must be licensed on the processing workstations.
AXICSRV
AXICSRV works with Kofax® or ZBar and recognizes barcodes. ZBar is integrated into enaio® capture.
A matching Kofax engine must be installed and configured for barcode recognition. In no Kofax engine is installed, the barcodes are automatically recognized with ZBar.
ZBar has a limited functionality. With ZBar recognition, a barcode that appears several times on a single page is only recognized once. Barcodes that are not exactly horizontal or vertical are not recognized.
ZBar supports the following barcode types:
3of9, 2of5, EAN, UPC-E/A, Code93, Code128, Codabar, QR code, PDF417, ISBN-10/13
The REK module must be licensed on the processing workstations.
In contrast to barcode recognition with AXICSCAN, standard settings can be used. For that reason, barcode recognition does not have to be configured. To use the standard settings, define AXRCCONF as the configuration program. Running AXICSRV in configuration mode allows you to define indexing fields and specify a database source.
If you define as the configuration program, you can access Kofax filters and configure barcode recognition in the configuration mode (see 'AXICSRV').
Enter the following parameters into the command line of the Edit subprogram types dialog (see 'Assigning Subprograms'):
|
/N |
Specify the parameter '/N' if you would like to use ZBar barcode recognition despite having an installed Kofax Engine. |
Afterwards, either the validation program AXVALID or a document separation and import program follows AXICSRV.
The program flow does not require user action.
AXFINER
AXFINER is based on FineReader and recognizes characters. Define AXRCCONF as configuration program and enter the parameter '/Z' to enable recognition. The recognized data will be used for the configured indexing fields.
The recognition speed is controlled via the parameter '/F'. Set this parameter to enable FineReader's fast mode. As a result, the recognition speed will be twice as fast, whereas, depending on the document to be recognized, recognition results may be less accurate.
The default language of FineReader is German. To switch to another language or to specify several languages, customize the \asindex\AXINDEX.CFG configuration file.
Example:
[GENERAL]OCRLanguage=German,English,French
Running AXFINER in configuration mode allows you to define indexing fields and specify a database source.
Afterwards, either the validation program AXVALID or a document separation and import program follows.
To specify the barcode types to be recognized, use AXFINER as the configuration program and start it in the configuration mode. You can then select the barcode types or choose 'automatic recognition'. By default, the automatic recognition option is preselected. Add the command line parameter '/B' to run automatic barcode recognition, even though you have specified the barcode types to be recognized. Thus, this parameter can be used to switch automatic barcode recognition on and off without removing the specified barcode type setting.
The parameter '/S' is used to create a text file for each recognized page. If, instead of a full page, you want only a part of a page recognized, then add the parameter '/R' and define the page area to be recognized using data in the indicated order:
|
X position |
Upper left corner of the horizontal recognition area in millimeters |
|
Y position |
Upper left corner of the vertical recognition area in millimeters |
|
Width |
Width of the recognition area in millimeters |
|
Height |
Height of the recognition area in millimeters |
Example: 
Type the parameter '/PDF' to save recognized data as PDF files. This feature requires an additional FineReader license.
The parameters '/S' and '/PDF' can be combined to have the created files forwarded to a full-text indexing component following import.
AXNOOCR
AXNOOCR is needed only if you do not integrate recognition subprograms. AXNOOCR then creates the necessary database table. Define AXRCCONF as the configuration program. Running AXNOOCR in configuration mode allows you to define indexing fields and specify a database source.
Afterwards, either the validation program AXVALID or a document separation and import program follows AXNOOCR.
AXNOOCR does not need to be licensed via a module. The program flow does not require user action.
AXVALID
AXVALID is used to index both scanned and imported images. If a recognition program is run before, AXVALID allows you to check, correct, and complete the indexing. What's more, it simplifies indexing while eliminating errors. Pre-check and after-check programs can be integrated as well. You can furthermore define AXVALID as a configuration program. Running AXVALID in configuration mode allows you to specify a temporary directory into which scanned images are copied. From there, the image files will be presented for validation.
Afterwards, a document separation and import program follows AXVALID.
AXVALID also qualifies as error handling program for document separation and import. If you want to use AXVALID only as an error handling program, select the Error sensitive option in its configuration dialog. Then, batches will be passed only if AXVALID is specified as an error handling program of another subprogram.
The VAL module has to be licensed on the processing workstations.
Pre-Check and After-Check Programs for AXVALID
After record set processing, pre-check and after-check programs make it very easy to auto-populate and edit a document record's indexing fields.
Creating a pre-check or after-check program is simple. You can either write individual programs or use VB scripts. If you use VB scripts, the files axaddus.dll and oxvbs.dll have to be located in the same directory as AXVALID. The modules VBV and VBE must be licensed on the processing workstation. VB scripts are either obtained from OPTIMAL SYSTEMS GmbH or created by you using the VB editor (see 'VB Editor').
Both pre-check and after-check programs can change and complete the data AXVALID has written to a CFG file.
The flowchart:
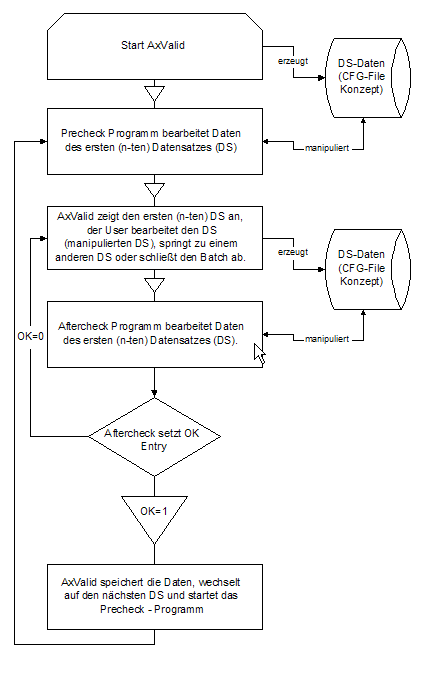
AxValid creates a CFG file containing the field information of a given record and saves it to the current temp directory. The path to the CFG file is passed as a command line parameter to the check program.
Structure of the CFG file:
| [DATA] |
//section with field contents, created by AxValid |
| {FIELD1}={<DATA>} |
|
| {FIELD2}={<DATA>}...{FIELDn}={<DATA>} |
|
| [RET] OK={0, 1} |
//Return values to AxValid, created by the after-check program |
After completing the check program, AxValid will fetch the data.
Pre-check and after-check programs can address a special function of AXVALID which facilitates user navigation. If you have any of the two check programs adding the '@' character to the first position of a data entry field, AXVALID will not show the character; instead, the editable field is highlighted in yellow. Thus, invalid indexing data can be flagged for the user. Once the user completes the data record, AXVALID saves the field entry without the '@' character, even if the field entry has not been edited.
Pre-check and after-check programs are integrated when configuring AXVALID. Open the dialog by selecting Batch options on the File tab. In the Path area, enter a path to the check program and its name.
AXVBINAB
AXVBINAB – enaio® capture datamatching – has been discontinued. Use enaio® database synchronization.
enaio® database synchronization
enaio® database synchronization is used to synchronize data of the enaio® capture database, where configured program flows are stored, with data from an external database. Consequently, the enaio® database synchronization’s flow requires the database to be set up and data to be entered beforehand. Provided that data has already been extracted with a recognition component and written to the database, AXVBINAB may follow after or be run before validation in the program flow.
You can also define enaio® database synchronization – OptimalSystems.enaio.inap.capture.exe – as a configuration program.
The component is licensed via the OCD module on the processing workstations. The program flow does not require user action.
AXIMPORT
AXIMPORT merges single pages into documents and imports the documents into enaio®. Define AXRCCONF as the configuration program. Running AXIMPORT in configuration mode allows you to specify criteria for document separation, assign a document type of the archive to the documents, and specify folders, registers, or the filing tray as the filing location. If the document separation or the import fails, invalid pages or documents will remain in the batch. Define AXVALID as the error handling program if you want to have the batch passed to AXVALID. There, the indexing can be corrected and completed, and the batch will be transferred to AXIMPORT afterwards. If the error is caused by an insufficient import assignment, the error can be corrected, and the batch can then be processed again.
AXIMPORT is licensed via the AIE module on the processing workstations. The program flow does not require user action.
In the Edit subprogram types dialog (see 'Assigning Subprograms') these parameters can be entered into the command line:
|
/D |
With the parameter '/D', the temporary ASCII files containing import data will not be deleted. This data can help you to find errors or erroneous assignments. |
|
/B |
Use parameter '/B' to enter a backup directory. After importing, backup files of the ASCII files will be filed to this directory. These files contain the IDs of the imported documents in the 'OSINDEX' column. If a document could not be imported, there will be no entry. If the directory does not exist, the import will not be carried out. |
|
/M |
With the parameter '/M' multi-page TIFFs can be created for the import of black-and-white image files in TIFF format. Errors will occur if images are not available as black-and-white TIFFs |
|
/OS |
PDF files are imported with an enaio®-specific file extension. |
AXMAILDC
AXMAILDC merges individual pages into documents. However, they will not be imported but sent as e-mail attachments. The e-mail details and the text can be obtained from the indexing of the documents. AXMAILDC gets this information from a configuration file that is created by you. Define AXMAILDC as a configuration program. If you start AXMAILDC in configuration mode, you can specify the path and the name in a configuration file which you have created. If the documents cannot be sent, they will remain in the batch. If the configuration file or the e-mail connection is corrupt, the batch can be processed again as soon as the error has been fixed. Set up AXVALID as the error handling program if the indexing is erroneous or insufficient. There, the indexing can be corrected and completed, and the batch will be transferred to AXMAILDC afterwards.
AXMAILDC is licensed via the AMT module on the processing workstations. The program flow does not require user action.
AXMAILDC Configuration File
Enter the sender, recipient, subject, and e-mail message text in the configuration file for AXMAILDC. You can apply values from the document indexing. The respective field names are surrounded by percent signs '%'.
An example:
| [MAIL] |
Header of the CFG file |
| FROM=%VON% |
Sender |
| TO=Klaus Peter |
Recipient |
| TO_CC=%CC% |
Cc |
| TO_BCC=%BCC% |
Bcc |
| SUBJECT=ASIndex from %DATUM% |
Subject |
| BODY1=Batch %BATCH_NA% BODY2=... |
E-mail message text. A maximum of ten lines is allowed. |
| ATTACHMENTS=%BITMAPS% |
The images are attached. |
For this example, the fields 'From', 'CC', 'BCC', and 'Date' must be set up. enaio® capture automatically presents the fields 'BATCH_NA' and 'BITMAPS'.
You can create the file with any text editor. Enter CFG as the file extension.
AXIMPMDC
Like AXIMPORT, AXIMPMDC merges individual pages to documents and imports them. In addition, an e-mail containing the indexed values of the document will be sent. Define AXIMPMDC as the configuration program. If you start AXIMPMDC in configuration mode, you can specify the path and the name of a configuration file which you have created.
For error correction, AXIMPMDC needs an indexing field with the name 'OSINDEX'. The field must be at least 11 characters long, and the data type has to be 'alphanumeric'. The field should not be indexed or assigned to an enaio® indexing field. In this field an imported document will be automatically indexed with a unique database number.
If documents cannot be sent or imported, they will remain in the batch. If the import assignment, the configuration file, or the e-mail connection is invalid or corrupt, the batch can be processed again as soon as the error has been fixed. Set up AXVALID as the error handling program if the indexing is erroneous or insufficient. There, the indexing can be corrected and completed, and the batch will be transferred to AXIMPMDC afterwards.
AXIMPMDC is licensed via the AMT and AIE modules on the performing workstations. The program flow does not require user action.
AXIMPMDC Configuration File
Enter sender, recipient, subject, and e-mail message text in the configuration file for AXIMPMDC. You can apply values from the document indexing. The respective field names are surrounded by percent signs '%'.
An example:
| [MAIL] |
Header of the CFG file |
| FROM=%VON% |
Sender |
| TO=Klaus Peter |
Recipient |
| TO_CC=%CC% |
Cc |
| TO_BCC=%BCC% |
Bcc |
| SUBJECT=ASIndex from %DATUM% |
Subject |
| BODY1=Batch %BATCH_NA% BODY2=... |
E-mail message text. A maximum of ten lines is allowed. |
For this example, the fields 'From', 'CC', 'BCC', and 'Date' must be set up. enaio® capture automatically presents the field 'BATCH_NA'.
You can create the file with any text editor. Enter CFG as the file extension.
AXPARTDC
AXPARTDC merges individual pages into documents and creates text files with fixed field lengths in Unicode installations and a dBASE table in ANSI installations. Based on this table, documents can be imported later on or in another context via the automatic action 'Data/Document import'. Define AXRCCONF as a configuration program. When you start AXPARTDC in configuration mode, you can specify a target directory for the data.
With the parameter '/M' and multiple black-and-white image files assigned to a document, the image files will be merged in a multi-page TIFF file.
Using the parameter '/OS', PDF files are imported with an enaio®-specific file extension.
In Ansi installations, AXPARTDC creates a dBASE table in the configured directory. Set up AXVALID as error handling program to save corrected data records in further dBASE tables. Enter the parameter '/A', if you need a dBASE table with all data for import or processing systems, which is usually the case. New data will be entered in the existing table. External components must not access the table simultaneously.
AXPARTDC is licensed via the AIE module on the processing workstations. The program flow does not require user action.
 areas. Use the toolbar to show all hidden areas at once:
