Creating Configurations
Configurations can be set up in the program window of enaio® capture. In this window, you will find the ribbon with tabs and the workspace. In the workspace, available configurations are displayed as a tree.
If you do not have the right to create configurations for enaio® capture, the necessary functions will not be displayed.
Creating New Configurations
To set up a new configuration, perform the following steps:
|
1. |
Click Create on the START tab. |
|
|
|
The Choosing an ASFORM Configuration window will open.
The list offers all enaio® capture configurations already created. These configurations cannot be applied. You can apply and update enaio® capture configurations which have been deleted whose directory structure and logs of were kept. |
|
|
2. |
Click the New button. A field to name the configuration will be displayed in the workspace. |
|
|
3. |
Enter a name in the designated field. A maximum of 100 characters can be entered; spaces or special characters are not allowed. Only the underscore '_' is permitted as a special character. Names are not allowed to begin with a number. |
|
|
4. |
Click outside the field on the workspace or press Enter. |
|

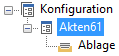
The new configuration will be shown in the workspace. A filing tray icon will be added automatically.
Once a user adds a batch to the configuration, i.e., starts a configuration, the following directory will be created in the enaio® ASINDEX\AXINDEX.DAT directory:
\CONFIGURATION NAME\BATCH_IDIn this directory, all batch data is saved.
If you start enaio® capture with the command line parameter '/W' and a specified path, the AXINDEX.DAT directory will be created for the batch data at the specified path.
You can copy a selected configuration by selecting Copy in the context menu or clicking the START tab. It will be automatically added without a name. You will need to enter a new name.
Defining User Rights for a Configuration
You can assign user groups to a configuration. The configuration in enaio® capture will then be displayed only to members of assigned groups. By default, new configurations are visible to all user groups.
It is possible to define whether a user who does not have the right to set up configurations is allowed to delete assigned batches.
Assigning User Groups
To assign user groups to a configuration, perform the following steps:
|
1. |
Select a configuration and click Edit on the START tab. |
|
|
|
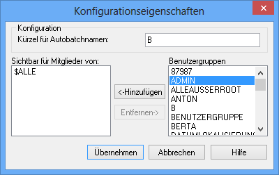
The Configuration properties window will open.
By default, configurations are visible to all user groups. |
|
|
2. |
Select the All entry from the Visible to members of list and delete it from the list by clicking the Remove button. |
|
|
3. |
Select the user groups which you want to allow to edit the configuration and add them to the Visible to members of list by clicking the Add button. |
|
|
4. |
Click the Apply button. |
|
|
The window will close and the user rights will be saved. |
||
Rights to Delete Batches
It is possible to define whether a user who does not have the right to set up configurations is allowed to delete assigned batches.
|
1. |
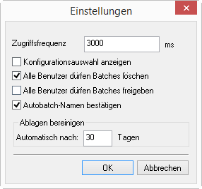
Click Settings on the File tab. The Settings window will open.
|
|
2. |
Select the All users are permitted to remove batches option or untick the option. |
|
3. |
Confirm by pressing OK. |
|
The selected user rights will be saved. The Settings window allows you to specify at what frequency enaio® capture updates changes made to configurations and batches. Select or clear the Show configuration list option to specify whether users can use the Select configuration list box on the toolbar of enaio® capture. You must restart enaio® capture for the settings to take effect. Select the All users are permitted to unlock batches option if you wish to assign this permission to all users. Specify whether it is necessary to confirm automatically generated batch names by ticking the Confirm Autobatch names option. The option is only available when the Autobatch function is enabled in the ribbon. In the dialog, you can also define whether the contents of the filing tray should be automatically deleted after a predefined period of time. |
|
Deleting Configurations
You cannot delete configurations that still contain unprocessed batches. These batches have to be deleted first. However, batches from the filing tray containing only logs do not have to be deleted beforehand.
How to delete configurations:
|
|
Select a configuration and click Delete on the START tab. |

You will be presented with a confirmation dialog and can then decide whether to keep or remove the directories created for the configuration. These directories contain the configuration's log files. If you do not wish to keep the directories, the logs will be removed as well.
 areas. Use the toolbar to show all hidden areas at once:
