Setting Up Users
While installing enaio®, a user with a default user account will be created. This user has the 'DMS: Supervisor' system role. You will need to delete this user account immediately the first time you log in to enaio® administrator, or at minimum change the password and create a new supervisor.
There must always be at least one user with the 'DMS: Supervisor' system role.
Users with the 'DMS: Supervisor' system role are flagged with a special icon: 
Follow these steps to set up users:
- Open the Security system window.
- Click on the User administration tab.
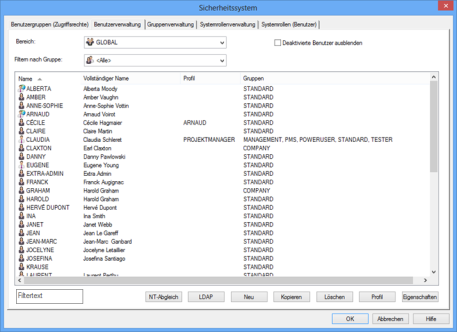
All existing users will be listed.
You can filter users by groups and hide users whose accounts are disabled and reduce the list using filter text.
- Click the New button.
- The User configuration window will open.
- Set up a new user on the User data tab.
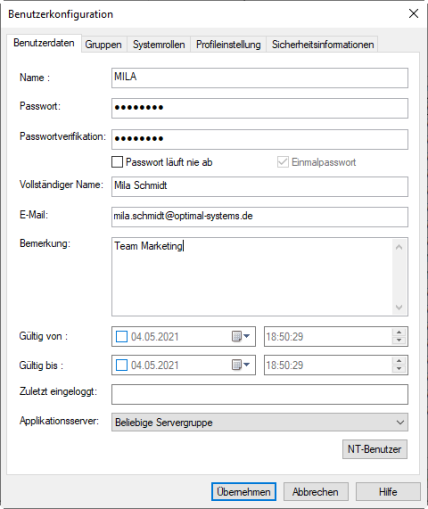
- Enter a user name with a maximum of 255 characters in the Name field.
To avoid errors, the 'Database' Tab can check whether special characters are contained in a user name.
You can transfer individual NT users. Click the NT user button and select a user from the list that now opens. Click the Apply button to transfer the selected user name to the Name field.
Multiple NT users can be transferred to the system using the NT sync function on the User administration tab.
- Enter a password for the user with a maximum of 100 characters in the Password field. It can be changed (see 'Changing the Password').
You can set rules for password syntax using regular expressions in enaio® enterprise-manager. These rules must be observed here and when users change their passwords.
Passwords may expire after a predefined period. This function can be turned off for users.
A password can be created as a one-time password. Users then need to change the password immediately after logging in. If this function is enabled, then it is preset here. This mechanism does not take effect if the user's authentication is against Windows.
Use the 'Start' Tab to specify whether or not to check the case sensitivity of passwords.
- Enter the password a second time in the Password verification field.
- You can decide whether or not to fill out the Complete name, E-mail address, and Comments fields.
- Optionally, select an enaio® server from the list for the Application server field, where the user will be logged in by default.
- Click the Apply button.
The new user will be entered into the user list. He or she will automatically become a member of the 'Standard' group, is not assigned a profile, and has the standard 'Client: Save personal settings' system role.
User settings can be specified (see 'Defining User Properties').
The Copy button on the User administration tab allows you to create a user that has the same settings as a pre-configured user. You just need to enter the user data. Group memberships, profile properties, and system roles will be copied from the selected user.
Technical Users
If the one-time password is enabled, technical users can be created without a one-time password via the context menu of the user list.
NT Synchronization
The NT sync function on the User administration tab imports multiple NT users into user administration.
If you click the corresponding button, a list of all users in the current domain will be shown. Select the required users and click the Assign button.
The User data dialog will open.
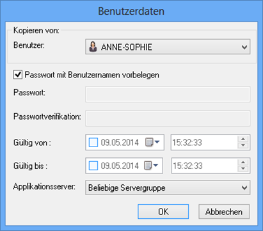
You can either enter a password for every selected NT user or preset the password of each user with his or her user name. Password verification is then unnecessary.
It is also possible to choose an enaio user from the user list whose user data will be copied and assigned to the selected NT users:
- group memberships
- system roles
- account state (whether the account is open or blocked).
Confirm by pressing OK to transfer users along with their data.
LDAP Users
For an LDAP authentication, you will need to transfer the LDAP user names to the user administration tab.
Use an LDAP query to identify all LDAP users.
Anonymous access to the LDAP directory service is not usually allowed; as a result, authentication at the LDAP system is required for identifying LDAP users and their rights. To do so, you will need an LDAP user with the appropriate rights. Name and password are entered on the 'LDAP Configuration' Tab.
Click the LDAP button on the User administration tab to open the dialog.
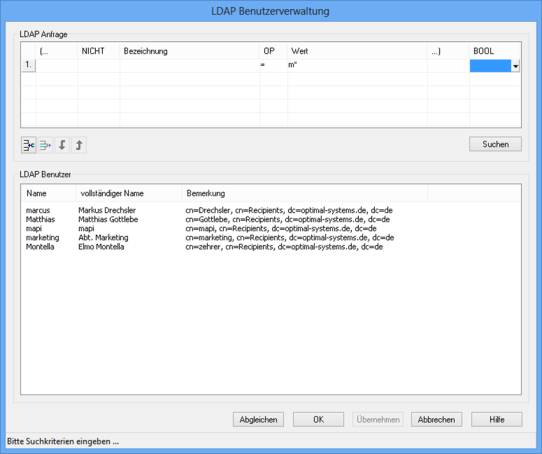
In the LDAP query area, names, operators, and values are combined to form a search expression. You can combine multiple search expressions using Boolean operators and parentheses.
The Name column lists the names to which you have assigned LDAP attributes, while the OP column displays the logic operators that can be used for LDAP queries. In the Value column, enter a value for the search expression.
The details of the LDAP query syntax can be found in the LDAP documentation.
If you select a line by clicking the line number, the following line options will be available:
|
|
Add an empty line below the selected one. |
|
|
Delete the selected line. |
|
|
Move the selected line down below the following line. |
|
|
Move the selected line up above the previous one. |


You start the query by pressing the Find button. The outcome of the search is an LDAP user list. The columns and the order in which they are shown are set on the 'LDAP Configuration' Tab.
If you click on the Apply button, selected users will be cached. Even after new LDAP queries, you can import users more than once and then add all of them to the user administration tab by clicking OK.
Click OK in order to transfer all selected and cached users together with associated data to the user administration.
Use the Synchronize button to delete all the users who have been removed from the LDAP directory service from the enaio® user administration and vice versa. A list with the differences will be displayed. You can mark enaio® users in the list that should never be deleted, for example the technical enaio® users.
A confirmation dialog will be shown where you will be prompted to confirm the deletion of each unmarked user that can no longer be found in the LDAP directory.
This marking function can be disabled using the \etc\as.cfg file of the data directory:
[System]
LDAPFASTADJUSTMENT=0
Deleting Users
Follow these steps to delete a user:
- Open the Security system window.
- Click on the User administration tab.
In the property dialog of a user, you can see when this user was last logged on in the User data tab.
- Select a user name from the user list.
- Click the Delete button.
- A confirmation dialog will now appear.
In enaio®, there must always be at least one user with the 'DMS: Supervisor' system role. Users with this system role are flagged with a special icon: .
You will need to remove a supervisor's administrative rights (system role) before you can delete him or her.
Imported LDAP users can be synchronized in the LDAP user administration.
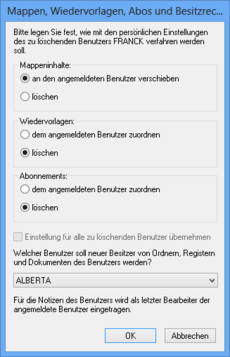
When you delete users, you specify how portfolios, follow-ups, subscriptions, and owner rights of the deleted users will be managed.
The portfolios, follow-ups, and subscriptions that were set up for other users are not deleted.
 areas. Use the toolbar to show all hidden areas at once:
