Defining User Properties
Every user is a member of one or more groups and is granted access rights to archive objects via their group memberships. Users can be assigned system roles, i.e., authorization to use administrative programs or access additional features in enaio® client, either as an individual user or via profile administration.
Group Membership
Follow these steps to add or remove a user from a group:
- Open the Security system window.
- Click on the User administration tab.
- Select a user from the User list and click the Properties button.
The User configuration window will open.
- Open the Groups tab.
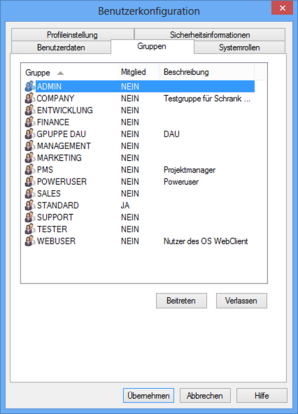
- Select the groups from the list in which you want to enter the selected user and click Join button.
- Select the groups from the list from which you want to remove the selected user and click the Leave button.
- Click the Apply button to apply the changes.
The changes to group membership will be saved and shown on the User administration tab.
User assignment to groups is performed on the Group administration tab (see 'Assigning Users to Groups').
System Roles
By default, new users are only assigned client system roles.
The 'Client: Save personal settings' system role allows users in enaio® client:
- to make changes on the Settings tabs.
- to make changes to the navigation and object search.
You should only strip a user of this basic right if you want to set up the navigation and object search for users via the profile administration and want to ensure that users do not change these areas.
The corresponding client system roles that users receive by default are required for the navigation and object search areas. Without access to the object search area, users cannot run an index data search.
Follow these steps to assign a system role to a user:
- Open the Security system window.
- Click on the User administration tab.
- Select a user from the User list and click the Properties button.
The User configuration window will open.
- Open the System roles tab.
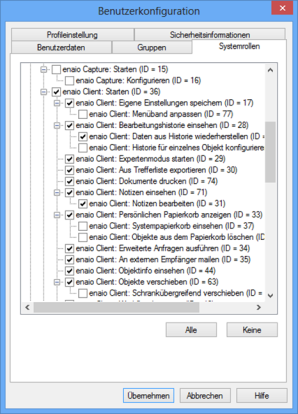
- Check the system roles that you want the selected user to have.
- Uncheck all those system roles you do not want the selected user to have.
- Click the Apply button to apply the changes.
The changes to the system roles will be saved.
Users with the 'DMS: Supervisor' system role are flagged with a special icon:  . At least one supervisor is always required.
The System role administration and System roles (user) tabs make it easier for you to manage multiple users.
- Open the Security system window.
- Click the System role administration tab.
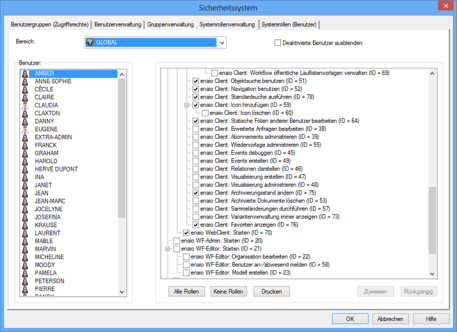
All users are listed on the left and all system roles on the right.
- Select a user from the list on the left.
- Check the system roles that you want the selected user to have.
- Uncheck all those system roles you do not want the selected user to have.
- Click the Assign button.
- Click the OK button to save the changes made to the system roles.
The system roles of users can be printed by pressing the Print button. The userrights.xsl style sheet is used for the printout. The style sheet can be found in the admin component directory. You can edit the design.
The exclusion of locked users does not apply to users whose account has been locked after entering the wrong password three times.
Users which have been configured as profiles are not shown on the System role administration tab.
All system roles are listed on the left on the System roles (user) tab. Select a system role to see which users it has been assigned to. You can assign a system role to multiple users or revoke it on this tab.
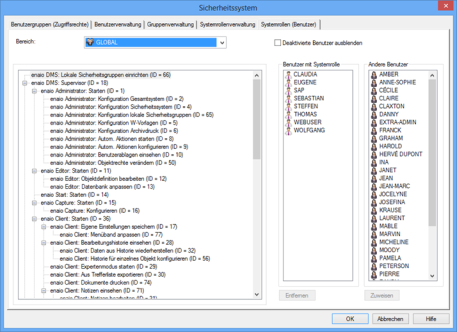
For local administrators within an area, the right to assign or revoke system roles may be limited to single system roles, which are being specified using the remote user administration.
Changing the Password
Follow these steps to change a user's password:
- Open the Security system window.
- Click on the User administration tab.
- Select an individual user and click the Properties button.
- Enter a new password in the Password field on the User data tab. Enter the password a second time in the Verify password field.
- Click the Apply button.
A maximum of 100 characters may be used for a password.
The changes will be saved.
You can set rules for password syntax using regular expressions in enaio® enterprise-manager. You are required to observe these rules.
Use the 'Start' Tab to specify whether or not to check the case sensitivity of passwords.
If the One-time password feature is enabled, then this feature is also enabled for existing users. Users then need to change the password immediately after logging in.
 areas. Use the toolbar to show all hidden areas at once:
