Transitions
Transitions link the activities. An activity can only be executed if a transition leads to it and the transition is actually made during the process.
Several transitions can be set up from between the end of one activity and the start of other activities. You can set conditions under which these transitions are implemented. It is possible to take more than one transition at a time.
Multiple transitions can lead to the starting point of an activity.
![]()
Setting Up Transitions
Like activities, transitions are set up visually in the Drawing page tab:
- Click the transition icon on the model editor toolbar.
- Click on the lower end point of an activity.
- Click on the upper starting point of an activity.
![]()
![]()
![]()
The transition is created and flagged with an arrow.
Click on a transition to flag it with its sizing handles. Drag the starting point of the transition to the starting point of another activity and the end point of the transition to the end point of another activity. Use intermediate points to change the course of the arrow.
Transitions which do not lead from an end point to a starting point are shown in red.
Use the context menu or the Del key to delete a transition.
Loops additionally have a loop exit and a loop entry for loop transitions. Transitions from a loop exit to an activity entry have the property 'FROM LOOP', whereas transitions from an activity exit to a loop entry have the property 'TO LOOP'. The loop passes the data through the 'FROM LOOP' transition and receives it back through the 'TO LOOP' transition. The loop will not forward data through the end point until the data fulfills the exit condition.
Click the Save button in the toolbar of the model editor to save the configuration data.
Transition Rules
The following rules apply if more than one transition emanate from an activity:
- Each transition that has no condition will be adopted.
- Each transition for which a condition has been set and fulfilled will be adopted.
- If more than one transition can be implemented, you can create a priority by way of an XOR split. The transition with the highest priority will be adopted.
- The process is canceled if a condition has been specified but not met for all transitions.
The following rules apply if more than one transition leads to an activity:
- The activity can only be performed if at least one transition was initiated.
- The activity can only be performed if all activities from which transitions emanate are finished and the transitions have been validated.
- If you want to have an activity start immediately as soon as one of the available activities has been finished and the transition from this activity can be initiated, you can use an XOR join to specify the transitions for which this is the case.
Transitions are not defined between activities assigned to an ad-hoc activity; this is done during the course of the workflow.
Transition Conditions
You can set up a transition condition in the properties dialog of a transition. Open the dialog from the context menu.
![]()
'From', 'To', and the transition type are displayed in the General area. If you change 'From' or 'To', the transition arrow on the drawing page will be changed respectively. If you change the type, the validity will be checked. Transitions from a loop exit to an activity entry are assigned the 'FROM LOOP' type, whereas transitions from an activity exit to a loop entry have the 'TO LOOP' type. All other transitions have the type 'NO LOOP'.
Furthermore, you have to specify the transition condition and optionally define a script code. The script will be executed before the loop condition is checked. Via the script you can access and change the current variable values. Changes are only taken into account for checking the conditional term, not returned to the process.
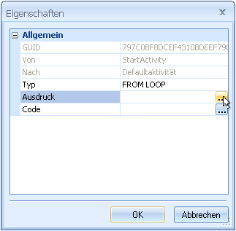
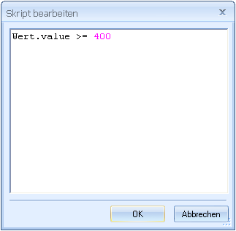
Variable values are checked using the expression. If the expression is true, the transition will be initiated.
Click the Save button in the toolbar of the model editor to save the configuration data.
Loop Transitions
Loops additionally have a loop exit and a loop entry for loop transitions. Transitions from a loop exit to an activity entry have the property 'FROM LOOP', whereas transitions from an activity exit to a loop entry have the property 'TO LOOP'. The loop passes the data through the 'FROM LOOP' transition and receives it back through the 'TO LOOP' transition. The loop will not forward data through the end point until the data fulfills the exit condition.
Loop transitions are also set up visually. The transition type is automatically assigned. It is displayed on the General tab of the properties dialog.
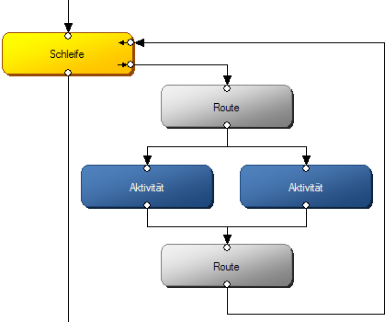
Only one transition is allowed from the loop exit. If you want to split a loop exit, create a 'Route' activity and do not split the loop exit until after the route activity.
Only one transition is allowed to the loop entry. If you want to merge two activities at a loop entry, you have to set up a 'Route' activity where the activities can be merged.
Schema:
Splits and Joins
If you set up more than one transition from the end of an activity and they can be taken as there are no conditions or only true conditions, you can use a XOR split to create a priority list. The transition with the highest priority will be adopted.
Outgoing 'XOR split' transitions are flagged with a red arrow on the drawing page.
If you set up multiple transitions to the starting point of an activity, you can use an XOR join to specify that a preceding activity with a true transition condition or without conditions is sufficient to run the next activity. Although the other preceding activities can still be executed, they are irrelevant to the transition.
Incoming 'XOR join' transitions are flagged with a red arrow on the drawing page.
Splits
Splits refer to all transitions that start at the end of an activity. All 'AND' splits are pre-configured.
Use the context menu of an activity to set the type.
- Choose Transitions/Outgoing (split) from the context menu of an activity.

All outgoing transitions are listed here.
- Change the type to XOR.
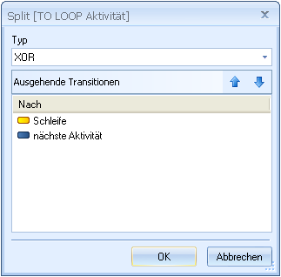
- Set the priority using the arrow buttons.
The higher a transition is in the list, the higher its priority.
- Confirm by pressing OK.
Click the Save button in the toolbar of the model editor to save the configuration data.
Joins
Joins refer to transitions which lead to an activity's starting point. All joins of the 'AND' type are predefined.
Use the context menu of an activity to set the type.
- Choose Transitions/Incoming (join) from the context menu of an activity.
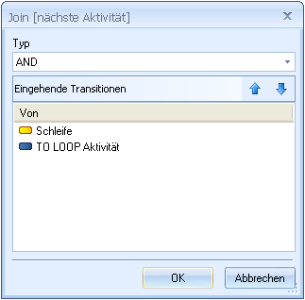
All incoming transitions are listed here.
- Change the type to XOR.
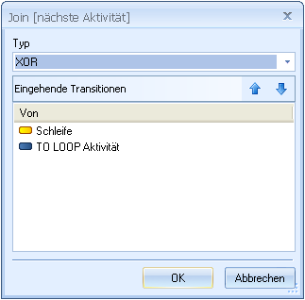
The order of the incoming transitions in the list is not important. The first transition is executed in the XOR join.
- Confirm by pressing OK.
Click the Save button in the toolbar of the model editor to save the configuration data.
 areas. Use the toolbar to show all hidden areas at once:
