Structure Tree
The structure tree catalog corresponds to a hierarchy catalog. From the structure tree catalog, the values selected by the user are transferred to the index data form using the default abbreviations.
An example:
A thread contains the following levels:
Year – Editor – Month – Process type
The user selects the following entries:
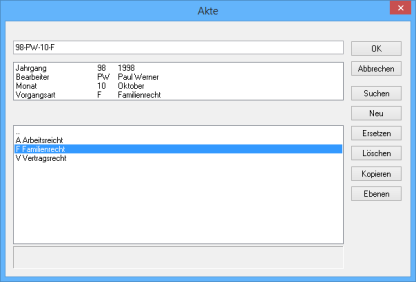
1998 – Paul Werner – October – Family law
As an abbreviation, the following is entered in the catalog field:
98-PW-10-F
The values from the structure tree can be edited by the user in the query, for example, a placeholder '*' can be added. Users can enter values to the catalog field independent of the catalog. If the values are not contained in the list, the user receives an error message.
Only ANSI values are allowed.
The values are saved to a file. Please note that all users can access the file.
How to create a structure tree catalog:
- From the properties window of a text field, select the Catalog row and then Structure tree.
-
Open the Structure tree tab.

If a structure file tree already exists, you can open it using the File button.
You can also specify on the tab if the content of all levels or only the last level is transferred.
The Validate separator option checks whether caps lock is on when the user enters the separator and displays a message if it is.
-
Click the Edit button to create a new file.
The Structure list window opens.
-
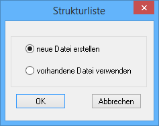
Select one of the following options:
-
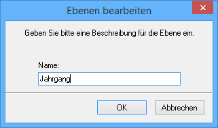
Create new: Name the file. Save the file in a directory which is accessible to all users.
The editing dialog will be opened.
- Use existing file: Open the file. Definitions of structure trees are saved to files which have the extension 'dat'. You cannot save the file under a different name. Changes to this file also apply to all other structure tree catalogs which are defined for this file.
You can edit the structure tree.
-
-
Define the levels in the blank editing dialog:
-
Click the Levels button.
The window Define levels will open.
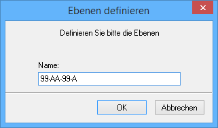
A level is defined by using placeholders to specify the structure and the number of digits for the abbreviation.
As a placeholder you use:
- a letter, if a letter or number is specified at the position for the abbreviation.
- a digit, if a number is specified at the position for the abbreviation.
The level definition is separated by a separator. Use the character '@' if the separator should not be entered into the catalog field. The separators '-', '/', and '.' will be entered in the catalog field. Separators can be replaced by any other character after the level definition.
The level definition for the above example is as follows: 99-AA-99-A
Confirm the level definition with OK.
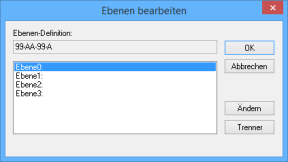
- Assign names to the levels:
- Click the Levels button in the editing dialog.
-
The Edit levels window will open. Here you can specify the names for the levels. The names are provided for reasons of clarity.
-
Select a level, click the button Change and enter a new name for the level.
In the Edit levels window you can also use the Separator button to enter a new separator for the selected level.In the example the levels have the names: Year, Editor, Month, and Process type.
The last level can be deleted, but no new levels can be added and you cannot change the level definition.
-
Confirm the level name with OK.
-
Create a list with values and abbreviations for the first level:
-
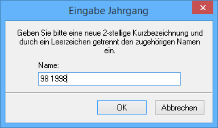
Click the New button. In the Input window, enter an abbreviation for the preset definition, a space, and a value.
-
Confirm the entry by clicking OK.
Entries can be selected and deleted. Entries are edited using the button New in the Input window and reentering an abbreviation with the edited value.
-
Create a list with the values and abbreviations for the next level:
- Double-click on an entry on the first level in the lower area of the editing dialog. The definition section of the next level for the entry of the first level will be opened.
-
Click the New button. Enter an abbreviation in the Input window according to the default definition for the level, a space, and a value and confirm the entry by clicking OK.
In the example, the entry for the second level 'Editor' with the definition 'AA' is: PW Paul Werner
To get to the definition section of the next level, double-click an entry on the current level.
To get to the definition section of the previous level, double-click the first row which has a line of dots.
- Save the structure tree by clicking the OK button in the editing dialog. It will be saved under the name of your choice.
In the example the entry for the level 'Year' with the definition '99' is:
98 1998
Once you have saved the structure tree, the Copy button will be shown in the editing dialog that is open again. With this button you can copy an entry, along with all subordinate entries, and insert them at a different location. As a target you enter the abbreviation of the target level followed by a separator. If the specified abbreviation does not exist on the target level you can create it.
You can assign the property Controlled by crosscheck to another text field and then reference the catalog field for the structure tree. Then the entry which stands for this abbreviation will automatically be inserted into the field. The level entries are separated by the character '\'.
If you select the property Controlled by crosscheck for a field, the Crosscheck properties dialog will be opened.
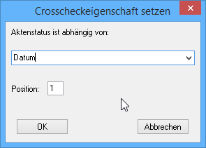
You then select the structure tree field from the list and assign position '1' to it.
The oxlist.dll library provides an API interface to convert ASCII text files into structure tree files and vice versa. This allows data for structure tree catalogs to be created, updated, and synchronized dynamically.
 areas. Use the toolbar to show all hidden areas at once:
