Configuration of enaio® directory-sync
To configure, start enaio® directory-sync via the command prompt with the -c parameter in configuration mode.
| Parameter | Value | Function |
|---|---|---|
| -c |
Opens enaio® directory-sync in configuration mode. Without this parameter, enaio® directory-sync is executed. |
|
| -configFile | "config.xml" |
Optional: Configuration file that is opened when enaio® directory-sync is started. Specification with path if the configuration file is not in the application directory. |
| -export | "directory name" |
Optional: Directory that is created when enaio® directory-sync is started. The configuration file and the export files are created there. Specification with path if the directory is not in the application directory. |
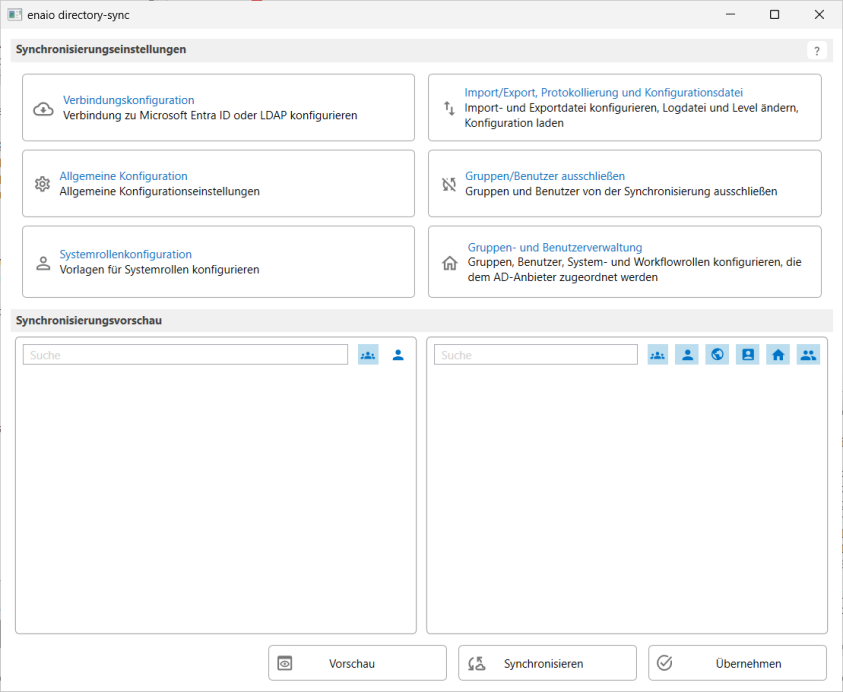
Configuration is carried out via the following areas:
Click Synchronize to create the import file and exit enaio® directory-sync.
Click Apply to save the configuration and to exit enaio® directory-sync.
After the configuration, the import data can be shown with all changes in the preview.
Connection Configuration
enaio® directory-sync can be connected to Entra ID or to an LDAP directory.
Once a connection has been established, the directory data can be saved via Export in a file that is used for synchronization. This file can be included in the area.
A current connection to the directory is then not necessary.
Entra ID Connection
The following login settings are required for an Entra ID connection:
| Tenant ID | Tenant ID from the app registration |
| Application ID | Application ID from the app registration |
| Client secret | Client secret from the app registration |
| User name/password | You can log in using a user name and password instead of the client secret. |
The connection can be checked.
Once a connection has been established, a file with the directory data can be created via Export and saved under the specified name.
This file can be integrated in the area via Groups/Users from import file. It is then used for synchronization.
As long as the file is integrated, the connection configuration cannot be changed and checked.
Save the configuration by clicking Apply. The area will be closed.
LDAP Connection
The following login settings are required for an LDAP connection:
| LDAP server |
URL to the full Active Directory path. Example for LDAP: domain.de:389/DC=enaio,DC=de Example for LDAPS: domain.de:636/DC=enaio,DC=de For LDAPS, only the corresponding port needs to be specified for LDAP. |
| User name/password | User name and password for logging on to the LDAP server. |
The connection can be checked.
Once a connection has been established, a file with the directory data can be created via Export.
This file can be included in the area. It is then used for synchronization.
Save the configuration by clicking Apply. The area will be closed.
Import/export, Logging, and Configuration File
Make the following entries in this area:
| Import file | File created by the 'Export users/groups' automatic action. |
| Export file | File that is imported into the enaio® user administration via the 'Import users/groups' automatic action. |
| Logging | Log file. You define the log level for logging. |
| Configuration file | Configuration file of enaio® directory-sync. |
Save the configuration by clicking Apply. The area will be closed.
General Configuration
Make the following entries in this area:
General Settings
| Name source of the user account |
LDAP connections: Select the user account name source:
The Entra ID always uses the UPN. |
| Pattern for full name |
For the full name of the user, select Values from the context menu or combine entries and values. Example: ${LastName}, ${FirstName} |
| Group for deactivated users | Group to which deactivated users are moved. |
| User comment | Comment that is entered as a remark for users in the user administration. |
| Group description | Description that is entered for groups in the group administration. |
Assignment Settings
You define the import mode for the individual object assignments.
Object assignments are added when the toggle is activated. Existing object assignments are overwritten when the toggle is deactivated.
Group Prefix
You provide information on the synchronization of groups.
-
Import users into enaio® who do not exist in the directory as locked.
-
Active: Users who do not exist in the directory are imported as deactivated. The user account is blocked.
-
Not active: Users who do not exist in the directory are not imported.
-
-
Group prefix
The following configurations are possible for groups that are identified in the directory by a prefix to the group name.
-
Add group prefix
-
Use the '+' button to specify the group prefix to be used.
-
Use the group icon to enter a name or select a group from the directory.
-
Active: Remove group prefix
The specified group prefix is removed from the group name.
If groups without names are created by removing the prefix, they are not created.
-
Active: Do not create groups
Groups are not created for the first time or assigned. Roles and workflow user objects can be assigned to users if they already belong to a enaio® group.
The groups are always shown in the 'Group and user administration' area.
-
Active: Import group members
If groups are not created, their members can be imported. They are shown in the 'Group and user administration' area in the group structure.
-
Password for new group members
You set the password for new members.
-
-
Save the configuration by clicking Apply. The area will be closed.
Excluding Groups/Users
In this area, you can specify enaio® groups and enaio® users that are excluded from synchronization.
Use the '+' button to create entries and then select enaio® groups or enaio® users from the corresponding list.
Save the configuration by clicking Apply.
You can import an XML file for the configuration.
The file requires the following structure:
<?xml version="1.0" encoding="utf-8"?><security>
  <group name="Consulting" description="Description Team Name" />
  <group name="Support" description="Description Team Name" />

  <user name="Root" user="Root@test.de" comment="Random User"/>
  <user name="Mustermann, Max" user="Mustermann.Max@test.de" comment="Random User"/>
</security>
Save the configuration by clicking Apply. The area will be closed.
System Role Configuration
You create system role assignments in this area. A system role assignment consists of a number of system roles that can be assigned to a group during group and user administration.
You create system role assignments using the '+' button. Provide a name for the system role assignment and assign the desired system roles from the list of system roles.
The assignment is made using the arrow buttons.
Save the configuration by clicking Apply. The area will be closed.
Group and User Administration
All available groups are shown in this area.
In addition, all system role assignments, user profiles, workflow roles, and workflow organization objects are shown.
The enaio® group 'DEFAULT' is always shown in the Group structure after synchronization area. Any users who cannot be assigned to any other group are assigned to this group.
Use the arrow buttons to transfer groups to the Group structure after synchronization area. You then assign system role assignments, user profiles, workflow roles, and workflow organization objects to these groups.
The groups are flagged using color-coding:

|
Black/bold/italics | Prefix |

|
Dark gray/bold/italics | Prefix group, with or without prefix |

|
Gray/bold/italics | Group in enaio® and in the directory |
|
|
Gray/bold | Group in enaio® |
All system role assignments, user profiles, workflow roles, and workflow organization objects are also flagged using color-coding.

|
Blue | System role assignments |

|
Light green | User profile |

|
Brown | Workflow roles |

|
Beige | Workflow organization objects |

|
Red | Assignments that no longer exist |
Save the configuration by clicking Apply. The area will be closed.
Preview
The synchronization preview shows the import data with all changes.
The data is flagged using color-coding and also indicates whether data has been added, removed, or modified.
The synchronization preview shows the groups and users on the left. Groups or users can be hidden and shown via the header. The search field can be used to search for groups or users.
The import data with all changes is shown on the right. Groups, users, profile templates, system roles, workflow organization objects, and workflow roles can be hidden and shown via the header. You can search for entries using the search field.
Color Coding for Changes

|
Green | Will be added |
|
|
Red | Will be removed |
|
|
Black | Will remain unchanged |
|
|
Blue | Will be modified |
|
|
Dark gray | Will be manually managed |
|
|
Light green | User profile |
|
|
Gray | Groups, system roles, workflow roles will remain in place |

|
Olive green | Deactivated users |
 areas. Use the toolbar to show all hidden areas at once:
