Setting Up Groups
The security system that controls access to archive objects is a group-oriented system. Access rights are granted to users based on their membership in a group.
Every user is initially a member of the Standard group. It is possible to remove a user from the Standard group, but the group cannot be deleted.
You can set up groups or transfer existing Windows NT groups to the system.
Within a local area, one group is always set as the 'Standard' group in the remote user administration dialog.
Setting Up a Group
Follow these steps to create a group:
- Open the Security system window.
- Click the User groups (access rights) tab.
- Press New in the Select user group area.
The Create new user group dialog will now open.
- Enter a name (using a maximum of 255 characters) for the new group.
A description is optional.
You can apply the assignment of objects, including object rights, clauses, and users, from the currently selected user group.
- Confirm by pressing OK.
The new group will be set up. Access rights can now be specified for the group (see 'Setting Group Access Rights').
Within a remote area, local administrators who have no additional rights cannot grant or revoke group rights.
Importing an NT Group
Follow these steps to import NT user groups into the enaio® security system:
- Open the Security system window.
- Click the User groups (access rights) tab.
- Click the Synchronize... button in the Select user group area.
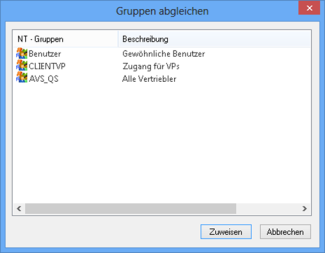
The Synchronize groups window will now open.

- Select one or several groups and then click the Assign button.
The NT groups will be imported. You can define the user rights (see 'Setting Group Access Rights') and add group members (see 'Assigning Users to Groups').
Only groups of the Primary Domain Controller (PDC) will be shown.
Deleting Groups
All newly created users are initially members of the Standard group. You cannot delete the Standard group.
Follow these steps to delete a group:
- Open the Security system window.
- Click the User groups (access rights) tab.
- Select a user group from the User group list.
- Click Delete.
The user group will be deleted. If users have been assigned to the chosen group, you will receive an error message indicating that the users must be removed from the group before the group is deleted. The group members will also be listed.
 areas. Use the toolbar to show all hidden areas at once:
