Add-ons allow you to integrate additional functions into enaio® client. Your administrator links the add-ons with fields in the index data forms of specific object types and configures them. Fields linked to an add-on will be followed by ![]() Add-on icon at the end of the field which can be used to run the add-on. Add-ons can also be executed via the shortcut Alt+Down arrow.
Add-on icon at the end of the field which can be used to run the add-on. Add-ons can also be executed via the shortcut Alt+Down arrow.
The following add-ons are included enaio® client:
The filing plan add-on enters a counter, a slash, and the last two digits of the current year to the index data of the linked field or to parts of the index data of a linked field. The counter is always increased by the value '1' but it can be reset at certain points.
When configuring the add-ons, the administrator will define the index data to be imported from other fields.
If the index data of imported fields have changed, the changes will not be applied to the filing plan field.
The application add-on will start an application which has been configured by the administrator.
The user add-on will list all users, user groups, and further configured entries. The administrator can allow users to select multiple entries. A filter can be used to limit the list to entries that contain character strings entered there.
The counter add-on resembles the filing plan add-on, but offers a more flexible configuration to the administrator.
The database add-on queries a database table of an external database. A hit list is displayed where you can select data and transfer them into the field and connected fields.
You can open a calendar using the Select date button. A month view with calendar weeks is displayed. Double-click on a date to transfer it to the field.
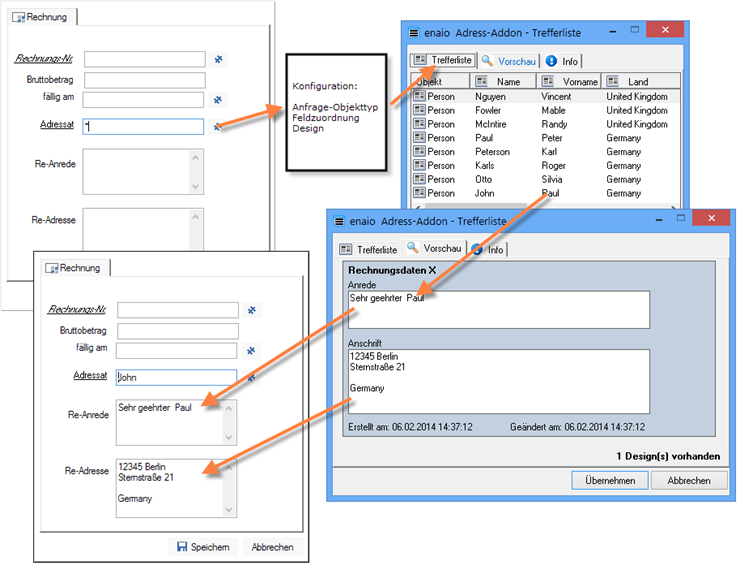
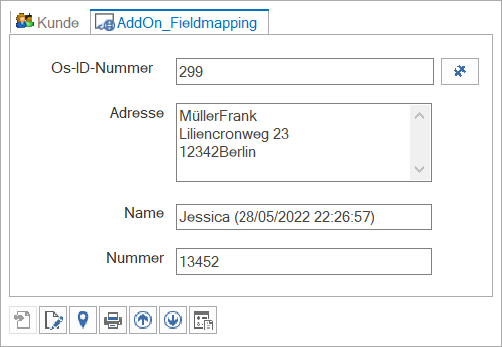
The Fieldmapping add-on is used for index data maintenance. It provides functions of the address add-on in Unicode installations.
-
Open the add-on by clicking the
 Add-on icon.
The configuration form of the Fieldmapping add-on opens.
-
Fill out the configuration form.
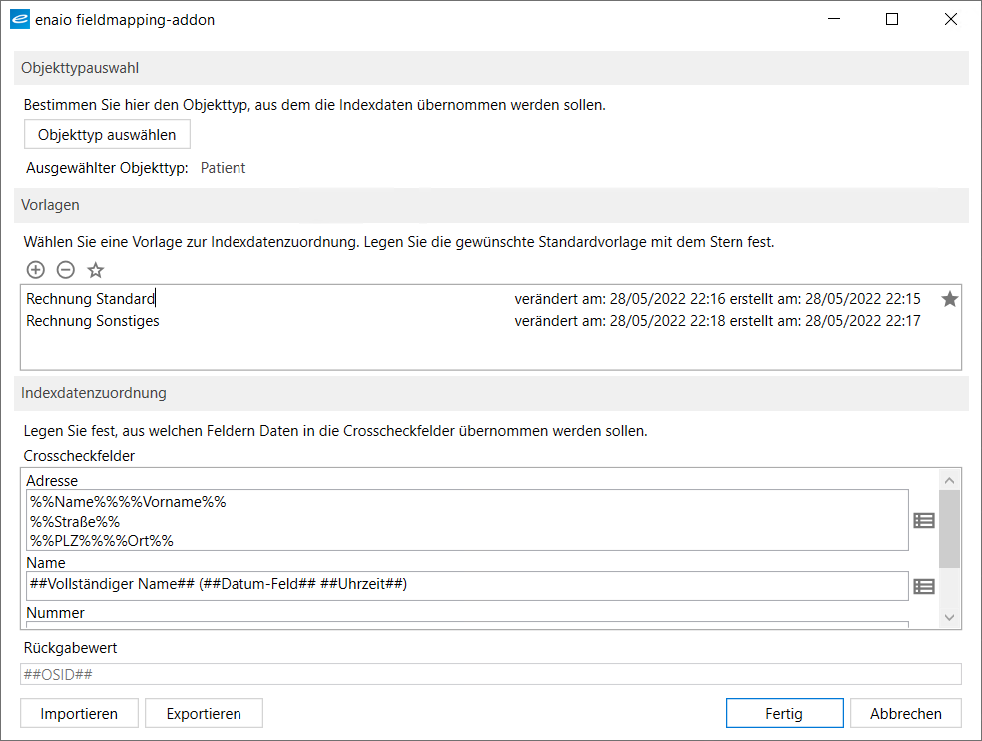
In the Object type selection area of the configuration form, select the object type from which you want to transfer index data.
Then, in the Index data assignment area, click the
 Select icon to select the index data fields whose data you want to transfer and copy & paste them into the correct order.
You can save this selection in the Templates area. You can save multiple configurations and add one template to favorites to make it the default template.
The saved templates can be exported and imported as xmlfiles.
The configuration form also allows you to redefine the selected object type.
-
After filling in the configuration form, click the Done button.
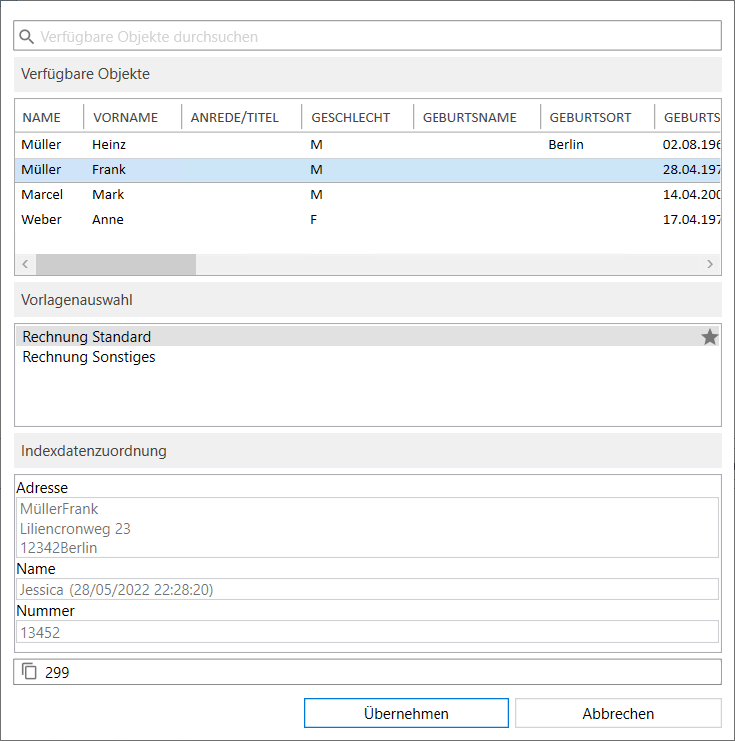
The Fieldmapping add-on performs a query over the index data of the selected object type and lists the result as a hit list in a new dialog box.
-
In the dialog box, select the object whose data you want to transfer.
In the Template selection area of the dialog box, you can specify the index data to be transferred as well as the formatting by selecting the corresponding template. The index data to be transferred is displayed as a preview in the Index data assignment area.
-
Click the Apply button.
The index data is transferred to the form of the Fieldmapping add-on.
The ID add-on will enter a number into the field that it is linked to. This number is unique throughout the archive and will increment with each new entry. Consecutive numbering is, however, not guaranteed.
You can use the catalog add-on to integrate a catalog that functions like a tree or hierarchy catalog and allows you to make multiple selections.
The catalog add-on can show catalog entries according to the language of the object definition. Imported data are always independent of the set up object definition language.
The Quickfinder links a field on the index data form to a field on another object's index data form. You can only enter values into the Quickfinder field which have already been entered into the index data form of the linked object.
You may link several index data form fields with each other. Though, there is only one field marked as a Quickfinder field.
If the Quickfinder field is linked to a folder field, you can create a new folder with the Quickfinder. The following restrictions apply:
-
The index data form opened with Quickfinder contains no add-ons itself even if add-ons are available on the index data form opened in the object search.
-
A subsequent modification of the index data of the linked object will not be applied automatically to the Quickfinder field.
-
Click Execute Quickfinder.
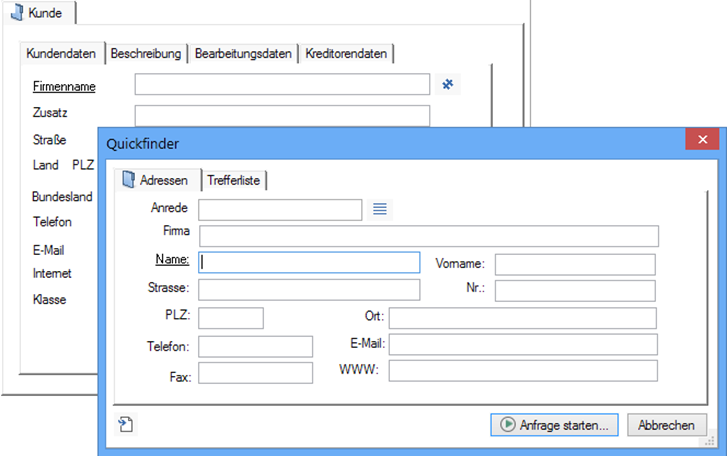
The Quickfinder window will be opened with the index data form of the linked object.
If you have already entered a value into the Quickfinder field, a query will be started and the Quickfinder window will open with the Hit ribbon tab and the query results.
-
Complete the index data form.
-
Click Start search.
The Hit ribbon tab opens.
You can configure the hit list and save settings via the context menu.
-
Double-click an entry in the list.
The linked values from the index data will be transferred into the Quickfinder field and other linked fields.
If there is no folder with the value you want to enter, you can create one using Quickfinder:
-
Click Create object at the bottom of the window. Fill in the index data form and save the object. It will then be shown on the Hit ribbon tab.
The Create object feature is only available for folders.
The Create object feature is available for folders only. You cannot run add-ons on a folders' index data form.
The query add-on enables you to execute a query. If you click the Add-on button, the query is launched and a hit list will open.
The hit list will show documents with a field that has the same name as specified in the add-on. That field is indexed with the entry in the add-on field.
The document types with which you perform searches are administratively preset. You can open the documents from the hit list.
No placeholders can be specified for this query.
The rights group add-on will also list all users and user groups. Selected users will be identified with (U), groups with (G).
Using a filter in the first line, the list can be limited to entries that contain character strings entered there. For groups, a dialog with the group members can be accessed.
This add-on can be used to assign object access rights to users or groups via the index data.
The SQL add-on executes SQL select statements that have been configured by the administrator. It thus provides an important functions of the Catalog add-on in Unicode installations.
The user must have the right to use the enaio® editor.
-
Open the add-on by clicking the
 Add-on icon.
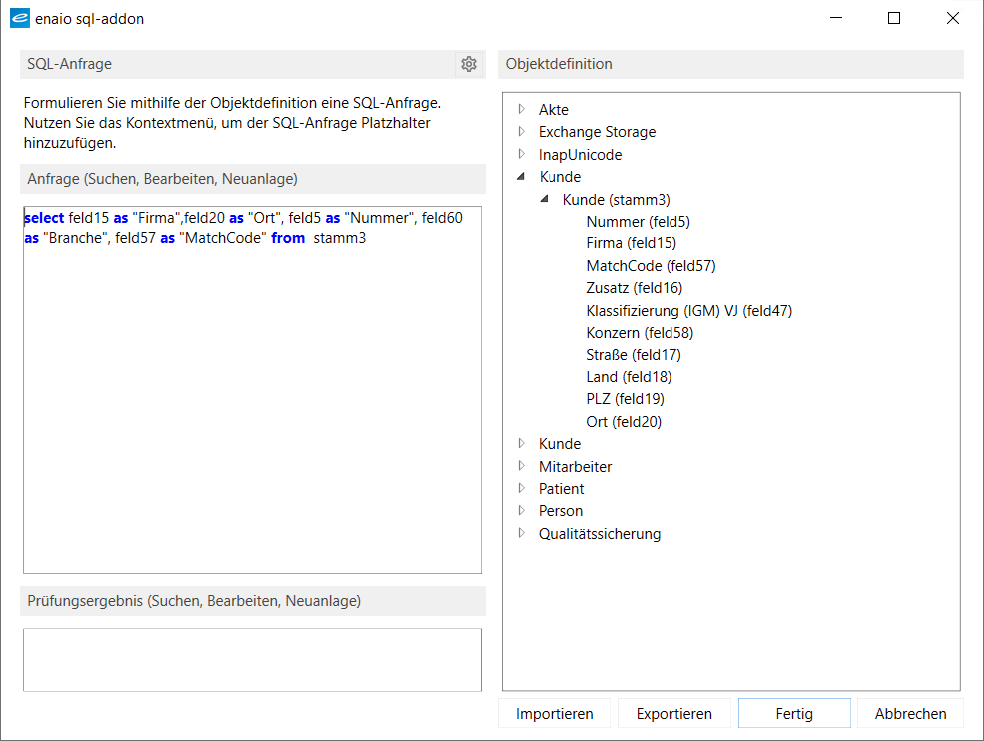
The configuration form of the SQL add-on opens.
-
Fill out the configuration form.
In the Queries area, enter the syntax of your SQL query. If the entry contains a syntax error, a warning message is displayed, and the Validation result area shows the incorrect syntax entry. The entered syntax cannot be saved.
In the Object definition area, all available object types are displayed with the corresponding fields. The selected field names can be inserted into the SQL query by double-clicking them.
The SQL statements can also be exported and imported via this form.
-
After filling in the configuration form, click the Done button.
The configuration form closes.
-
Click the
 Add-on icon again.
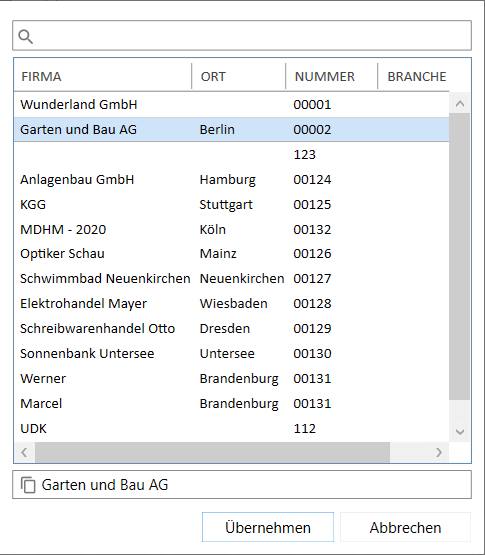
The SQL add-on performs the configured query and lists the result as a hit list in a new dialog box.
-
Select one or more entries from the hit list.
You can reduce the number of hits displayed with the filter above the hit list.
-
Click the Apply button.
The selected entries are transferred to the input field of the SQL add-on.
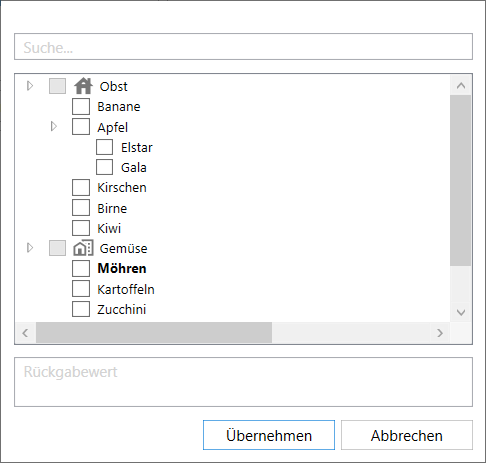
The Treeview add-on provides key functions of the Catalog add-on in Unicode installations. The Treeview add-on enables structured selection lists to be integrated into an index data form, which function like tree or hierarchy catalogs and where multiple selection is possible. Values including the element path can be returned for the enabled list entries.
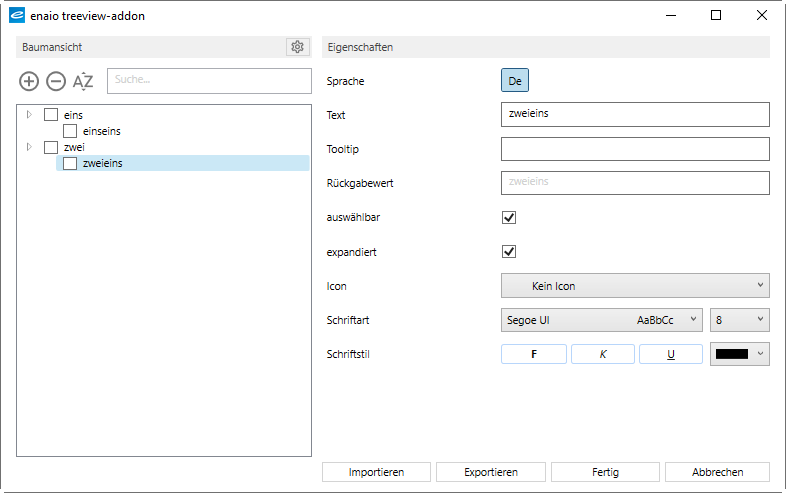
The structured selection lists can be configured. The Treeview add-on is configured in enaio® client.
Users require the Editor: Start system role to configure the Treeview add-on.
Right-click the add-on icon in the index data form to open the configuration dialog.
Please note that the data cannot be edited by more than one user at the same time.
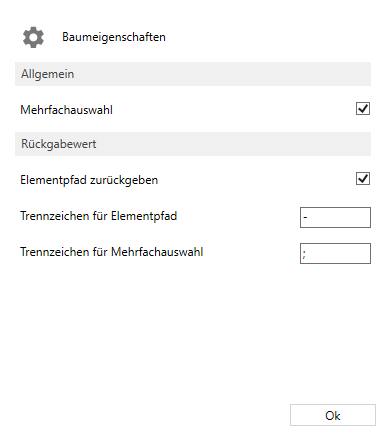
Use the tree properties dialog to specify whether multiple selections are allowed in the selection list and how data is transferred. Open the tree properties dialog by clicking the Cog icon.
| Multiple selection |
Enabled: Multiple selection allowed |
|
| Return element path |
Enabled: All parent elements are also copied in structured lists. |
|
| Separator for element path | Separator used between the elements of structured lists | |
| Separator for multi-selection | Separator used between the elements for multi-selection |
Clicking the Plus icon creates a new node. If a node is marked, then it is created below the marked node. If you want to remove a node again, then click the
Minus icon. You can use the
Up arrow and
Down arrow icons to move the nodes of a tree branch vertically within a level. You can put the nodes in alphabetical order by clicking the
Sort icon. All the functions described in this section are also available in the context menu of a selected node. In addition, you can also move nodes up and down by pressing the Alt + arrow key ↑ (up) or arrow key ↓ (down).
You can configure the properties of the nodes in the Properties area of the dialog.
| Property | Description |
|---|---|
| Language | Currently, DE – German only. |
| Text | The entry that is shown to the user. |
| Tooltip | The tooltip that is shown to the user of the text. |
| Return value |
The value that is copied to the field, depending on the configuration. Users also see the return value next to the text in the dialog. |
| Selectable | Enabled: The value can be copied to the field. |
| Expanded | Enabled: Nodes are displayed in expanded format. |
| Icons | An icon can be selected for the entry from the list of icons. |
|
Font Font style |
Font and font style for the entry can be selected. |
The export and import functions can be used to save or transfer the configuration as an *.xml file.
Click Done to finish the configuration. The data is immediately transferred to enaio® server and is immediately available to other enaio® users when the configuration is saved.
Currently, the Treeview add-on is not available for enaio® webclient.
The conversion add-on will multiply an entered numeric value by a preset factor and will insert the value into an assigned field.
It may for instance be useful for currency conversion.
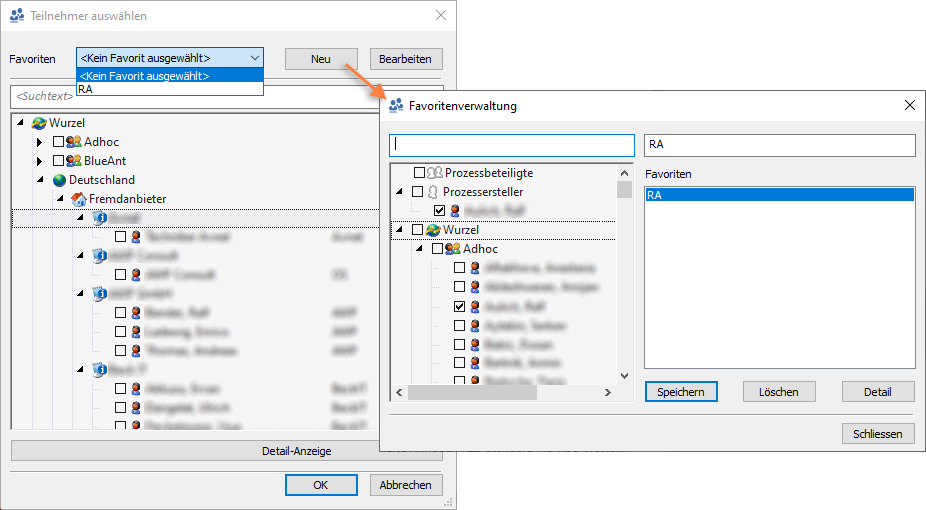
The workflow recipient add-on generates a list of all users and roles that are unlocked for workflows. The administrator can allow users to select multiple entries.
The user can create favorites lists to make selecting recipients easier. These lists can be compiled and saved in the add-on's favorites management. The saved list is then available in the Favorites field. An entry can be selected from the Favorites field, which will then be transferred as the list of selected users. The list can be customized further after it has been transferred from favorites.
The add-on is only available for workflow work items.
The WWW add-on can be utilized to control all logs available in the respective Windows system, such as http://, mailto:, tel:, etc. The WWW add-on is also linked with index data fields, where URLs or e-mail addresses are entered. The add-on transfers the entries in these fields to a browser or as an address to an e-mail program. It is now additionally possible to use the WWW add-on to also control calling from the index data via telephone systems integrated into Microsoft Windows. Additionally, the prefix of the Windows action tel: to be used can be specified in the configuration of the add-on in a targeted manner. Validating the phone number via regular expression is also possible.
Additional optional add-ons are also available. For more information on this feature, contact your administrator.
 areas. Use the toolbar to show all hidden areas at once:
