Data Import – Configuration
You can use enaio® administrator to configure a data import. As in all automatic actions, you must first include the appropriate library from the Entire system/Additions tab, in this case axacimp.dll. The library is found in the ..\clients\admin directory.
Follow these steps to configure a data import:
-
Create a configuration for the automatic action Data/Document import.
Click the Automatic actions button to open the configuration dialog. Select the Data/Document import action and add it. The import wizard will open.
You can also manage existing configurations, edit them, export them, and import them.
-
Describe the import data.
-
Specify the DMS objects that should be produced by the import data.
The import itself can be started from enaio® administrator or set on a timer using enaio® start.
When you start an import, an information window is displayed.
The window closes automatically after the import. Press and hold the Ctrl key, and the window remains open.
Import and LDAP Login
If login is carried out using LDAP, the import cannot be run. In this case a login sequence including LDAP and enaio® user administration is needed. However, the users in LDAP and the enaio® user administration must have identical passwords. For security reasons this usually is not the case.
In enaio® user administration you can instead set up a login pipe exception for the user who will run the import. This user has to be set up in both LDAP and the enaio® user administration, although the two passwords may differ.
It is configured in enaio® enterprise-manager.
As an alternative, please contact the OPTIMAL SYSTEMS consulting team.
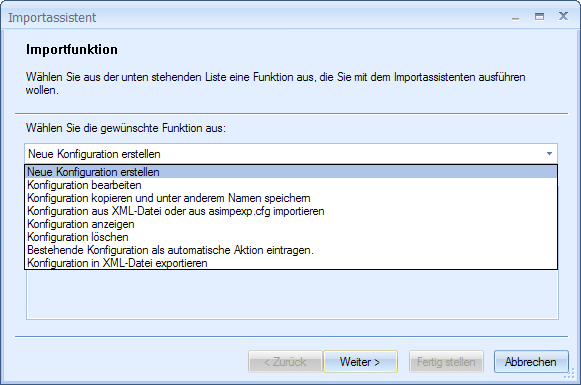
Import – Configuration Management
The import wizard reads in existing configurations from the database at startup and lists them.
The following functions are available and resemble those used for an export:
-
Create new configuration
In the next step you give the configuration a name and describe the import data.
-
Edit configuration
The data associated with the configuration that is selected in the list of existing configurations is read and can be edited in later steps.
-
Edit configuration and save under different name
The data associated with the configuration that is selected in the list of existing configurations are read in. You enter a new name and can edit the configuration in later steps, or save it without changing its data.
-
Show configuration
First use the configuration data to create an HTML or XML file that you can save or print.
-
Delete configuration
Here you delete the selected configuration from the database.
You always receive a confirmation dialog before deleting a configuration. This deletion cannot be undone. You should also delete the configuration in the Automatic actions dialog.
Configurations that you can only delete from the Automatic actions dialog are not removed from the database; they are simply no longer shown and cannot be started.
-
Enter existing configuration as an automatic action
Configurations that you have deleted in the Automatic actions dialog, but not using the Delete configuration administrative function, are still in the database and can be entered as automatic actions again.
-
Export configuration to an XML file
The XML file can be imported at a later time or on another system.
Export the data of the selected configuration to an XML file. The name of the configuration is assigned to the file as a label. Characters that are not allowed in the file name are replaced with '_'.
You can also export all configurations.
 areas. Use the toolbar to show all hidden areas at once:
