Setting Up Profiles
Setting up profiles can make it easier to manage the security system. You can assign a profile to users, enter them at the same time in several groups, and define the system roles. By changing a profile, you can modify group memberships and system roles for all users who have the same profile.
It is also possible to create saved searches, extended SQL queries, and links to external applications for all users with the same profile.
Profiles contain the following settings:
- Settings for hit lists:
- Column configuration
-
Sorting and grouping
For both enaio® client and enaio® webclient
- enaio® client: hierarchical folder hit lists
- enaio® client: ribbon settings
- Inbox configuration
enaio® webclient: system columns for inboxes only - Language for object definition and user interface
- Saved searches
- enaio® client: extended SQL queries
- enaio® client: links to external applications, limited to the first 15
-
Settings for the object search
For both enaio® client and enaio® webclient
-
Settings for navigation
For both enaio® client and enaio® webclient
-
Positions of windows and bars
(for screen resolutions smaller and bigger/equal to 1024 × 768 pixels)
For both enaio® client and enaio® webclient
- Settings for the private desktop
- enaio® client: settings of the full-text facets
- enaio® client: OCR settings
- enaio® client: modules for annotation stamps
- enaio® webclient: offline settings
- enaio® webclient: layout settings
- System roles
- Group memberships
The scanner settings of enaio® client and enaio® capture can also be allocated via the profile administration dialog.
When assigning a profile to a user, the user's settings and rights will be overwritten. You can specify whether group memberships and system roles are overwritten or added when allocating a profile.
Group memberships and system roles of users with the 'DMS: Supervisor' system role will not be changed.
If a user is assigned the 'Client: Save personal settings' system role, they can customize the profile settings assigned to them in enaio® client and enaio® webclient.
A profile is created like a new user, though the new user is flagged as a profile template. The profile gets a user name and a password. These enable a user to log into enaio® client and enaio® webclient and configure the settings.
Group memberships and system roles of the profile and its assignment to users are set up in enaio® administrator in the same way you would with regular users.
If you change the settings of this profile, you will need to explicitly reallocate it in order to update the settings of users with the profile.
In addition to the described individual profiles, it is possible to create group profiles.
Group profiles contain:
- Saved searches
- enaio® client: extended SQL queries,
- enaio® client: links to external applications, limited to the first 15.
This profile is assigned to a group and will be applied to all current and future members of the group. Individual settings of group members will not be overwritten.
Group profiles do not allow you to manage the access rights to archive objects, system roles, and scanner settings.
Creating Profiles
You can create profiles on the User administration tab in the security system. You create it in the same way you would add a new user. The profile gets a user name and a password. Use these to set up the clients. Profiles can also define language resources for desktop objects.
An already created user can also be used as a profile template.
Follow these steps to create a profile:
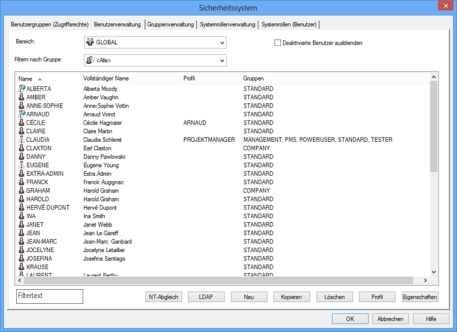
- Open the Security system window.
- Click on the User administration tab.
- Select an individual user and click the Properties button.
- Select the User is a profile template option on the Profile setting tab.

- Choose whether to use the desktop and/or scanner settings of enaio® client and enaio® capture.
- Click the Apply button.
The user will be shown with the  profile logo in the user list on the User administration tab.
You can assign the profile to users (see 'Assigning a Profile to Users').
If you modify the settings of a profile, you will need to reassign the profile in order to update the settings of the assigned users (see 'Allocating Profiles').
Profiles that are not assigned to individual users but are used to assign saved searches, extended SQL queries, and links to external applications for enaio® client to groups must be members of one group only.
Assigning a Profile to Users
You can assign exactly one profile to a user. The user's settings will be then replaced by those specified in the profile. Whether group memberships and system roles are overwritten or added is specified when allocating a profile (see 'Allocating Profiles').
If you assign a profile to a  supervisor, his or her system roles will not be changed.
Follow these steps to assign a profile to users:
- Open the Security system window.
- Click on the User administration tab.
- Select one or more users.
- Click the Profile button.
- The User configuration window with the Profile setting tab will now open.

- Select a profile.
- Click the Assign button.
The profile will be assigned to the selected users. The user's settings will be then replaced by those specified in the profile. According to profile allocation settings group memberships and system roles are extended or overwritten.
You can remove the assignment of a profile to a user by clicking the Delete button on the Profile setting tab.
You should make sure that the relevant users are not logged in before assigning a profile to them; otherwise, errors may occur in enaio® client, and in enaio® webclient the profile settings for logged in users are not applied.
Allocating Profiles
Profile allocations with extensive profile settings and a large number of users require extensive changes in the user administration and can take a corresponding amount of time. It is not possible to continue working in enaio® administrator and other users of enaio® administrator can only open the security system in read-only mode while profile allocation is running. The timing for such profile allocations needs to be carefully planned.
If you change the settings of a profile in enaio® client or in the security system, these changes will only be applied to assigned users after the profile has been allocated.
Follow these steps to allocate a profile:
- Open the Security system window.
- Click on the User administration tab.
- Select a profile and click the Properties button.
- Open the Profile settings tab in the User configuration window.
-
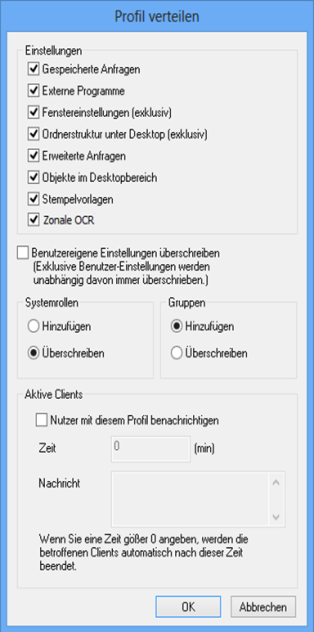
Select the Distribute profile option.

This option is available only if the profile settings differ from the settings of the previously allocated profile.
-
Click the Apply button.
The Distribute profile dialog will now open.
-
Select the settings you want to allocate.
-
Saved searches and External applications are distributed in separate folders on the user's desktop as read-only. The user cannot modify or delete them. The folder structure, including the available DMS objects stored there, is distributed as editable. This means that the user can subsequently modify these objects and structures at their discretion.
-
If you choose to allocate settings such as Window settings or Folder structure under the desktop, the user's settings will always be overwritten by these exclusive settings. Window settings always include the hit list configurations.
-
You can set whether the existing user settings are overwritten for the saved searches, external applications, extended SQL queries, objects in the desktop area, modules for annotation stamps, OCR settings, and full-text facets.
-
-
If you select Overwrite user-own settings, not only the selected settings but also other user settings are overwritten with the profile settings. As a result, advanced settings as well as settings which the user has configured on the settings dialogs of enaio® are replaced.
-
For groups and system roles you can choose to only add new groups and system roles or to completely overwrite them with the groups and system roles of the profile.
System roles are never overwritten when the user has the 'DMS: Supervisor' system role.
-
Confirm by pressing OK.
Changes to the profile will apply to all assigned users.
Notification for Active Clients
To allocate the profile to logged-in users, you will first need to inform them. Select this option if you cannot prohibit users from being logged in.
You can enter a period in minutes after which the logged-in clients will be closed automatically. After restart, the changed settings will be available.
If you do not enter a time and instead leave the setting at '0', the modified settings will be available after enaio® client has been closed and restarted by the user.
enaio® webclient users will not be notified and enaio® webclient will not be closed automatically. If profiles are to be distributed to enaio® webclient users, then you must ensure that these users are not logged in; otherwise, the changed settings will be overwritten again by the cached settings after enaio® webclient is closed.
Assigning Profiles to Groups
If you assign a profile to a group, you are providing all current and future members of this group with the saved searches, extended SQL queries, and links to external applications assigned to this profile. Other settings will not be modified. Saved searches and links created by the user will not be replaced.
A profile to be assigned to a group is created in the same way as you would create a profile that will be assigned to individual users (see 'Setting Up Profiles'). However, the profile may only be a member of the group that you want to assign it to and may only use desktop settings.
If you change the saved searches, extended SQL queries, and links to external applications for enaio® client assigned to this profile, these changes are only applied to the group if you allocate the profile (see 'Allocating Profiles').
Follow these steps to assign a profile to a group:
- Open the Security system window.
- Click on the Group administration tab.
- Select a group.
-
Click the Profile button.
The Profile window will now open.
-
Select a profile from the list of available profiles.
Only the profiles that can be assigned to the selected group will be listed.
-
Click the Apply button.

The saved searches, extended SQL queries, and links to external applications are assigned to the group.
If you want to delete the assignment of a profile to a group, select (No Profile) in the Profile window and click Apply.
 areas. Use the toolbar to show all hidden areas at once:
