enaio® mediamanagement-import
You can use enaio® mediamanagement-import to import media from a data storage medium, such as a camera or a file system, into the enaio® system. The index data of the imported objects is automatically populated with the data from the media files.
enaio® mediamanagement-import supports the following file types:
|
Image |
JPG, GIF, PNG, TIF, BMP, PSD, EPS, AI, CDR, PCT, TGA, PCX, WMF, SVG, CGM, DCM, PDF, ICO |
|
Audio |
WAV, MP3, WMA, MID, OGG, MOD, M4P, AAC, DTS, AC3, FLA |
|
Video |
AVI, MPG, WMV, MOV, MP4, RM, VOB, MPV, MKV, M2TS, TS, FLV, SWF, GIF |
enaio® mediamanagement-import automatically detects all connected devices. If enaio® mediamanagement-import is started and you connect a device, such as a digital camera, a message will appear in the notification area; click on this to start an import operation with the selected directory or device.
The enaio® mediamanagement-import user manual can be found in the enaio® client documentation.
Installation and Configuration
enaio® mediamanagement-import is automatically installed as part of enaio® mediamanagement by the setup program if you select the 'Mediamanagement' component from the setup options. The axmediaimport.exe application is then installed in the client32 directory.
To configure enaio® mediamanagement-import, run the axmediaimport.exe application with the command line parameter '-config'. Once you have finished the configuration, the axmedienimport.xml configuration file is saved to the \etc directory in the data directory. If users use enaio® mediamanagement-import, the application always accesses this global configuration file.
The 'Editor: Start' system role is required to configure enaio® mediamanagement-import. All users with this system role can then edit enaio® mediamanagement-import. This always overwrites the existing configuration.
The application can only be launched in configuration or work mode if enaio® client is running on the workstation.
Users who use enaio® mediamanagement-import require access rights to the object types and the 'DPI' license.
You can integrate enaio® mediamanagement-import as an external program in enaio® client for users.
The 'Media Content' Object Type
On request, OPTIMAL SYSTEMS will provide you with the 'Media content' object type for use with enaio® mediamanagement which already contains the standard fields for the metadata of individual media types.
If you then select the 'Media content' object type for the configuration, enaio® mediamanagement-import recognizes it based on the internal names and configures it automatically. The object type fields are automatically assigned to the corresponding import functions.
Import Functions
enaio® mediamanagement-import provides basic and dynamic import functions. The basic functions are the same for all media types. The dynamic functions always relate to a certain media type. The functions are assigned to object type fields. During an import operation, the data in the media files is read out by these functions and entered in the index data fields of the object types.
Basic functions:
|
Current time |
Current user |
|
Current date |
Current format (image, audio, or video) |
|
Change date |
File size in bytes/KB/MB |
|
File name with/without file extension |
Directory path |
|
Creation date: |
Fixed text |
|
Free text |
Complete file path with file name |
|
Only file extension |
Full user name |
Dynamic functions for image files:
|
Application name |
Date taken (creation date) |
|
Alignment |
Authors |
|
Rating |
Image format |
|
Image rights |
Bit depth |
|
Width in pixels/cm |
Latitude |
|
Copyright |
DPI horizontal/vertical |
|
Creator |
Color mode |
|
Format |
Geo data |
|
Height in pixels/cm |
Camera maker/camera model |
|
Comments |
Longitude |
|
Mime type |
Lens maker/lens model |
|
Object name |
City |
|
Aspect ratio |
Keywords |
|
Heading |
|
Dynamic functions for audio files:
|
Sample size in bits |
Sample rate in kHz |
|
Album |
Album artist |
|
Audio format |
Authors |
|
Bit rate |
Codec |
|
Copyright |
Genre |
|
Publisher |
Artists |
|
Year |
Channels |
|
Comments |
Composers |
|
Length |
Number |
|
Title |
|
Dynamic functions for video files:
|
Audio bit rate |
Audio codec |
|
Authors |
Image width |
|
Images per second |
Image height |
|
Copyright |
Data rate |
|
Genre |
Total bit rate |
|
Artists |
Year |
|
Length |
Aspect ratio |
|
Title |
Video codec |
|
Video format |
|
Configuring enaio® mediamanagement-import
The 'Editor: Start' system role is required to configure enaio® mediamanagement-import. All users with this system role can edit the configuration if they start enaio® mediamanagement in configuration mode. This always overwrites the existing configuration.
Once you have finished the configuration, the axmedienimport.xml configuration file is saved to the data directory's \etc directory. If users is using enaio® mediamanagement-import, the application always accesses the configuration file in the data directory's global \etc directory.
Perform the following steps to configure enaio® mediamanagement-import:
- Start enaio® client since enaio® mediamanagement can only be launched if enaio® client is running on the workstation.
- Start enaio® mediamanagement (axmediaimport.exe) from the client32 directory using the command line parameter 'config'.
The enaio® mediamanagement wizard opens and guides you through the entire configuration process.
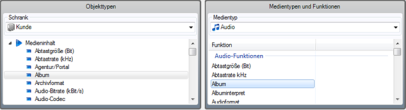
- In the Objekttyp-Verknüpfungen (Object type – assignments) dialog, select a cabinet and an object type from the drop-down lists in the enaio® area.
The available media types which you can assign to the selected object types are displayed in the Medientypen (Media types) area. By default, all media types are selected.

If you select the 'Medieninhalt' (media content) object type, it will automatically be recognized on the basis of the internal names and automatically configured. The object type fields are then automatically assigned to the corresponding import functions.
You can specify for every object type that images are imported as W-Documents so that these images can be edited later in a standard Windows program. Enable the Bilder als W-Dokumente importieren (Import images as W-Documents) option.
- To set an assignment, click the Verknüpfen (Assign) button. You can assign every media type (Bild, Audio, and Video (image, audio, and video)) to only one object type per cabinet; however, you can assign more than one media type to an object type.
All mappings that have been created are listed for each cabinet in the Verknüpfte Objekttypen (Assigned object types) area.
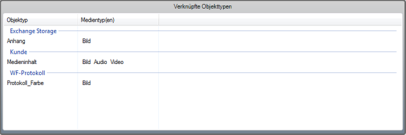
The mappings cannot be subsequently edited. To change a mapping, you have to delete it and create it again. To delete a mapping, select the entry and click the Verknüpfung entfernen (Remove mapping) button.
- Click Weiter (Next).
- Then link the desired import functions – free or fixed texts – to the object type fields in the Objekttyp-Funktionsverknüpfungen (Object type – functional assignments) dialog. The functions read data from the media files and, during import, populate the index data fields with this media file data. Fixed texts are texts which are configured once, while free texts are entered only when the user imports the files.
There are two types of import functions which you can assign to the object types: basic functions and dynamic functions (see 'Import Functions'). Basic functions transfer data which do not relate to the files to be imported. Use dynamic functions, which vary based on the media type selected, to detect data when the media files are being imported and enter it in the index data fields of the object type.
- Select the desired import function for every object type and click the Funktion dem Feld zuweisen (Assign function to the field) button. In order to assign several import functions to an object type field, press and hold Ctrl or Shift when selecting the import function.
All assignments for each cabinet and object type are listed in the Vorgenommene Zuweisungen für den Objekttyp (Existing assignments for the object type) area.
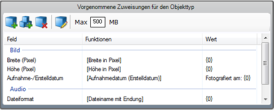
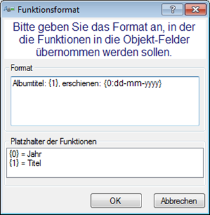
You can also customize the content of index data fields by creating an assignment using the Funktion dem Feld formatiert zuweisen (Assign formatted function to the field) button.
The Funktionsformat (Function format) dialog will now open. In the Format dialog, you can then enter any text which will additionally be written to the index data field. The maximum length and whether you can enter letters, numbers, and/or special characters depend on the settings made for the corresponding object type field in enaio® editor. The placeholders, e.g., {0} and {1}, specify where the text of the import value is entered. If a placeholder refers to a date field, you can specify the date format. To do so, use the format specifiers: y (year), M (month), d (day), h (hour), m (minute), and s (second), e.g., {0:dd-MM-yyyy} for the date format '08-11-2015'.
Further format specifiers can be found on the following web page: http://www.csharp-examples.net/string-format-datetime/
The lower area of the dialog lists which placeholder is assigned to which import function. You are required to use all the placeholders listed here in the Format area; otherwise, you will be shown a message box.
- Confirm your entries by pressing OK.
Media files are always imported with enaio® mediamanagement-import, regardless of whether key fields are unique, all mandatory fields have been completed, or catalog entries are included in the original catalog. Media data is not imported, however, if a text is too long for a selected object type field.
Use the Feldfunktionen editieren (Edit field functions) button to modify an existing assignment.
- To delete an assignment, select the entry and click the Zuweisung entfernen (Remove assignment) button.
You can establish the maximum file size for each object type. Media files will not be imported if they are bigger than the specified file size. In the import progress bar and in the log you will see a message stating that the affected files have not been imported due to their size.
- Once you have created all the assignments, click Weiter (Next).
All configuration settings will be summarized for each cabinet in the next dialog. Click Fertigstellen (Finish) to save the configuration.
Once you have finished the configuration, the axmedienimport.xml configuration file is saved to the \etc directory in the data directory.
To edit the existing configuration, restart enaio® mediamanagement in configuration mode and edit the configuration as required.
 areas. Use the toolbar to show all hidden areas at once:
