Managing Seat Licenses
Seat license keys are linked to a specific workstation. Use enaio® enterprise-manager to integrate workstations in the license system and assign module-specific license keys to them.
Set up the 'Standard' station in order that, when installing local components required for a computer (network setup), any new computer will be entered as a workstation and will be provided with all seat license keys that are assigned to the 'Standard' station, as long as seat licenses are available. In addition, all available seat license keys of the 'Standard' station are assigned to each computer that accesses enaio® and is entered in the workstation list.
The automatic transfer of the seat licenses of the 'Default' workstation needs to be activated via a registry entry: enaio® enterprise-manager > Server > Settings > Registry entries > DefaultOnLogin: value: 1
The workstation's IP address or GUID is required to add a workstation in enaio® enterprise-manager. The IP addresses can be detected using enaio® enterprise-manager once the workstations are available in and connected to the network.
You are allowed to either use only GUIDs or only IP addresses to integrate all workstations.
Every computer, from which a user accesses enaio® using enaio® client or another enaio® component, will be listed automatically as a workstation.
Adding a Workstation
Seat license keys are linked to specific workstations. These workstations can be added to the enaio® system.
Follow these steps to add a workstation to the system:
- Select Administration > License settings > Licenses from the console root.
The license view will be displayed.
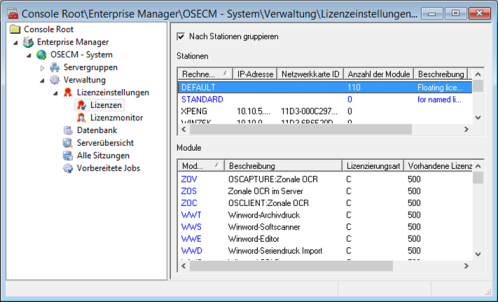
- Select Add stations from the context menu in the Stations area.
- In order to add the 'Standard' station, select Add 'Standard' station from the context menu.
The Available computers window will now open.
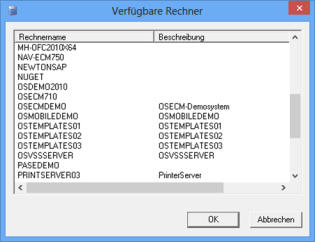
All stations which cannot be accessed via the network and have not yet been added are listed in the window.
- Select one or more stations.
- Click OK.
The new stations will be shown in the license view. You can then assign modules to these stations (see 'Adding a Module').
Follow these steps to manually add a workstation:
- Select Administration > License settings > Licenses from the console root.
The license view will be displayed.
- Select Add station manually from the context menu in the Stations area.
The Add station window will now open.
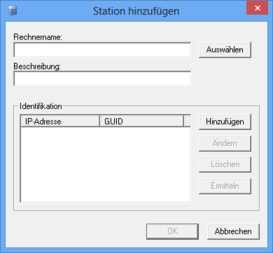
- Enter a computer name or click Select.
Press Choose to select an available station from across the network.
- Optionally, you can enter a description. It will be displayed together with the computer name in the license view.
- Click Add in the Identification area.
The Computer identification window will now open.
- Enter the IP address of the computer if you want to integrate all workstations via the IP address.
- Specify the network card ID (GUID) if you want to integrate all workstations via the GUID.
- Confirm by pressing OK.
The new station will be shown in the license view. You can assign modules to the station (see 'Adding a Module').
Several IP addresses/GUIDs can be specified to identify a computer.
Modifying and Removing Workstations
Follow these steps to remove a workstation:
- Select Administration > License settings > Licenses from the console root.
The license view will be displayed. The configured stations will be listed.
- Select a station.
- Select Remove station from the context menu.
The station will be deleted.
Follow these steps to modify a workstation:
- Select Administration > License settings > Licenses from the console root.
The license view will be displayed. The configured stations will be listed.
- Select a station.
- Select Properties from the context menu. The Station properties window will now open.
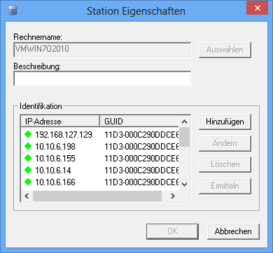
The following buttons are available to you in the Identification area:
- Add – used to add another computer.
- Modify – used to change the IP address and GUID.
- Delete – used to delete the IP address and GUID.
- Determine – used to detect the IP address again.
- Confirm by pressing OK.
Adding a Module
Follow these steps to assign floating license keys for modules to workstations:
- Select Administration > License settings > Licenses from the console root.
The license view will be displayed. The configured stations will be listed.
- Select the station to which you want to assign a module license key.
The license keys which have already been assigned will be listed in the Modules for selected station area.
- Select Add modules from the station's context menu.
This window lists all available module license keys which have not yet been assigned to the station.
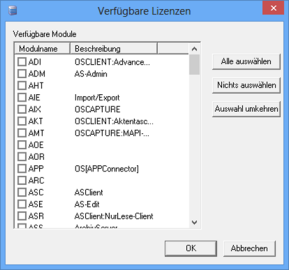
- Select the modules you want to assign to the station's license key.
- Use the Select all button to select all modules, the Deselect all button to remove the selected modules, and the Invert selection button to invert your selection.
- Confirm by pressing OK.
The changes will be saved.
The selected module license key will be assigned to the station and displayed in the Modules area.
You can print out a module report via the context menu of a module or several modules. In addition to the information shown in the view, server data is also printed out.
Layer administration is licensed in the 'ADI' module. If you use this module, a license key must be available on every workstation.
If you assign a seat license key to the 'Standard' station, this license key will automatically be assigned to each station that is integrated during network setup or that logs in, provided that seat licenses are available.
Removing Modules
Follow these steps to delete the assignment of a module license key to a station:
- Select Administration > License settings > Licenses from the console root.
The license view will be displayed. The configured stations will be listed.
- Select a station. The assigned module license keys will be listed.
- Select a module.
- Select Remove modules from the context menu.
The module will be removed from the list of assigned modules.
Printing Module Lists
You can select modules and print a module list via the context menu.
 areas. Use the toolbar to show all hidden areas at once:
