Clauses for Access Rights
Access rights can be made to depend on a clause. The assigned right will only be granted when the clause has been fulfilled.
Follow these steps to create clauses:
- Open the Security system window.
- Click the User groups (access rights) tab.
- Select a user group from the User group list and choose an object type in the right-hand window as well as an assigned right in the bottom window.
-
Click the Clauses button.
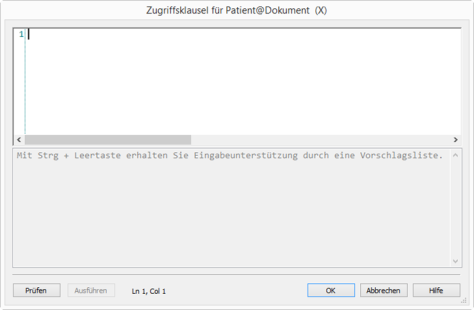
The editor will open.
-
Create the clause in the editor.
Press Ctrl+Space to get input support in the form of a suggestion list.
Entries can be selected, copied, inserted, and deleted via the context menu.
-
Check the clause.
The check shows the corresponding SQL statement with the current values of variables.
If you click Run then the SQL statement will be executed. The number of hits will be shown. Meaningfulness depends on the data pool and the current values of variables.
-
Confirm by pressing OK.
The clause is shown on the User group tab. Press Save to save changes you made to the security system.
Clause Syntax
A clause consists of a field, an operator, and a constant or variable value. Several clauses can be logically combined, and combinations can be organized using brackets.
Fields
The index data fields of an object and basic parameters are available as fields. The editor offers all fields of the object in the suggestion list (Ctrl+Space). You can also include the folder fields for document type and register type clauses (see 'Clauses with folder reference').
Name:
- Field names with square brackets: [To:]
- Internal names with curly brackets: {MAIL_TO}
- Database names without brackets: field1
- Basic parameters with 'sys' prefix: sys'creator'
For exporting and importing into other systems, the spelling of the field names of clauses must match the data of a system into which the data will imported.
The following basic parameters can be used:
|
sys'created' |
Date created |
|
sys'creator' |
User who created the object |
|
sys'archiver' |
Archivist |
|
sys'archived' |
Archive date |
|
sys'mimetypid' |
Mime type ID |
|
sys'modifytime' |
Last modification time |
|
sys'modifyuser' |
User who last modified the object |
|
sys'retention' |
Retention time |
|
sys'retention_planned' |
Planned retention time |
Operators
The following operators can be used:
|
= |
equal to |
|
!= |
not equal to |
|
> |
greater than |
|
< |
less than |
|
>= |
greater than or equal to |
|
<= |
less than or equal to |
|
in |
contained in |
|
between |
within a range |
a clause in field, operator, and value can also have the prefix 'not'.
Constants
Constants are dependent on the database field type.
Character fields
Type: 'All characters', 'Letters', 'Capital letters', 'Numerals (alphanumeric)', 'Patient type', 'Page', 'Gender', 'Questions'.
Constants for character fields are enclosed in single quotes. They may contain placeholders.
The placeholder '?' represents exactly one character, while the placeholder '*' stands for a multiple character wildcard. Placeholders can be inside, at the beginning, and at the end.
If constants are to contain the characters '*' or '?', they must be masked with '\'. Single quotes and the marker '\' must also be masked.
Values for the 'in' operator are listed in brackets:
field1 in ('a', 'b', 'c')The range for the 'between' operator is specified as follows:
field1 between 'a' and 'c'
Date/time fields
Type: 'Date', 'Date/Time', and 'Time'.
Constants for date fields have the prefix date. The date is enclosed in single quotes. Notation: YYYY-MM-DD
Example: date1 = date'2016-09-30'
Constants for date/time fields have the datetime prefix. The value is enclosed in single quotation marks: Notation: YYYY-MM-DD HH-MM-SS
Example: number1 = datetime'2016-09-30 11:31:55'
Constants for date/time fields have the datetime prefix. The value is enclosed in single quotation marks: Notation: HH-MM-SS
Example: number1 = time'11:31:55'
The last elements can be omitted gradually so that the clause refers to values independently of these elements.
Example: number1 = datetime'2016'
Decimal/numeric fields
Type: 'decimal' and 'integers (numeric)'
Constants for decimal field and numeric fields are not enclosed in brackets.
Examples:
number1 >= 400
number1 between 300 and 400
real1 in (1.2,2.3,3.4)
Variables
The following variables can be used:
|
#DATE# |
Current date |
|
#DATETIME# |
Current date and time |
|
#TIME# |
Current time |
|
#USER# |
Name of the logged-on user |
|
#COMPUTERNAME# |
Name of the logged-on computer |
|
#COMPUTERGUID# |
GUID of the logged-on computer |
|
#COMPUTERIP# |
IP of the logged-on computer |
|
#GROUPS# |
Groups of which the logged-on user is a member. Operator is always 'in' or 'not in'. |
|
#RIGHTGROUP# |
Rights groups or name of the logged-in user. The rights group add-on or the rights group control must be assigned to the specified field. Operator is always 'in' or 'not in.' Only #RIGHTGROUP# and 'is null' clauses are permitted for the rights group control. |
Date information can be subtracted (-) or added (+) to #DATE# and #DATETIME#.
Example: number1 = #datetime#-1y2m3w4d
One year, two months, three weeks, and four days are subtracted from the current datetime.
Example: number1 = #DATETIME#+2m4d
Two months and four days are added to the current date/time.
Empty fields
Clauses to empty fields are formulated as followed:
field1 is nullfield1 is not null
The clause depends on whether null values are allowed in the database.
Owner
A simple clause can be used to assign access only to the user; the owner of the object is:
isownerClauses with folder reference
Clauses on register types and document types can refer to the folder data: The index data fields and basic parameters of the folder type are available in addition to the fields of the register or document type.
Syntax:
folder (folder field operator value)
Clauses for a folder type can be combined:
folder (folder field1 operator value1 operator folder field2 operator value2)
For document types with locations in multiple folders:
folder (folder field1 operator value1) operator folder (folder field2 operator value2)
Combinations of clause with folder reference and clause without folder reference:
folder (folder field operator value) operator object field operator value
Example:
The folder field and object field may not be blank.
folder ([folder field] is not null) and [object field] is not null
Press Ctrl+Space to get input support in the form of a suggestion list.
The access right to one location always includes access to the other locations for documents with multiple locations.
Example of Clauses
In the following example, the right is only assigned to the current user if the user is the creator or if the creator has entered the current user's name into the 'Share with' index data field, given that the date indicated in the 'Release date' field has already been reached or expired.
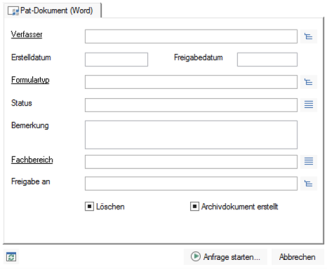
The data sheet contains the fields: 'Creator', 'Release date', and 'Share with'. These fields are used in the clause.
Use the expression editor to create the clause. It reads as follows:
[Creator] = #USER# or ([share with] = #USER# and [Release date] <= #DATE#)The check shows the clause with the current values of the variables #USER# and #DATE#.
Clauses in Previous Versions
Up to version 8.10, clauses were created using a clause editor. Existing clauses in these versions can still be used, edited, and recreated in the old format. Once converted to the current format, the clause editor is no longer available.
Follow these steps to create a clause using the clause editor versions 8.10 and higher:
- Open the Security system window.
- Click the User groups (access rights) tab.
- Select a user group from the User group list and choose an object type in the right-hand window as well as an assigned right in the bottom window.
-
Click the Clauses button.
The clause editor will open.
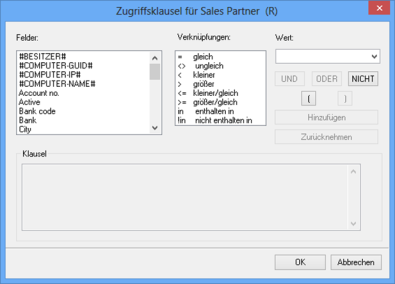
The Fields area will list the index data fields of the selected object type. Select the field for which you want to create a clause.
The following values will also be listed here:
- #Computer-IP# – the IP address of the user's computer,
- #Computer-GUID# – the GUID of the user's computer,
- #Computer-Name# – the name of the user's computer.
For documents, the following basic parameters are available:
- #Creation date#, #Creator#, #Archivist#, #Archiving date#, #Owner#, #Retention time#, #PRetention time#.
- The Links area lists all operators available to you. Select an operator.
- Enter a value for the selected field in the Value area.
- #User# – the current user name,
- #Date# – the current date,
- #Null# – no entry in the field,
- #Groups# – the groups of which the user is a member. Use the operators 'in' and '!in'.
- #Computer-IP# – the IP address of the user's computer,
- #Computer-GUID# – the GUID of the user's computer,
- #Computer-Name# – the name of the user's computer.
- #Right group# – groups and users who are entered in the field via the 'Rights group' add-on. Use the operators 'in' and '!in'.
- #Creation date#, #Creator#, #Archivist#, and #Archiving date#.
- The planned retention time #PRetention time# and retention time #Retention time# are additionally available.
- Then click the Add button.
By combining the field, the operator, and the value, you have formed a clause. This clause can furthermore be logically combined with other clauses. The entire clause is shown in the field below. You cannot edit the entries in the Clause field. If you want to delete or correct entries, press the Undo button.
- Confirm by pressing OK.
'*' can be used as a placeholder for any string of characters and '?' can be used as a placeholder for any single character.
The following variables can additionally be used:
For documents, the following basic parameters are available:
The clause is shown on the User group tab. Press Save to save changes you made to the security system.
Access to User Lists
In certain contexts, users have the possibility to open a list of all users. This includes, for example, in search forms of portfolios and basic parameters, in configuration dialogs of view filters, in configuration dialogs of subscriptions and follow-ups, and in other contexts.
If this is not always desirable or practical, you can restrict the list to those users who are members of at least one of the groups in which the user who opens the list is a member.
To do so, you will need to add the following entry to the \etc\as.cfg file of the data directory:
[MANDANT]HideOthers=1You can add another line to the section in order that other individual users are included even if they do not share group membership with the current user:
Exclude=User1;User2Change the value of 'HideOthers' to '0' to turn off this function.
Users with the 'Client: Show system recycle bin' system role are always shown all users in the recycle bin's user list.
 areas. Use the toolbar to show all hidden areas at once:
